(
Click on the photo to see a better version of it. Blogger is re-sizing it poorly, so it looks a little funky here...)
It's cold outside, so lately my creative juices have been flowing towards studio photography. Truth is, I have a real interest in it and I'm looking to start building a portfolio incase I get a chance to do some photos professionally.
So, this means I need practice (and hopefully some good photos). For "proper" studio photography, most people purchase light tents and photography lighting in order to get that soft light that eliminates harsh reflections as well as harsh shadows. -I'll probably buy the proper equipment eventually, but I wanted to demonstrate how I get studio shots without any investment in special equipment.
For those who are not interested in studio photography, note that the goals in studio work are the same as for portraits. It's just that for portraits, the subject's a bit bigger...
So, here's a walkthrough of a successful (in my opinion) studio shot McGyver-style.
Equipment and supplies that I used:
* Camera
* Tripod
* Shutter release cable (a self-timer works if you don't have one)
* 2 pieces of copy paper
* A white plastic garbage bag
* A 5-foot piece of wire, bent
* A paper towel
* A drinking glass and empty boxes for propping stuff up.
* A bright lamp (a halogen desk lamp is perfect)
* At least one other lamp (another desk lamp, a clamp light, or a floor lamp -whatever you have around)
I set up under a halogen spot-light that's in the ceiling above my kitchen counter. (I've also set up in the bathroom successfully -under the lights above my sink.)
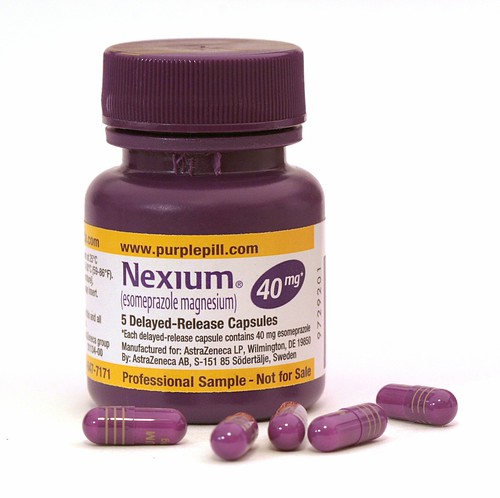
I propped the copy paper up against the drinking glass so it was sitting at a 90* angle. This created the white below the bottle and pills in the picture as well as the white in the background without creating a "seam" between the two. (This works well with white poster board as well when you're shooting larger items.)
I then set the bottle on the paper, and arranged the pills around it in a non-centered way so the overall shape of the subject was more interesting -it also gave the pills a more hap-hazard look I think.
Next I needed something to filter the light through to spread it around. This is what the walls of a light tent do, so I looked around for something that'd work similar to that. What I ended up doing is taking a white plastic trash bag and some wire to make a frame to keep it flat. You could just as easily tape the corners of the bag to 4 boxes or something to keep it flat. It doesn't have to be perfect, and you don't need to cut the bag either -double-thickness (at least for the brand I'm using -regular Hefty bags) seems to work just fine. (Of course, if your light is significantly brighter or more dim, this may not be the case.
I propped my trash bag light filter up so it's middle would be over the bottle and under my halogen desk lamp. -I then turned the lamp on and checked how the lighting looked from the perspective I'd be shooting it from.
I ended up with a lot of glare on the label because it's glossy and I also had 2 bright spots on the bottle. This meant that the light was too bright. I placed a paper towel on top of the trash bag and moved it around until the highlights and hot-spots were gone.
The next thing I noticed was that, while my "trash bag light filter" made the shadows fuzzier, the shadows were still more noticeable than I liked. I grabbed a fairly dim floor lamp and propped it at a 45* angle against a chair, and aimed it directly at the bottle (from the front so that it eliminated the shadows in the front where they'd be visible in the photo).
I checked the view through my camera once again and found that this created more hot-spots, so I lowered the floor lamp until it's harshest light was below my subject, leaving it's softer (more diffused light) to fall on my subject and eliminate much of the shadows that I had a problem with earlier.
At this point, the setup was done. I was happy with how the scene looked, and the next thing to think about was exposure. -I had a fairly dark subject on a very light background which is always tricky. I knew the camera's light meter would see all that white and would try to tone it down, which would my my photo darker than it should be. -On top of that, my goal was to over-expose the background so it ended up looking all white! (but not so much that it over-exposed the white label on the bottle.) I decided I'd start with exposing the scene 1 stop above normal or at +1.
Next, I had to decide what setting to use on the camera. For studio shots I tend to go with Aperture Priority so that I can control the depth of field without worrying about the shutter speed because it really doesn't matter much in still-life photos like this one. Generally, an aperture of f/8 to f/16 is the sharpest part of any lens, so I try to keep within that range if I can. -I wanted a fairly shallow depth of field, though, so I decided to try f/8 to start with.
Last, I turned on mirror lockup. -Not all cameras have this option, but if yours does (on my Canon 30D it's Custom Function 12, for other makes and models, check your manual). Mirror lockup can help you get sharper photos when you're using slow shutter speeds and here's how it works: When you take a photo what happens is the mirror that allows you to see the image through the viewfinder flips out of the way so that the image can get through to your film or sensor. When the mirror flips up it causes the camera to vibrate ever so slightly. Mirror lockup creates a delay between when you click the shutter the first time (and the mirror flips up), then you wait and click the shutter a 2nd time to take the picture (after those micro-vibrations have probably stopped). You can get sharp photos either way, so if your camera doesn't have mirror lockup, don't worry about it; but if you do, I think it's worth playing with.
At this point I was ready to take my first shot. From start to finish I arranged the photo 2 different ways and I took about 25 shots total. -I had to play with the exposure compensation and aperture just a little bit each time before I got it to come out how I wanted.
After I was pretty sure I got a "keeper", I connected the camera to my computer, downloaded the photos, and opened it in Gimp. I used the "Levels" tool (Auto) to fix the white balance (I compensated for the warmth of the incandescent lights in the camera, but not quite enough.). After that, I used curves to just slightly adjust the darkest and lightest portions of the photo. Then, I cloned out the dust that was on the bottle. (I'm a dork -I missed the most important part of studio photography -preparing your subject to be photographed!) When I was done cloning, I applied a slight Unsharp Mask, cropped the photo to a square, and saved it.
I'm pretty happy with it as it stands right now except that I think as a result of editing it on my laptop screen, it appears that it looks a little washed out on my work monitor. I may have to go back and fix that...