Wednesday, April 14, 2010

Shooting The Moon

Your camera gets confused when you have a really dark background (the sky) with a really bright spot on it (the moon). -It doesn't know what's more important: the dark sky, or the bright moon, so it'll often "compromise", which will make the moon too bright.

Fix #1: Spot Metering

Using "spot" metering to tell the camera which part of the scene you want it to expose for (more info on how exposure is determined here), works well, but not all cameras offer spot metering.

If your camera has it it'll make moon shots really easy. Simply select spot metering, then put the moon in the center of the frame (there should be an indicator for where the exact center-point is), hold the shutter button half-way down to activate the camera's meter and lock-in the settings for proper exposure, then re-frame the shot and press the shutter button the rest of the way down to take the photo.

Here's my result using Spot Metering (click photo to see a larger version):

Fix #2: Center-Weighted Metering and Exposure Compensation

If you don't have spot metering it's not a big deal, you can use Center-Weighted metering instead. It may not get you 100% of the way there, but you can use Exposure Compensation to make up for the difference.

If you know that the camera will over-expose the moon (make it brighter than you want it), then all you have to do is tell it to make it a bit darker with "exposure compensation".

If you have an SLR, your meter probably gives you a graph that looks like this:
[-2..-1..0..+1..+2]

If you have a "point and shoot", your camera may give you the value like "-1.2", but either way, "0" is "correct exposure" according to your camera. -That's what it'd choose if you set it to "Auto". But, you know that those settings make the moon too bright, so change the settings to give you a negative number, like -1, then take a photo and see how it comes out. Keep making adjustments until you find what works best for you. Just remember: Negative numbers make the photo darker, positive numbers make it lighter. (Setting the camera to +1 will help photos of snow turn out white instead of gray.)

If you have a digital camera you should be able to use exposure compensation with an "Auto" or "Semi-Auto" mode (see your camera's manual for how to do this). If you have a "point and shoot" film camera this probably won't be possible, but you can try pointing your camera down a well-lit street (make sure your focus is really far away), press the shutter button half-way down and hold it there, point the camera back at the moon, then press the shutter button the rest of the way to take the picture. This should make the moon a little darker than it would have otherwise come out...

For more on Exposure Compensation, click here.

Friday, April 9, 2010

How to Determine Your Depth of Field

There's more to background blur than aperture!

Sometimes it seems like the amount of background blur that you get in a given shot is completely random. I mean, the guideline that the larger the aperture (or the lower the aperture value), the more blur you get is a good one, but it doesn't always work, does it? ...or when it does work, you get varying amounts of background blur, even when using the same aperture value!

The reason for the variation is: There's more to background blur than aperture.

Your distance from the subject (the point of focus) as well as the focal length of your lens makes a big difference in how much background blur you'll get on a given shot.

* NOTE: (Focal length just means how much you're "zoomed in" -it's measured in millimeters, like "100mm".)

So, whitout further delay...

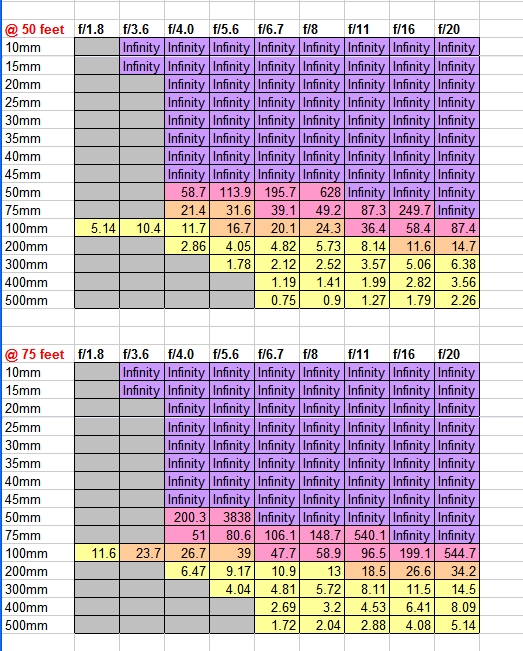
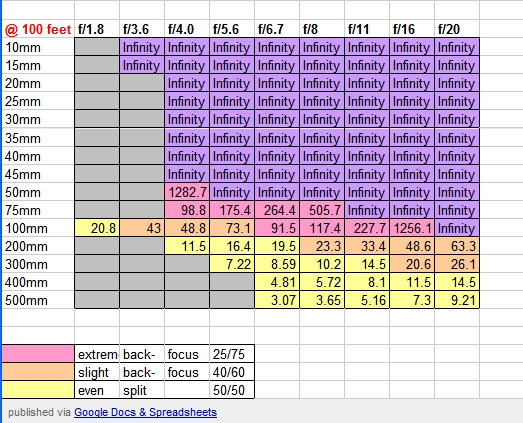
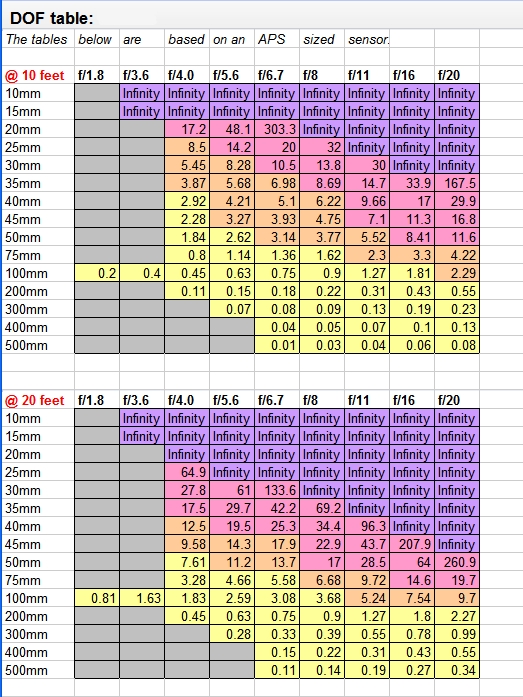
Here's a table to help you determine DOF:

(Click on the tables to view a less crowded and more printable version of the tables.)


These are actually just screenshots of my tables because the ones I made on Google Spreadsheets won't print in color. If you want to view the actual spreadsheet, click here.


Using the spreadsheet:

Print it out (preferably in color), and keep it in your camera bag.

Note that there are 4 tables, each for subjects at different distances from the camera. Use the first table when focusing on a subject that's about 10 feet away, the 2nd for a subject @ 20 feet, etc...


Similar tools, links:

There's a free DOF calculator for Palm OS available. If you have a Palm Pilot, it may be more convenient for you: Click here to go to the program's site. -I've never downloaded or used this software, so this is not an endorsement, use at your own risk.

Alternatively, you can search for online calculators (this is the one I used) or other DOF calculators that you can download for various portable devices. There are also cards you can buy with this information on them, but I find it easier to just print it out myself, study it and refer to it as necessary.

Questions? Comments? Email me on the Photography_Beginner'syahoogroup or use my info on this site's homepage.