Monday, March 31, 2008

Panorama How-To (learn from my mistakes!)

Abandoned house panorama

I took this panorama in Saskatchewan this winter, but it took me about two hours to edit in software due to a few mistakes I made while taking the photos that make it up. I'll explain those mistakes here in an attempt to help others avoid having to learn these lessons the hard way like I did.

First, the focus. It'd be best to have a large depth of field. When I took this shot it was getting dark outside, so I was using a large aperture in order to be able to hand-hold the camera while taking the shots. That may have been ok, but I focused on the house in the first shot, then a third of the way into the scene for each additional shot. As a result, the foreground infront of the house is blurred due to the shallow depth of field while the foreground is sharp in the rest of the shots.

Second, exposure. It took way over an hour of manually blending out the exposure differences between the shots. Stupid, stupid, stupid. Take meter readings throughout your scene, then find a middle-ground, shoot RAW, and use Manual Mode so the exposure doesn't change from one shot to the next.

Third, white balance. Same as above. My white balance was set to "Auto" and was slightly different for each shot. Choose the closest manual white balance setting you can and use it for each shot in the scene.

There are other issues with this particular shot that bother me -the horizon isn't straight, etc. But, I think it was a good scene to use the technique on and I certainly learned a lot by trying it!

Sunday, March 30, 2008

Lens Rentals

This is kindof a personal post for me, I'm looking into renting a Canon 70-200mm f/2.8 IS lens before I run out and purchase one for $2k. So, I'm looking for the best price and I plan to test it over my upcoming vacation (in a few months). But I figured the prices are probably similar for other lenses, and at the very least I could compile a list of places for people to go if they want to rent a lens, so I figured I'd post it here...

Calumet Photo (local):

  • Reservations accepted
  • Canon 70-200mm f/2.8 IS = $120 for 1 week
  • 1.4 X teleconverter is $33 for 1 week
  • 2 X teleconverter is $33 for 1 week
  • $186 total for the week + $ ? tax? = $? (if there's tax and it's 8%, it'd be $200.88)

RentGlass.com:
  • No reservations, first come first served
  • Canon 70-200mm f/2.8 IS = $54 for 1 week
  • 1.4 X teleconverter is $17 for 1 week
  • 2 X teleconverter is $17 for 1 week
  • $71 total for the week + $30.80 shipping = $101.80
LensRentals.com
  • Reservations can be made through the "Special Instructions" box at checkout and you'll receive confirmation about whether it is available on that date via email.
  • Canon 70-200mm f/2.8 IS = $59
  • 1.4 X teleconverter is $22 for 1 week
  • 2 X teleconverter is $22 for 1 week
  • $103 total for the week + $54 shipping = $157
Ziplens.com
  • Reservations can be made by making note of the dates needed at checkout and you'll receive confirmation about whether it is available at that time via email.
  • Canon 70-200mm f/2.8 IS = $60
  • 1.4 X teleconverter is $25 for 1 week
  • 2 X teleconverter is $25 for 1 week
  • $110 total for the week + $35.80 shipping = $145.80
...to be continued.

Saturday, March 29, 2008

Flickr's printing service -bad for digital sized photos

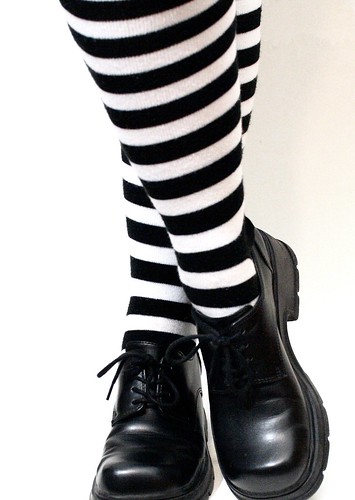
"Stripes" -Bad Crop by Flickr

I got the original version of the photo above printed by Flickr and I chose the "8 x D" option, which was supposed to print it at it's normal digital size of 8x12, but when I got the print in the mail, it was cropped as you see here. What's worse is I couldn't find an email address or phone number to call about the issue. Oh well, I'm only out a bit of money, but I won't be ordering prints from Flickr again unless they are film size. Too bad, the quality's good and it's definitely convenient :-\.

Friday, March 28, 2008

Calculating for long exposures (or how Shutter Speed and Aperture relate Part II)

This article is kindof an extension of this one here. You may want to read the previous one before continuing.

When you want to take photos at night that require shutter speeds of over 30 seconds, you're left to calculate the settings on your own. If you grab your camera and put it on Manual Mode, set the shutter speed to 30sec, and then go one more setting down, you'll see "Bulb" or "B". When you put the camera on "Bulb", you'll should notice that it won't calculate aperture or give you a meter to read to see what your exposure will be. This is because with "bulb", the shutter speed depends on you to open and close the shutter manually. You do this with a bulb cable that will allow you to push a button down to open the shutter, and then lock it down to keep the shutter open until you release the button to close the shutter.

So, how do you know how long to keep the shutter open? Well, this is where the ability to add and subtract stops of light comes in. If you understood the previous article, then it should be easy:
* set your camera to aperture priority and dial in the aperture priority mode
* dial in the aperture you want to use
* set the ISO to 800 or 1600 -whatever will give you a shutter speed of 30sec or close to it
* take a test shot -does it look close to what you were hoping for? If not, use exposure compensation to tweak it now instead of tweaking it when you're waiting 5min between shots (I never remember to do this, but often kick myself for not doing it after the first shot :-P)
* when you get a good shot, write down or remember the settings you now have for shutter speed, aperture, and ISO
* switch to manual mode and choose "bulb" for your shutter speed
* do the math to dial the ISO down to reduce noise while using longer shutter speeds to keep the exposure the same

The following will all give you the same exposure:
30sec f/16 ISO 1600
1min f/16 ISO 800 <-- subtract 1stop of light w/ ISO, add 1stop w/ shutter speed 2min f/16 ISO 400 <-- ditto, on down the list 4min f/16 ISO 200 8min f/16 ISO 100 If it's really dark or you're trying for longer shutter speeds, to get star trails for example, then you may need to use a smaller aperture for your first 30sec exposure as well, then calculate a smaller aperture for more depth of field as well as for reducing ISO. It makes it a bit more complicated, but not by much: And here's an example for even darker photos (like star trails): 30sec f/4 ISO 1600 <-- subtract 2 stops of light w/ aperture, add 2 stops w/ shutter speed 2min f/16 ISO 1600 <-- ditto 4min f/16 ISO 800 <-- subtract 1stop of light w/ ISO, add 1stop w/ shutter speed 8min f/16 ISO 400 16min f/16 ISO 200 32min f/16 ISO 100 I literally write this out if I can't do it in my head while doing long exposure shots. There may be an easier way (tables?), but a quick google search of this question on Flickr and several forums reveals that most people just calculate it out this way. After you get the idea of adding a stop and subtracting a stop, than it's just a matter of remembering how the settings effect light. If you aren't 100% sure about it, it's easy enough to write/print out the following on a small slip of paper, "DIY laminate" it with packing tape, and keep it in your camera bag: * Shutter speed: more time = more light * Aperture: lower number = more light * ISO: higher number = more light

* For shutter speed: 1 stop = half or double the number
* For aperture: 2 stops = half or double the number
* For ISO: 1 stop = half or double the number

Tuesday, March 25, 2008

Using HDR to overcome harsh mid-day sun and shadows

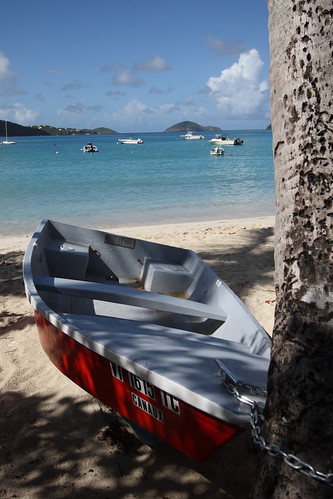
I was on a tour in St Thomas that let us off at Megan's Bay for 2 hours before continuing on to other destinations when I came across a boat chained to a tree near the beach that I really wanted to capture on film. The problem was that the bright caribbean sun was in full force and it was the middle of the afternoon. As a result, there were harsh shadows from the tree all over the boat.

I knew from experience that while the scene was pleasing to my eye it wouldn't be captured in a photo as nicely. This is because the "dynamic range" (or the range of light vs dark) that the eye can see is a lot bigger than the range that the camera can record. The result would be either the areas in full sun being exposed properly or the areas in shadow being exposed properly, but having both areas look right would be impossible. So, I made sure my camera was set to take photos in RAW and I took a kindof middle-of-the-road photo making sure the histogram showed no data loss on the light or dark ends and here's the result without any editing:

Boat "before" picture

Then, when I got home, I opened the photo in my RAW editor of choice (Canon's Digital Photo Pro or "DPP") and I used the brightness tool to make a copy of the photo that was 2 stops brighter than the original, then another that was 1 stop brighter, then another that was exposed normally, then 1 stop darker, and the final one at 2 stops darker.

The above is the "fake" part of "fake HDR" photos. For real HDR photos, you'd take separate shots at each exposure (+2, +1, 0, -1, and -2 or whatever will cover the dynamic range of the scene you are shooting). But, by shooting in RAW, you can record almost all of that data in one shot so you don't have to worry about the camera moving in-between the shots. I take the time to do 3 to 5 shots when the photo is important and I have a tripod handy, but I find that the "fake HDR" technique works just fine most times. (But I'm a relative HDR newbie, so take my advice there for what it's worth.)

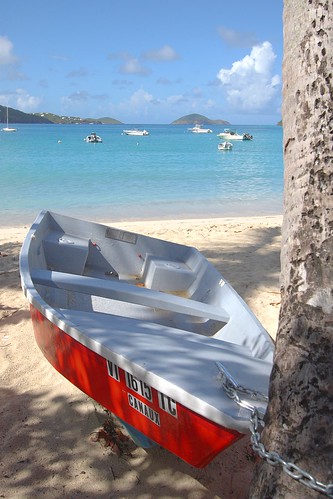
What next? Well, you get some HDR software. I use FDRtools Basic (the free version of FDRtools). There are a lot of different programs available for HDR, so you can google for them to find one that you like. But basically, you feed it your images and the software will spit out a more even-toned version of the photo. You can tweak it if it doesn't automatically come up with what you were looking for. Some prefer a more cartoon-like appearance, others like it to be more subtle, the effect is up to you. But here's my result:

Boat on beach

Better, don't you think? This looks a bit more like what we see with our eyes in mid-day conditions. So, while you should listen to the rule of thumb that says you'll get bad results in mid-day sun, now you know there's a work-around for it! Ahh... technology. :-)

Monday, March 24, 2008

How aperture relates to shutter speed and vice versa

Learning how aperture and shutter speed (and ISO) relate to one another is an important thing to know when you're learning to use manual mode as well as the priority modes. But, this too is easy!

If you find a combination of settings that gives you the magic "0" reading on your meter (which means the photo should be exposed properly), and then you want to change the aperture value to get more depth of field, it's fine -all you have to do is some elementary math:

You may have heard of a "stop" of light? That's what those numbers on your exposure meter are -"stops" of light.

(Your exposure meter looks like this: [-2...-1...0..+1..+2] although Nikon flips the numbers around.)

The handy thing about measuring light in "stops" is the fact that when you half or double the number you use for ISO, aperture, or shutter speed -that's a "stop". So, in this example, if you remove a "stop" of light by using f/8 instead of f/4 your photo will come out too dark (at -1 on your exposure meter). But, by doubling the shutter speed to ADD a stop, you'll be back at "0" (correct exposure)! But if we want f/16, then you're doubling the number twice, so we have to half the shutter speed twice, which gives us 1/250 at f/16.

All you have to remember is how the settings effect the light that hits your film or sensor:
* Shutter speed: you gain a stop of light by halving the shutter speed.
* Aperture: you gain TWO stops of light by halving the number.
* ISO: you gain a stop of light by doubling your ISO.

So, as an example assuming your ISO is set to 100 and doesn't change, 1/1000th at f/4 would be the same as all of the following:
* 1/500 at f/5.6
* 1/250 at f/8
* 1/125 at f/11
* 1/60 at f/16
* 1/30 at f/22
...if you wanted a shutter speed of 1/15 you can't double your aperture to 1/32 -that setting isn't available on most lenses. So, you'd have to get that extra stop of light by doubling your ISO instead.

So, assuming your aperture was set to f/4 and doesn't change, 1/1000 at ISO 800 would be the same as all of the following:
* 1/500 at ISO 400
* 1/250 at ISO 200
* 1/125 at ISO 100

If you're not one for math you could even just count the clicks up from f/4 to f/16, then change the shutter speed down by the same number of clicks to get back to correct exposure. ...the math really isn't hard though.

This may be hard to read and understand, but it's really easy once you do it a few times. A great way to see this for yourself is with this camera simulator:
http://www.photonhead.com/simcam/shutteraperture.php


One reason that you may want to know how to do this is night shots. For exposures longer than 30 seconds, you need to calculate the settings yourself. More info on this can be read in Part II of this article here.

Wednesday, March 5, 2008

Blue Ice

Blue Ice

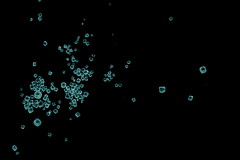
I was going through photo withdrawl and it was icky cold outside, so I went on a scouting trip through the house looking for things to take photos of. I played with some alternative ways of lighting a model car, which worked well, but not well enough to post, so I got bored with that and started looking for something else. I'm not sure why, but I had this feeling that I wanted to do something abstract and macro. As I thought about it, salt came to mind. I've always been fascinated by how each grain of salt is a cube if you look close enough. So, I ran downstairs and grabbed the salt shaker (which I've yet to return to the kitchen) and one of our dark blue plates to use as the background (which I also haven't returned to the kitchen yet).

I grabbed one of my bendy floor lamps with 100W daylight-balanced CFL's in it and positioned it to light the scene from directly above. I didn't use my light tent for this one because glare, shadows, and reflections weren't really an issue here. Then I turned the plate upside-down because the bottom was less scratched than the top, and I sprinkled some salt on the surface. Next I giggled the plate, trying to figure out what part would look most interesting, and I started trying to line something up in the viewfinder. This scene appealed to me because it's off-center, which makes it more interesting, and I liked the grain in the lower left corner as well as the trailing off of the grains to the right across the frame.

Once I found the area to shoot, I started snapping photos with my Canon 30D and a Canon 100mm f/2.8 on a tripod, using a remote shutter release to eliminate camera shake. I believe mirror lockup was also enabled to eliminate that source of shake as well so that I could get the sharpest photo possible. I started at f/4, took about 4 shots, then 4 more at f/8, and 4 more at f/16. Afterwards, I ran downstairs and checked the results. They were ok. The best one was a bit blurry and I wished for a few tweaks in the pattern of salt grains, so I ran back upstairs and hand-picked some bigger salt grains to trail off right, and was a bit more careful about camera shake on this set as well. When I was done, I ran back downstairs and this time I was happy with the results.

The original photo showed the blotchy glaze job on the plate, which was kindof ugly and distracting, so I darkened the photo up in Digital Photo Pro to make the blue plate appear black, then used curves to brighten up the salt again afterwards. I cranked the contrast up a bit to make the salt really stand out from the background, then I converted the RAW photo to jpeg and imported it into Gimp.

My first thought in Gimp was color. It was dull in black and white, so I clicked on the "Colorize" tool. By default it opens to a color that's either exactly this hue or very close to it. I played around looking at reds and purples, but in the end this ice blue look appealed to me the most. That's it. I saved it and that was that. The whole thing start to finish took less than an hour.