Here's a secret for all of you who are frustrated trying to learn manual mode. ...it took me at least 3 REAL tries (in addition to numerous half-hearted attempts) before I learned how to use manual mode. Know how I finally did it? I tackled it one piece at a time. I limited my reading to what the numbers meant for aperture and shutter speed and with the aim that all I cared about was how the different aperture settings would effect my photos, and what shutter speeds would be fast enough so I didn't need a tripod. And I wrote down short notes to help me when I had my camera in hand:
Aperture:
small numbers = shallow depth of field = more light
large numbers = deep depth of field = less light
Shutter Speed:
60mm or less = minimum of 1/60th
over 60mm = 1/lens (100mm = 1/100, 500mm - 1/500, etc)
That's it -that note and your camera's manual are all you need for your first outing. Put your camera on Aperture Priority mode, go outside during the day when there's a lot of light, and practice on anything you can find. Aperture Priority mode is great -all you do is set the aperture you want, the camera will find the shutter speed to match it, so as long as the shutter speed is fast enough (according to the note above), you're fine -shoot away! If the shutter speed is not fast enough, increase your ISO.
With time you'll get a feel for how aperture effects your photos, how your shutter speed changes when you change the aperture, and how ISO effects your settings as well. It's a great, slow way to learn.
When you're comfortable with aperture, explore other people's photos and find things to experiment with as far as shutter speed goes -there's light painting, silky/milky waterfall effects, ghost effects, etc that involve shutter speed. The more you experiment, the more you'll learn.
This slow way of learning by doing worked much better than reading and studying for me because there's just so much to learn at the beginning. You can read and understand 10 pages of material, but when you pick up the camera it all seems to blur while you try to figure out which of those numbers are what setting, and which buttons and dials effect what. Learning one thing at a time, slowly, worked much better for me. If you're frustrated trying to learn manual mode and feeling overwhelmed, this way of learning may work better for you as well.
Showing posts with label manual mode. Show all posts
Showing posts with label manual mode. Show all posts
Friday, January 23, 2009

Tuesday, January 6, 2009
Manual Mode Cheat Sheet
Exposure & your light meter:
* Exposure means how bright or dark your photo is.
* "Correct" exposure means that the photo came out as dark or light as you intended.
* The light meter on your camera will show you your exposure.
* The light meter on your camera looks like this:
[-2...-1...0..+1..+2]
* "0" on your light meter usually gives you a "correct exposure".
* Exposing for positive numbers like "+1", "+1.5", "+2", etc will make the photo BRIGHTER.
* Exposing for negative numbers like "-1", "-1.5", "-2", etc will make the photo DARKER.
Aperture:
* Aperture adjusts how large of an opening your lens makes to let light in.
* Low numbers like f/4 = larger opening = more light = a more shallow depth of field
* High numbers like f/20 = smaller opening = less light = a deeper depth of field
* Depth of field means how much of the photo is in focus. See examples below:
Shallow depth of field:
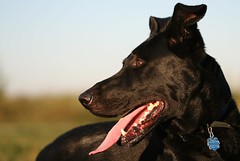
(click for larger version)
Deep depth of field:
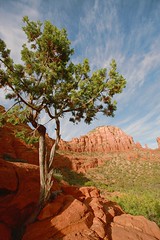
(click for larger version)
Shutter Speed:
* "500" in the viewfinder means a shutter speed of 1/500
* Shutter speeds of 1/60th or less can't usually be handheld, put your camera on a tripod
* For telephoto lenses, even faster shutter speeds are needed to handhold the camera, a rule of thumb is for a 100mm lens you need 1/100 or faster, 300mm = 1/300 or faster, 500mm = 1/500 or faster, etc.
* 1/6 or 1/8 is good for blurring waterfalls
* 1/125 can be used for panned shots of cars
* 1/500 will stop most action
* The slower your shutter speed, the more light you get.
* The faster your shutter speed, the less light you get.
ISO:
* ISO determines how fast your image is recorded
* ISO 100 will record light the slowest (less light)
* ISO 800 will record light 8x faster than ISO 100 (more light)
* Higher ISO's will result in more noise or "graininess" in your image.
Each setting effects the rest. Once you find settings that give you a "correct" exposure ("0" on your exposure meter), you can change your settings to find a more "creatively correct" exposure.
If you change the aperture from f/4 to f/5.6 you'd be SUBTRACTING light by 1 stop. You could ADD back a stop of light by increasing the ISO from 100 to 200, or by choosing a slower shutter speed like 1/30 instead of 1/60.
A great way of seeing how aperture and shutter speed relate to one another is to play with this camera simulator for awhile. And note that ISO relates to aperture and shutter speed in the same way.
...but don't worry too much about calculating the exposure like the examples above. Eventually you'll want to know how to do it, but for now you can just change the settings, watch the exposure meter, and aim for "0" (or whatever gives you the brightness you want, but "0" is a good place to start if you're unsure -it'll at least get you close and you can adjust from there).
Feel free to print this or copy and paste parts of it to keep in your camera bag as a quick reference. I kept a cheat sheet like this with me for at least 6 months after learning to shoot in manual mode.
* Exposure means how bright or dark your photo is.
* "Correct" exposure means that the photo came out as dark or light as you intended.
* The light meter on your camera will show you your exposure.
* The light meter on your camera looks like this:
[-2...-1...0..+1..+2]
* "0" on your light meter usually gives you a "correct exposure".
* Exposing for positive numbers like "+1", "+1.5", "+2", etc will make the photo BRIGHTER.
* Exposing for negative numbers like "-1", "-1.5", "-2", etc will make the photo DARKER.
Aperture:
* Aperture adjusts how large of an opening your lens makes to let light in.
* Low numbers like f/4 = larger opening = more light = a more shallow depth of field
* High numbers like f/20 = smaller opening = less light = a deeper depth of field
* Depth of field means how much of the photo is in focus. See examples below:
Shallow depth of field:
(click for larger version)
Deep depth of field:
(click for larger version)
Shutter Speed:
* "500" in the viewfinder means a shutter speed of 1/500
* Shutter speeds of 1/60th or less can't usually be handheld, put your camera on a tripod
* For telephoto lenses, even faster shutter speeds are needed to handhold the camera, a rule of thumb is for a 100mm lens you need 1/100 or faster, 300mm = 1/300 or faster, 500mm = 1/500 or faster, etc.
* 1/6 or 1/8 is good for blurring waterfalls
* 1/125 can be used for panned shots of cars
* 1/500 will stop most action
* The slower your shutter speed, the more light you get.
* The faster your shutter speed, the less light you get.
ISO:
* ISO determines how fast your image is recorded
* ISO 100 will record light the slowest (less light)
* ISO 800 will record light 8x faster than ISO 100 (more light)
* Higher ISO's will result in more noise or "graininess" in your image.
Each setting effects the rest. Once you find settings that give you a "correct" exposure ("0" on your exposure meter), you can change your settings to find a more "creatively correct" exposure.
If you change the aperture from f/4 to f/5.6 you'd be SUBTRACTING light by 1 stop. You could ADD back a stop of light by increasing the ISO from 100 to 200, or by choosing a slower shutter speed like 1/30 instead of 1/60.
A great way of seeing how aperture and shutter speed relate to one another is to play with this camera simulator for awhile. And note that ISO relates to aperture and shutter speed in the same way.
...but don't worry too much about calculating the exposure like the examples above. Eventually you'll want to know how to do it, but for now you can just change the settings, watch the exposure meter, and aim for "0" (or whatever gives you the brightness you want, but "0" is a good place to start if you're unsure -it'll at least get you close and you can adjust from there).
Feel free to print this or copy and paste parts of it to keep in your camera bag as a quick reference. I kept a cheat sheet like this with me for at least 6 months after learning to shoot in manual mode.
Friday, March 28, 2008
Calculating for long exposures (or how Shutter Speed and Aperture relate Part II)
This article is kindof an extension of this one here. You may want to read the previous one before continuing.
When you want to take photos at night that require shutter speeds of over 30 seconds, you're left to calculate the settings on your own. If you grab your camera and put it on Manual Mode, set the shutter speed to 30sec, and then go one more setting down, you'll see "Bulb" or "B". When you put the camera on "Bulb", you'll should notice that it won't calculate aperture or give you a meter to read to see what your exposure will be. This is because with "bulb", the shutter speed depends on you to open and close the shutter manually. You do this with a bulb cable that will allow you to push a button down to open the shutter, and then lock it down to keep the shutter open until you release the button to close the shutter.
So, how do you know how long to keep the shutter open? Well, this is where the ability to add and subtract stops of light comes in. If you understood the previous article, then it should be easy:
* set your camera to aperture priority and dial in the aperture priority mode
* dial in the aperture you want to use
* set the ISO to 800 or 1600 -whatever will give you a shutter speed of 30sec or close to it
* take a test shot -does it look close to what you were hoping for? If not, use exposure compensation to tweak it now instead of tweaking it when you're waiting 5min between shots (I never remember to do this, but often kick myself for not doing it after the first shot :-P)
* when you get a good shot, write down or remember the settings you now have for shutter speed, aperture, and ISO
* switch to manual mode and choose "bulb" for your shutter speed
* do the math to dial the ISO down to reduce noise while using longer shutter speeds to keep the exposure the same
The following will all give you the same exposure:
30sec f/16 ISO 1600
1min f/16 ISO 800 <-- subtract 1stop of light w/ ISO, add 1stop w/ shutter speed 2min f/16 ISO 400 <-- ditto, on down the list 4min f/16 ISO 200 8min f/16 ISO 100 If it's really dark or you're trying for longer shutter speeds, to get star trails for example, then you may need to use a smaller aperture for your first 30sec exposure as well, then calculate a smaller aperture for more depth of field as well as for reducing ISO. It makes it a bit more complicated, but not by much: And here's an example for even darker photos (like star trails): 30sec f/4 ISO 1600 <-- subtract 2 stops of light w/ aperture, add 2 stops w/ shutter speed 2min f/16 ISO 1600 <-- ditto 4min f/16 ISO 800 <-- subtract 1stop of light w/ ISO, add 1stop w/ shutter speed 8min f/16 ISO 400 16min f/16 ISO 200 32min f/16 ISO 100 I literally write this out if I can't do it in my head while doing long exposure shots. There may be an easier way (tables?), but a quick google search of this question on Flickr and several forums reveals that most people just calculate it out this way. After you get the idea of adding a stop and subtracting a stop, than it's just a matter of remembering how the settings effect light. If you aren't 100% sure about it, it's easy enough to write/print out the following on a small slip of paper, "DIY laminate" it with packing tape, and keep it in your camera bag: * Shutter speed: more time = more light * Aperture: lower number = more light * ISO: higher number = more light
When you want to take photos at night that require shutter speeds of over 30 seconds, you're left to calculate the settings on your own. If you grab your camera and put it on Manual Mode, set the shutter speed to 30sec, and then go one more setting down, you'll see "Bulb" or "B". When you put the camera on "Bulb", you'll should notice that it won't calculate aperture or give you a meter to read to see what your exposure will be. This is because with "bulb", the shutter speed depends on you to open and close the shutter manually. You do this with a bulb cable that will allow you to push a button down to open the shutter, and then lock it down to keep the shutter open until you release the button to close the shutter.
So, how do you know how long to keep the shutter open? Well, this is where the ability to add and subtract stops of light comes in. If you understood the previous article, then it should be easy:
* set your camera to aperture priority and dial in the aperture priority mode
* dial in the aperture you want to use
* set the ISO to 800 or 1600 -whatever will give you a shutter speed of 30sec or close to it
* take a test shot -does it look close to what you were hoping for? If not, use exposure compensation to tweak it now instead of tweaking it when you're waiting 5min between shots (I never remember to do this, but often kick myself for not doing it after the first shot :-P)
* when you get a good shot, write down or remember the settings you now have for shutter speed, aperture, and ISO
* switch to manual mode and choose "bulb" for your shutter speed
* do the math to dial the ISO down to reduce noise while using longer shutter speeds to keep the exposure the same
The following will all give you the same exposure:
30sec f/16 ISO 1600
1min f/16 ISO 800 <-- subtract 1stop of light w/ ISO, add 1stop w/ shutter speed 2min f/16 ISO 400 <-- ditto, on down the list 4min f/16 ISO 200 8min f/16 ISO 100 If it's really dark or you're trying for longer shutter speeds, to get star trails for example, then you may need to use a smaller aperture for your first 30sec exposure as well, then calculate a smaller aperture for more depth of field as well as for reducing ISO. It makes it a bit more complicated, but not by much: And here's an example for even darker photos (like star trails): 30sec f/4 ISO 1600 <-- subtract 2 stops of light w/ aperture, add 2 stops w/ shutter speed 2min f/16 ISO 1600 <-- ditto 4min f/16 ISO 800 <-- subtract 1stop of light w/ ISO, add 1stop w/ shutter speed 8min f/16 ISO 400 16min f/16 ISO 200 32min f/16 ISO 100 I literally write this out if I can't do it in my head while doing long exposure shots. There may be an easier way (tables?), but a quick google search of this question on Flickr and several forums reveals that most people just calculate it out this way. After you get the idea of adding a stop and subtracting a stop, than it's just a matter of remembering how the settings effect light. If you aren't 100% sure about it, it's easy enough to write/print out the following on a small slip of paper, "DIY laminate" it with packing tape, and keep it in your camera bag: * Shutter speed: more time = more light * Aperture: lower number = more light * ISO: higher number = more light
* For shutter speed: 1 stop = half or double the number
* For aperture: 2 stops = half or double the number
* For ISO: 1 stop = half or double the number
Monday, March 24, 2008
How aperture relates to shutter speed and vice versa
Learning how aperture and shutter speed (and ISO) relate to one another is an important thing to know when you're learning to use manual mode as well as the priority modes. But, this too is easy!
If you find a combination of settings that gives you the magic "0" reading on your meter (which means the photo should be exposed properly), and then you want to change the aperture value to get more depth of field, it's fine -all you have to do is some elementary math:
You may have heard of a "stop" of light? That's what those numbers on your exposure meter are -"stops" of light.
(Your exposure meter looks like this: [-2...-1...0..+1..+2] although Nikon flips the numbers around.)
The handy thing about measuring light in "stops" is the fact that when you half or double the number you use for ISO, aperture, or shutter speed -that's a "stop". So, in this example, if you remove a "stop" of light by using f/8 instead of f/4 your photo will come out too dark (at -1 on your exposure meter). But, by doubling the shutter speed to ADD a stop, you'll be back at "0" (correct exposure)! But if we want f/16, then you're doubling the number twice, so we have to half the shutter speed twice, which gives us 1/250 at f/16.
All you have to remember is how the settings effect the light that hits your film or sensor:
* Shutter speed: you gain a stop of light by halving the shutter speed.
* Aperture: you gain TWO stops of light by halving the number.
* ISO: you gain a stop of light by doubling your ISO.
So, as an example assuming your ISO is set to 100 and doesn't change, 1/1000th at f/4 would be the same as all of the following:
* 1/500 at f/5.6
* 1/250 at f/8
* 1/125 at f/11
* 1/60 at f/16
* 1/30 at f/22
...if you wanted a shutter speed of 1/15 you can't double your aperture to 1/32 -that setting isn't available on most lenses. So, you'd have to get that extra stop of light by doubling your ISO instead.
So, assuming your aperture was set to f/4 and doesn't change, 1/1000 at ISO 800 would be the same as all of the following:
* 1/500 at ISO 400
* 1/250 at ISO 200
* 1/125 at ISO 100
If you're not one for math you could even just count the clicks up from f/4 to f/16, then change the shutter speed down by the same number of clicks to get back to correct exposure. ...the math really isn't hard though.
This may be hard to read and understand, but it's really easy once you do it a few times. A great way to see this for yourself is with this camera simulator:
http://www.photonhead.com/simcam/shutteraperture.php
One reason that you may want to know how to do this is night shots. For exposures longer than 30 seconds, you need to calculate the settings yourself. More info on this can be read in Part II of this article here.
If you find a combination of settings that gives you the magic "0" reading on your meter (which means the photo should be exposed properly), and then you want to change the aperture value to get more depth of field, it's fine -all you have to do is some elementary math:
You may have heard of a "stop" of light? That's what those numbers on your exposure meter are -"stops" of light.
(Your exposure meter looks like this: [-2...-1...0..+1..+2] although Nikon flips the numbers around.)
The handy thing about measuring light in "stops" is the fact that when you half or double the number you use for ISO, aperture, or shutter speed -that's a "stop". So, in this example, if you remove a "stop" of light by using f/8 instead of f/4 your photo will come out too dark (at -1 on your exposure meter). But, by doubling the shutter speed to ADD a stop, you'll be back at "0" (correct exposure)! But if we want f/16, then you're doubling the number twice, so we have to half the shutter speed twice, which gives us 1/250 at f/16.
All you have to remember is how the settings effect the light that hits your film or sensor:
* Shutter speed: you gain a stop of light by halving the shutter speed.
* Aperture: you gain TWO stops of light by halving the number.
* ISO: you gain a stop of light by doubling your ISO.
So, as an example assuming your ISO is set to 100 and doesn't change, 1/1000th at f/4 would be the same as all of the following:
* 1/500 at f/5.6
* 1/250 at f/8
* 1/125 at f/11
* 1/60 at f/16
* 1/30 at f/22
...if you wanted a shutter speed of 1/15 you can't double your aperture to 1/32 -that setting isn't available on most lenses. So, you'd have to get that extra stop of light by doubling your ISO instead.
So, assuming your aperture was set to f/4 and doesn't change, 1/1000 at ISO 800 would be the same as all of the following:
* 1/500 at ISO 400
* 1/250 at ISO 200
* 1/125 at ISO 100
If you're not one for math you could even just count the clicks up from f/4 to f/16, then change the shutter speed down by the same number of clicks to get back to correct exposure. ...the math really isn't hard though.
This may be hard to read and understand, but it's really easy once you do it a few times. A great way to see this for yourself is with this camera simulator:
http://www.photonhead.com
One reason that you may want to know how to do this is night shots. For exposures longer than 30 seconds, you need to calculate the settings yourself. More info on this can be read in Part II of this article here.
Monday, July 23, 2007
ISO -What it is and when to change it.
If you owned a film camera, you may remember going into the camera shop and having a bunch of different film speeds to choose from. Most of the time people stuck with 400, or turned the package over to find out which one was right for the conditions they'd be shooting in. There was 100 speed film for "sunny days", 200 for outdoors/cloudy, 400 indoor with flash, and 800 was for "low light". Digital cameras retained the idea of film speed in a setting called "ISO".
Either way, "film speed" or "ISO" is a measurement of how fast the film (or your digital camera's sensor) will record the light that makes up your photo. The faster it records, the higher the number, and the better it'll perform in low-light situations. -Have you ever tried taking photos inside and they came out blurry? If you would have used a faster speed film or a higher ISO, you'd get less of that blur because the camera would have been able to record the image faster.
Of course, you don't get something for nothing. There's a tradeoff for choosing a higher ISO, and that's image quality. With film, you get graininess. With digital, you get noise (those grainy, multi-colored specks that you sometimes see in digital photos). There are programs out there, like Noise Ninja or Neat Image that can help reduce the noise in your photos, but generally it's best to keep the ISO as low as you can for the conditions you are in.
(Below is an example of a noisy image:)
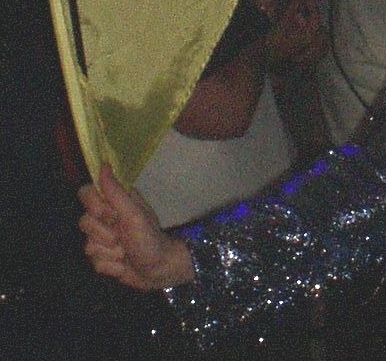
So, if you see that your low-light photos are coming out blurry on your camera, try raising the ISO number to the lowest number that gets you clear, unblurred photos. (Then remember to put it back to 100 when you're done so you don't end up taking photos in daylight at ISO 800 and get unnecessarily noisy photos as a result).
This is one of the 3 things you can adjust when using your camera in Manual Mode. So, if you are wanting to learn Manual Mode, this is an important concept to understand. -With ISO, a bigger number means more light can be recorded in a given amount of time.
**NOTE** Film speed and ISO are not exactly the same, but they are close enough that for our purposes and, especially in this intro, you can treat them as if they are 1 to 1.
If you don't understand something or have trouble with any of my tips, feel free to contact me via a comment on this (or any) article, or see my website for my email address and I'll be happy to help you out!

Either way, "film speed" or "ISO" is a measurement of how fast the film (or your digital camera's sensor) will record the light that makes up your photo. The faster it records, the higher the number, and the better it'll perform in low-light situations. -Have you ever tried taking photos inside and they came out blurry? If you would have used a faster speed film or a higher ISO, you'd get less of that blur because the camera would have been able to record the image faster.
Of course, you don't get something for nothing. There's a tradeoff for choosing a higher ISO, and that's image quality. With film, you get graininess. With digital, you get noise (those grainy, multi-colored specks that you sometimes see in digital photos). There are programs out there, like Noise Ninja or Neat Image that can help reduce the noise in your photos, but generally it's best to keep the ISO as low as you can for the conditions you are in.
(Below is an example of a noisy image:)
So, if you see that your low-light photos are coming out blurry on your camera, try raising the ISO number to the lowest number that gets you clear, unblurred photos. (Then remember to put it back to 100 when you're done so you don't end up taking photos in daylight at ISO 800 and get unnecessarily noisy photos as a result).
This is one of the 3 things you can adjust when using your camera in Manual Mode. So, if you are wanting to learn Manual Mode, this is an important concept to understand. -With ISO, a bigger number means more light can be recorded in a given amount of time.
**NOTE** Film speed and ISO are not exactly the same, but they are close enough that for our purposes and, especially in this intro, you can treat them as if they are 1 to 1.
If you don't understand something or have trouble with any of my tips, feel free to contact me via a comment on this (or any) article, or see my website for my email address and I'll be happy to help you out!
Subscribe to:
Posts (Atom)