Friday, February 27, 2009
Tips on dealing with backlighting
"Backlighting" just means that there's light behind your subject. An example of this would be lining your friends up in front of a sunset to take their photo -the sun would be behind your friends, so they'd be backlit.
What happens with a typical backlighting situation is that your camera sees all that light aimed towards it, so it makes the photo darker to compensate for the excess light. The problem is, the part you want exposed properly is in shadow because of all the light coming from behind, so when the camera darkens the photo, your subject comes out almost black.
There are a few ways to fix this. You can:
* Meter off of your subject instead of metering the whole scene.
* Use exposure compensation to brighten the photo.
* Use fill flash for portraits and other photos where your subject
is small enough and close enough for it to be effective
How these changes effect your background:
If you choose to meter off your subject or use exposure compensation to brighten them, remember that you'll be brightening the entire photo. This was what I intended for the butterfly shot at the top of this post, I wanted the sky to go white behind it. But, for sunset shots this will wash out the beautiful colors of your sunset. For portraits in front of sunsets, use flash. This will balance the light of the sun with the light of your flash and will allow more color to be kept in the sunset.
Tuesday, February 17, 2009
Copyrights, protecting your photos, and CC licensing.
You automatically have copyright on your photo as soon as you click the shutter button on your camera. The problem lies in proving it if your image is stolen. If you have the RAW file, if the EXIF is attached and your camera's serial number is in it (although this can be faked), or if you only post a crop or a version that's smaller than the original and you keep the full size on file, you're good. ...the problem is, most of the time when your work is stolen you'll never know and if you don't know about it, you can't take legal action against them.
As far as not allowing your work to be stolen, if it's on the web it can be taken. Many photo hosting sites try to put protections in like not allowing right-clicks, but there are well known workaround for getting around that (google "right click blocked" without the quotes and look at the 3rd result).
Your options are:
...for the record I don't do any of this. It's too intrusive to the viewer and doesn't allow normal people who like my photos to download them to use them for their wallpaper, etc. So, I give many of my copyright protections away by using a Creative Commons license that allows people to download or use my photos on their blogs, etc as long as they are using it for personal use. I've tried to sell my photos, but I found that it takes too much marketing (which I hate). So, this way, people do the marketing FOR me because part of my Creative Commons license says that they need to attribute the photo to me including the url for my website that advertises my photography lessons and product photography work.
The upsides of giving my copyright protections away have been amazing! My photos have been used on all kinds of blogs, some popular enough to be dugg. They've also been used by travel sites, one's supposed to be put on a brochure although I haven't heard back from them in a long
time, but they've been on news sites, and I've been contacted about getting 2 of my photos published in books as well. To me, the trade's been well worth it.
For more on Creative Commons licensing check out: http://creativecommons.org ...their licenses are customizable so you can keep or give away whatever rights you choose.
As far as not allowing your work to be stolen, if it's on the web it can be taken. Many photo hosting sites try to put protections in like not allowing right-clicks, but there are well known workaround for getting around that (google "right click blocked" without the quotes and look at the 3rd result).
Your options are:
- Watermark it: Put a graphic or text (like your name) over thephoto. There is software that can remove watermarks if they are clear or even if they are opaque if they are over sky or grass, so for maximum protection they need to be put over important parts of the photos (like facial or building details that can't be "figured out" or"faked" by software).
- Post only really tiny photos that aren't worth stealing.
...for the record I don't do any of this. It's too intrusive to the viewer and doesn't allow normal people who like my photos to download them to use them for their wallpaper, etc. So, I give many of my copyright protections away by using a Creative Commons license that allows people to download or use my photos on their blogs, etc as long as they are using it for personal use. I've tried to sell my photos, but I found that it takes too much marketing (which I hate). So, this way, people do the marketing FOR me because part of my Creative Commons license says that they need to attribute the photo to me including the url for my website that advertises my photography lessons and product photography work.
The upsides of giving my copyright protections away have been amazing! My photos have been used on all kinds of blogs, some popular enough to be dugg. They've also been used by travel sites, one's supposed to be put on a brochure although I haven't heard back from them in a long
time, but they've been on news sites, and I've been contacted about getting 2 of my photos published in books as well. To me, the trade's been well worth it.
For more on Creative Commons licensing check out: http://creativecommons.org ...their licenses are customizable so you can keep or give away whatever rights you choose.
Tuesday, February 10, 2009
Adjusting curves by a photo's histogram
Because you can adjust the brightness of your monitor, how do you know if your photo is light or dark? Judging exposure on your computer monitor, unless it's calibrated, is not a good idea. Luckily, there's a tool that can help us judge if our photo is too light or too dark -it's called a histogram. If you are unfamiliar with reading histograms, read this article.
So, let's open this photo in Gimp: (feel free to download it to follow along)
http://www.flickr.com/photos/15059459@N02/3269890274/
Then, open the Curves tool:
(click on image to view it larger)
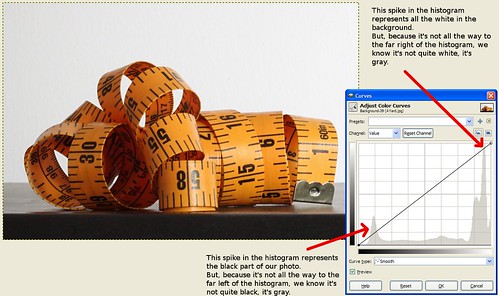
In the background of the Curves tool you can see the image's histogram. For this image, I wanted the white background to be pure white, meaning I wanted it intentionally over-exposed so it lost it's detail. That means, I expected the white spike on the right side of the graph to spill off the right side of the graph instead of being so far into the graph on that side.
I can also see that the spike on the left representing the black parts of the photo is too far in as well.
To fix the white, click on the far right hand part of the curves line and drag it to the left until it's in the middle of the "white spike". Essentially what you're doing here is making the histogram end in the middle of that white spike. In this case, to get the far left side of the photo to become pure white you actually need to drag the curve line past the middle of the spike as shown in the final screenshot below.
For the black, we're not aiming to loose the detail like we wanted to do with the white, so we're just going to drag the curve line on that side to the right until it touches the point where the data just begins on the left side of the histogram.
The result should look like this:
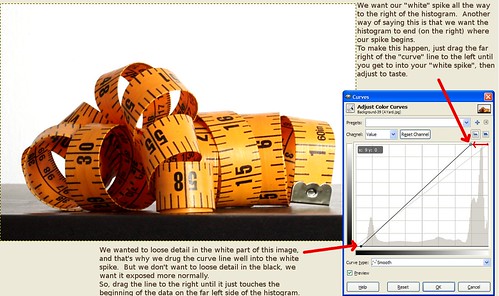
...now the white is pure white instead of gray and the black part at the bottom doesn't look so washed out.
So, let's open this photo in Gimp: (feel free to download it to follow along)
http://www.flickr.com/photos/15059459@N02/3269890274/
Then, open the Curves tool:

(click on image to view it larger)
In the background of the Curves tool you can see the image's histogram. For this image, I wanted the white background to be pure white, meaning I wanted it intentionally over-exposed so it lost it's detail. That means, I expected the white spike on the right side of the graph to spill off the right side of the graph instead of being so far into the graph on that side.
I can also see that the spike on the left representing the black parts of the photo is too far in as well.
To fix the white, click on the far right hand part of the curves line and drag it to the left until it's in the middle of the "white spike". Essentially what you're doing here is making the histogram end in the middle of that white spike. In this case, to get the far left side of the photo to become pure white you actually need to drag the curve line past the middle of the spike as shown in the final screenshot below.
For the black, we're not aiming to loose the detail like we wanted to do with the white, so we're just going to drag the curve line on that side to the right until it touches the point where the data just begins on the left side of the histogram.
The result should look like this:

...now the white is pure white instead of gray and the black part at the bottom doesn't look so washed out.
Histogram basics
Histograms don't look that hard. Many people make assumptions about them based on reading similar graphs in the past, but this leads to so many people thinking it's the shape of the data that matters when, in truth, all that matters most of the time is the far left edge and far right edge of the graph.
So, let's start over. Here's what you need to know:
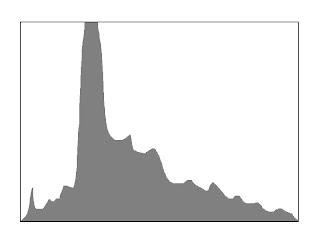
Proper exposure:
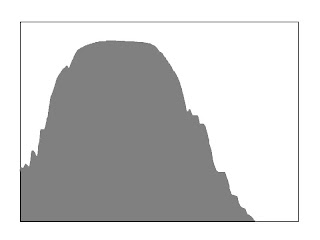
Too dark (under-exposed):
Too bright (over-exposed):
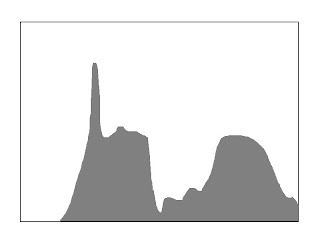
So, let's start over. Here's what you need to know:
- The far left edge of the graph represents black
- The far right edge of the graph represents white
- The middle is all the shades of gray in-between (and for color photos, just think about them being converted to black and white before being represented on the graph)
- If the data peters off to zero at the edges of both ends of the graph, your exposure is perfect.
- If the data gets chopped off on the left side and peters off to zero on the right before reaching the far right edge, your photo is too dark or "underexposed".
- If the data gets chopped off on the right side and peters off to zero on the left before reaching the far left edge, your photo is too bright or "overexposed".
Proper exposure:

Too dark (under-exposed):

Too bright (over-exposed):

Subscribe to:
Posts (Atom)
