Friday, April 24, 2009

Light painting how-to

22. "Light Painting"

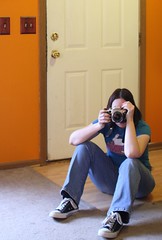
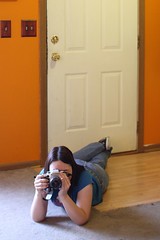
The above image illustrates an effect known as "Light Painting". It's an effect you can achieve with your camera alone -no special software knowledge is necessary!

"Light painting" is a fun way to let your creativity flow. Kids love playing with it, but I've found that it's equally as entertaining to adults, turning them into kids after the first time they see the effect for themselves. But besides being fun, it's a great exercise on just how light interacts with your film or sensor to create an image, so here's how it's done...

What you need:

  • A tripod
  • A light source such as a flashlight, sparkler, etc. "Erica" in the above image was written with a $2 one-LED flashlight
  • A camera, with a flash (on-camera flash is fine), that will allow you to select a long shutter speed.

Setup:

You need the environment to be almost, if not totally, dark for this to work. Set up your tripod with your camera mounted on it, and set the camera on Manual Mode ("M" on Canon cameras), then set a shutter speed of 10 seconds (on Canons you want it to look like 5" or 10" -the quote mark indicates FULL seconds rather than fractions of seconds like 1/5sec or 1/10sec which are displayed as just 5 or 10).

This long shutter speed is required to give you enough time for the camera to take a still shot of you (while the flash fires) and then for you to draw or write whatever you want with the flashlight or other light source after that. If you find 10 seconds too long or too short you can change it later.

Set the aperture to f/11 -this will give you a fairly deep depth of field in case your focus is off (which is easy to do in the dark).

Set your ISO to 400.

Now have your subject take his/her place (you may want to mark the spot so you don't have to keep re-focusing), and then have them put their flashlight on their face so you can focus on them. -If you're doing a self portrait, get a stand in (a broom?) or just guess and take some practice shots 'til you get it right.

When you're all set up, make sure your subject has the flashlight (or other light source) ready and have them stand in front of the camera in whatever (still) pose you'd like them to appear in. Then, press the shutter. (If this is a self portrait, turn the camera timer on, press the shutter and run into your position, pose and wait for it to take your picture.)

At this point, the flash will fire and light up the subject in his/her pose. As soon as the flash is done the subject can begin to draw or write with the flashlight (or whatever) until the shutter closes (you'll be able to hear it close) or until they are finished. If they are finished before the shutter closes, they should run out of the area that the camera is focused on so that neither they nor the light source will continue to be recorded on the film or sensor. (If they run, they'll need to turn off or cover the light source while they move so that it does not continue to be recorded as they run!)

**NOTE:** If your subject is going to write something, they'll have to write it backwards since they are facing the camera. -You may want to have them practice it beforehand!

After the shutter closes, review the image on your LCD to make sure it isn't over or under-exposed. If you can see blurring ghostly images of the subject while he/she was writing or drawing, then you'll need to lower the ISO to 100 or 200 and/or find a darker environment to take the photos in. If the picture is too dark, try increasing the ISO to 800. -If you are shooting film, just make sure it's as dark as possible.

Why it works:

Cameras simply record light. Bright lights take much less time to be recorded than faint light does. So, when the flash fires it records the image of the subject onto the film or sensor very quickly because the flash lights them up so much more than when it goes off. And after the flash is complete, the shutter remains open, but since it's so dark, images will take a looong time to record. So, while the subject moves, you won't be able to see them or their movements on the photo when it's complete. All you'll see is the movement of the flashlight (or whatever), since light is all that a camera records.

When you dial in the settings you may notice that the camera's light meter says the photo's exposure will be way off, but you can ignore it. The camera's light meter has no idea that we don't care about the fact that the background won't be recorded and it also doesn't know that the flashlight's going to appear and that that's really what we want to see, etc. The settings I've chosen just rely on the fact that bright light is recorded quickly, so neither of them matter much and there's really no balancing to be done between them like there is during the daytime. This is why the shutter speed of 10 seconds can be changed without having to worry about how it'll effect exposure it won't (at least not by much).

Try it tonight!

Chances are that once you see the effect for yourself and how easy it is to achieve you'll probably take a ton of shots using the effect in different ways. You can use a self-timer if you want to practice these shots on your own, but this is a really fun way to take shots of people during a camping trip, etc. The last time I did it in a group of 30-somethings, everyone was lining up saying "me next" and "ooh! I have another idea!". -It's a ton of fun, you gotta try it!

Monday, April 20, 2009

Book: Pricing Photography

If you are thinking or even just hoping to one day sell an image commercially, you should seriously think about getting this book:

Pricing Photography: The Complete Guide to Assignment & Stock Prices

It tells you what kinds of questions you need answered before you come up with a price for your image and then gives you an idea of what price range is expected given it's anticipated use. It also helps you avoid some legal pitfalls with wording of PO's, contracts, and the like.

(Buying the book via this link will give me a small commission and does not effect the price you will pay for it.)

Sunday, April 19, 2009

Avoiding blur due to camera shake

If you're without a tripod, at the highest ISO you're willing to shoot at and you're still getting shutter speeds that are too low to hand-hold your only options are to optimize your stance in order to be as stable as possible to eliminate camera shake. Here are some examples of stable shooting positions you can try:

First, slowly squeeze the shutter button:
The first thing to pay attention to when you are taking photos at low shutter speeds is how you are pressing the shutter button. Many people don't realize it, but they often jerk or move the entire camera when they push it. If you are reading this at home, grab your camera, line it up with the line where your ceiling meets the wall and watch as you press the button. If you move the camera, practice until you eliminate that movement.

Second, relax:
Tense muscles lead to shake due to muscle fatigue, so keep it loose. If you feel a muscle getting tired, burning, or shaking you are doing it wrong. Find a position that's comfortable and your shots will be more stable.

Third, breathe:
Another common problem is the natural tendency to hold your breath, but this will also lead to shake. Instead, take a slightly deeper than normal breath, then slowly let the air out as you gently press the shutter button.


Now on to stable positions to take photos:
Click on any of the photos below to see larger versions of them.

A normal stance:
Stable Shooting Position #1:  Standing
Your feet should be about shoulder-width apart and your arms should be relaxed.

A slightly more stable stance uses an "elbow tripod" like this:
Stable Shooting Position #2:  Standing, Elbows Tripod
When people try this stance they tend to press their elbows together too hard. Remember to keep it loose, not tense. Your elbows should be just touching and resting on your chest/stomach, so it'll cause your hips to come forward and your shoulders back a little bit, but it should be comfortable. There should be no squeezing or tension in the position at all.

If there's something horizontal to rest the camera on:
Stable Shooting Position #3:  Leaning
You can rest the camera directly on a chair, fence, car, or any other horizontal surface you can find. If the camera doesn't rest at the angle you'd like you can put your hand under it or prop it up on a towel, blanket, sweatshirt, or anything else you might have handy.

If you have a vertical pole you can use it as a brace:
Stable Shooting Position #7: Vertical Pole
This works well with stop sign poles and the like. Just grab the pole with your left hand, then use your forearm as a stable horizontal surface to rest your camera on. I use this position a lot for macro photography because it allows me to move the camera back and forth in tiny increments to get the depth of field exactly where I want it.

If there's a wall you can use it like this:
Stable Shooting Position #8:  Using A Vertical Wall
Press the camera against the wall with just enough force to keep it there (again, nothing should be tense to avoid shake due to muscle fatigue).

Another option is to kneel:
Stable Shooting Position #4:  Kneeling
Kneel in a stable position, then use your knee to rest your elbow on. Keep it comfortable and relaxed.

Or use a sitting position like this one:
Stable Shooting Position #5: Sitting
Sitting is more stable than kneeling because you can create a tripod by resting both elbows on both knees. Keep it comfortable and don't let your knees fall outward or you'll be using your inner thigh muscles to keep them up and that will lead to shake from muscle fatigue pretty quickly.

Even more stable is the prone position shown here:
Stable Shooting Position #6: Laying
Here your "elbow tripod" rests directly on the ground. If the perspective works and you're willing to lay down this is a very stable position. Even more stable, if necessary, is resting your arm on the ground, then putting your camera on your arm, but this will give you an even lower perspective.

If all else fails, try burst:
If you use the above techniques and still can't get a stable shot, try putting your camera on "burst" so that holding the shutter button down will have the camera take several photos in a row. Many times the 2nd or 3rd photo will show less shake than the 1st. (This is especially helpful if you can't seem to press the shutter without moving the camera.)

Friday, April 10, 2009

Shooting RAW

Jpg vs RAW:
The jpg file format was created to make images smaller through something called "compression", and more specifically, "lossy compression". What this means is that it actually makes some changes to the file so it's smaller. So, if a patch of blue sky had 12 different shades of blue before your camera saved the file as a jpg, it'd end up with maybe just 4 different shades of blue afterwards.

That sounds bad, right? And here's where people will start to tell you that RAW has more detail than jpg. The fact is, though, that in order to print the photo, upload it to the web, or email it to your friend you're likely going to have to convert it to jpg anyway, so the loss is pretty much inevitable. Besides, our eyes can only tell the difference between 7 million different colors while RAW files contain billions or even trillions of different colors!

So, what's the advantage of shooting RAW?
Well, when editing a photo, all those extra colors mean a lot. To avoid talking about millions of colors, let's think about it in terms of crayons. If you have a box of 32 different colored crayons you may only have 4 different shades of gray between white and black. So, if you want to lighten an image or darken it, you only have 2 shades to move, up or down before you get "black" or "white". But, if you have a box of 64 different colors, you may have 4 shades to move up or down before getting "white" or "black". The same goes for RAW -all those extra colors mean extra data in the shadows or highlights so, when you go to dramatically lighten shadowed areas or darken highlights you have a lot more room to move with RAW than you do with jpg.

RAW and fake HDR:
Raw files contain enough information to create an HDR photo from a single RAW file rather than from 3 to 5 jpgs. This means that taking photos in the middle of the day when the light is really harsh and the shadows are really dark isn't a problem anymore! You can take one RAW photo, brighten it by one to two stops, and darken it to the same degree, than run it through HDR software and the shadows and highlights will both be softened so you get this:
Boat on beach

instead of this:
Boat "before" picture

Summary:
* RAW allows you extra room to darken, lighten, or change the color cast in your image.
* RAW files will be larger, about the same size in megabites as your camera has megapixels, so a 10MP camera will have RAW files around 10MB each.
* RAW files require conversion (usually to jpg) before you can upload them to the web, print them, or email them to friends.
* JPG cannot be lightened or darkened to the same degree as a RAW file can.
* JPG files are smaller than RAW files, so you'll get more shots in jpg on your memory card than you can with RAW.
* JPG files can be opened by any image editing software, uploaded directly to the web, or printed with no conversion needed.


RAW workflow:
RAW files can't be opened by many programs, but your camera should have come with software that can open RAW files, do some basic editing on them, then convert them to jpg. Photoshop, Photoshop Elements, and Picasa can open some RAW files. Updates may be necessary to these programs if you have a fairly new camera.

Generally, though, you'll open the file in it's RAW format, make changes to the brightness, white balance, curves, contrast, saturation, etc on the entire image, then convert the image to jpg for further processing, and from there you can work with the file like you would any other jpg image. Because the main advantage of RAW is the ability to use that extra data to make color or brightness changes, that's really all most RAW software can do.

So, when do I shoot RAW?
This, of course, is up to you. I shoot RAW 99% of the time because sometimes I make mistakes and take a photo that's not exposed well and RAW gives me a better chance to save those images. This doesn't make me lazy -my goal is always to get it right in the camera, but a safety net is always nice! The boat photo I used as an example was taken in horribly harsh mid-day light while I was on vacation and had no time to wait for evening or morning light. It wasn't until I was home that I remembered that I could do an HDR technique on it to try to make the shadow areas less dark and it worked! This is why I shoot RAW all the time.

Many fellow photographers laugh at me, though. They find RAW to be tedious because of the extra step involved in processing every image. I don't find it to be a big deal. So, I'd recommend trying it and seeing if you mind the extra step. If you do, you're in the majority, so don't worry. Just remember that if you're unsure about your white balance or exposure, or if youthink you might want to try an HDR technique to improve the balance of light areas to dark areas in a photo, just switch to RAW or RAW+jpg for a safety net. For day-to-day photos for practice or images that you're pretty sure you can get right in the camera, stick with jpg to avoid that extra step!

Example of RAW vs Jpg after brightening an image:
A while back I posted the results of a test I did by taking a photo in RAW and in jpg, then brightening both by the same amount. The RAW file retained it's detail, but the jpg lost some detail as a result of the brightening:
Link

Thursday, April 2, 2009

Image Editing How-To: Creating a twin

  • Set your camera up on a tripod
  • Take the first picture. (These are self portraits, so I used my camera's timer to trip the shutter.)
  • Change positions, clothes... whatever you choose, but leave the camera EXACTLY where it was for the first photo.
  • Take the second picture.
  • Open both photos in Gimp (free here or use whatever software you like)
  • Select the clone tool (the icon looks like a stamper or you can find it under the "Tools" menu by selecting "Paint Tools" then "Clone").
  • Put the clone tool's cursor on the verson of the photo that you want to copy FROM
  • Hold the "Control" key down (it may be labelled "Ctrl" on your keyboard) and click on some easily defined point that appears in both photos -I used the point of the lamp shade here.
  • Move to the photo you want to clone the 2nd image ONTO
  • Put the clone tool's cursor at exactly the same point as you did before -DON'T hold the Control key down this time, though!
  • Click and hold the button down to "Paint" the 2nd image into the first. If you let up on the mouse button, be careful to put it back in the same spot when you click it again, or you'll have to go back and do the Ctrl + click thing again.
  • This works best with a simple background so that if you're off by a little bit it won't matter or you can fix minor issues using the "Smudge" tool.