The "problem" is probably your camera's exposure meter.
Cameras are simple devices and one of the assumptions they make is that the overall tone (how light or dark the overall photo is) will average out to a set medium tone (~18% gray, which is about the same tone as the skin on the palm of your hand). If large portions of the photo will be darker than the assumed tone, the camera will think the reason for that darkness is lack of light and it'll brighten it up to make up for it. And the opposite is also true -with extremely light-colored scenes, the camera will think that the lightness is due to too much light, and it'll make them darker so they come out gray.
So, if you have a dark scene that you're shooting and you want to tell your camera that the scene should be darker than that "average tone", you have a few choices: #1. If you want accuracy, you can buy a "gray card" to calibrate your camera to the lighting conditions, set the exposure, and take the photo. #2. To get pretty close, you can meter off your hand. Or, #3, you can use trial and error like I do most of the time -just use exposure compensation in whatever mode you're shooting in:
Exposure compensation uses the exposure graph you see and use in manual mode or the "priority modes", it looks like:
[-2...-1...0..+1..+2]
..(Note that on Nikon's it's reversed and the positive numbers are on the left). There's usually a small marker under the numbers that indicates where your exposure is on the graph using whatever settings the camera is on. The "0" on the graph indicates what the camera thinks is proper exposure (assuming that "average tone"). Setting the exposure towards positive numbers means you're telling the camera to add light or brighten the photo as compared to what the camera would usually choose. And negative numbers, then, darken the photo as compared to what the camera would choose to be correct.
So, if the camera is making your snow scene turn out gray (it's coming out too dark), you need to brighten the photo, or expose more towards positive numbers. Try exposing at +1, then adjust up and down from there until you get the result you desire. On the other hand, if you're taking a photo of your black cat lying on a dark blanket, it'll likely come out too light, so you'll have to expose towards negative numbers to darken the photo. Try -1, then adjust up or down from there.
Experiment:
If you want to see just how wrong your camera's meter can be, find an all white subject (a wall or your ceiling should work), and an all black subject. Take a photo of each. Lighting shouldn't matter, but you can try adjusting the lighting to prove that it has no effect -just make sure the lighting is consistent over the entire area that you'll be taking a photo of. You can add subjects to your photo as long as they too are 100% white or black (you'd want to take a photo of a white subject against a white background, then a black subject against a black background). If you want to take it even further, you can switch subjects and backgrounds and take 2 more photos (white subject on black background and vice versa) -those should come out mostly correct since the two tones (one dark, one light) will average each other out. My photos are here if you wanna cheat ;-)
Your 100% white and 100% black photos should all come out almost the same shade of gray no matter if your subject was all white or all black. -That's what your exposure meter is designed to do! Most of the time it works just fine, but when you have a scene that's made up of extremely light or dark tones, remember this and use exposure compensation to make the photo come out as you see it instead of all gray.
Monday, August 27, 2007
Friday, August 24, 2007
In the Chicago area? Join the club!
I've decided to start a photography club in the Chicago area. No meetings or dues or anything, just fun photography outings -at least one a season or more as interest grows. The idea is, that we'll just all get together at Starved Rock as the fall colors peak, or during winter maybe we can go to the butterfly exhibit at the Nature Museum. Other ideas: skyline photos at the Planetarium, or maybe even a camping trip to practice light painting shots. Events like Starved Rock would be free -it'd just be a chance to get to know fellow photographers and practice together so we can learn from one another. If you are interested, I've started a Yahoogroup so that I can post dates and times for our events: http://tech.groups.yahoo.com/group/muddybootsphotography/
Thursday, August 23, 2007
DIY Stealth Camera Bag
There are several reasons I've been looking to replace my Tamrac Velocity 7 sling style camera bag. Don't get me wrong, I love this bag. It's a perfect size and I love how accessible it keeps the camera. But, I carry it with me every day and, well, it LOOKS like a camera bag. -There's 2 downsides to that. One is, it's not all that fashionable (not that I'm all that "fashionable" anyway, but why be dragged down further by my camera bag?). Two is, everyone knows what's in the bag, which makes me a walking target for theft.
In fact, I'm my own worst enemy sometimes; a few weeks ago I went to lunch with my husband, then we walked a few doors down to get coffee. In the middle of my latte, I realized that I had left my camera bag in the sandwich shop! Luckily, it was still there, but I know next time my luck may not be as good...
So, I started looking at "stealth" camera bags. From what I saw, there are only a few options. The only one I liked, and one of the cheapest, was the Crumpler bags, which would cost anywhere from $105 to $128 depending on which model I wanted. One was a bit shorter than my current bag, so I was worried that my camera with my 75-300mm lens attached wouldn't fit. The other one was a bit too big -I don't know if I'd want to carry it around everyday. I also didn't like the idea of shelling out over $100 for a BAG!!!
I googled some more, and stumbled upon a blog post someone made about a camera bag they put together from various parts. It wasn't as compact as I'd like and the insert the guy used moved around in the bag unless it was held in place with more stuff, like a sweatshirt, books, etc. -I didn't want to deal with all that since I really wanted to keep my bag about the same size as the Tamrac bag I'm used to carrying. I needed just enough room for my camera and an attached lens (stored lens-down for accessibility), then compartments for 2 more lenses, one on each side. The insert he used was perfect, but the bag was much too big for my needs.
I took down the info about the insert, then searched for a bag that it'd fit more snuggly in. I probably searched for over an hour, then decided to give it a rest for the day. Later on I got to thinking -I had bought a bag that was about the right size from an Army Navy Surplus store locally years ago and I had never used it. I ran upstairs to my closet and dug it out. I measured it and it seemed perfect, so I coughed up the $20 for the insert and waited for the Fed Ex truck to arrive. When it did, cardboard and packing peanuts flew as I unpacked the insert, and then stuck it in my Army bag. It was a perfect fit!
Now I have a new $20 stealth camera bag :-) . It's just a tiny bit bigger than my Tamrac was, so now I don't have to use force to fit my Canon 10-22mm in the bag anymore ;-) There are all kinds of nifty pockets all over the thing, and the strap's wide enough that it was quite comfortable to carry it around all weekend at the Shootout!
Here's some pics of what it looks like, click on the photo to go to my Flickr page where you can see larger versions of it:
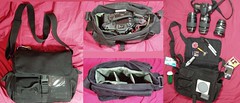
And here's the info if you want to make one for yourself for about $35 (the bag's about $15):
The downsides of this bag: The lens insert doesn't have as much padding between the lenses as my old bag. That's just those 2 interior walls, though. I find that the lenses are snug enough in there that I'm not concerned about them at all. The front velcro pockets have big gaps where stuff can fall out, so I don't use them much -just for snacks and other stuff that I could get by with loosing. And the last issue some may have with this bag is that it's not waterproof. In fact, it's canvas. I'm sure it'd soak up water nicely... That's why I have the plastic bag in the big back pocket, permanently. If I get stuck in a downpour, my plan is to just stick my camera bag in the plastic bag and run for it!
In fact, I'm my own worst enemy sometimes; a few weeks ago I went to lunch with my husband, then we walked a few doors down to get coffee. In the middle of my latte, I realized that I had left my camera bag in the sandwich shop! Luckily, it was still there, but I know next time my luck may not be as good...
So, I started looking at "stealth" camera bags. From what I saw, there are only a few options. The only one I liked, and one of the cheapest, was the Crumpler bags, which would cost anywhere from $105 to $128 depending on which model I wanted. One was a bit shorter than my current bag, so I was worried that my camera with my 75-300mm lens attached wouldn't fit. The other one was a bit too big -I don't know if I'd want to carry it around everyday. I also didn't like the idea of shelling out over $100 for a BAG!!!
I googled some more, and stumbled upon a blog post someone made about a camera bag they put together from various parts. It wasn't as compact as I'd like and the insert the guy used moved around in the bag unless it was held in place with more stuff, like a sweatshirt, books, etc. -I didn't want to deal with all that since I really wanted to keep my bag about the same size as the Tamrac bag I'm used to carrying. I needed just enough room for my camera and an attached lens (stored lens-down for accessibility), then compartments for 2 more lenses, one on each side. The insert he used was perfect, but the bag was much too big for my needs.
I took down the info about the insert, then searched for a bag that it'd fit more snuggly in. I probably searched for over an hour, then decided to give it a rest for the day. Later on I got to thinking -I had bought a bag that was about the right size from an Army Navy Surplus store locally years ago and I had never used it. I ran upstairs to my closet and dug it out. I measured it and it seemed perfect, so I coughed up the $20 for the insert and waited for the Fed Ex truck to arrive. When it did, cardboard and packing peanuts flew as I unpacked the insert, and then stuck it in my Army bag. It was a perfect fit!
Now I have a new $20 stealth camera bag :-) . It's just a tiny bit bigger than my Tamrac was, so now I don't have to use force to fit my Canon 10-22mm in the bag anymore ;-) There are all kinds of nifty pockets all over the thing, and the strap's wide enough that it was quite comfortable to carry it around all weekend at the Shootout!
Here's some pics of what it looks like, click on the photo to go to my Flickr page where you can see larger versions of it:
And here's the info if you want to make one for yourself for about $35 (the bag's about $15):
- The insert is made by Domke, search google for for "Domke FA-230" and you should get some results. I bought mine at Adorama (link), but B&H also has them.
- The bag can be found by searching google for "urban explorer bag". Since I got mine locally a few years ago, I can't really recommend a site to buy that part from.
The downsides of this bag: The lens insert doesn't have as much padding between the lenses as my old bag. That's just those 2 interior walls, though. I find that the lenses are snug enough in there that I'm not concerned about them at all. The front velcro pockets have big gaps where stuff can fall out, so I don't use them much -just for snacks and other stuff that I could get by with loosing. And the last issue some may have with this bag is that it's not waterproof. In fact, it's canvas. I'm sure it'd soak up water nicely... That's why I have the plastic bag in the big back pocket, permanently. If I get stuck in a downpour, my plan is to just stick my camera bag in the plastic bag and run for it!
Wednesday, August 22, 2007
Planning for an Event (Part 3) -Results
Well, planning only goes so far. The race on Sunday was rained out. But, the car show did happen on Saturday, so lets back up to the previous topic, "Research", for a sec...
While researching drag racing photos, I took the time to look up some car show pics as well. Here's one that really stuck with me as one that I liked and would like to replicate: http://www.flickr.com/photos/motors/527999671/in/set-72157600304454278/
Now, back to Results:
On, Saturday, while driving to the car show I couldn't get over the sky. It was perfect for photos and I knew I'd want my polarizer out to enhance the blue sky and pop the white puffy clouds out even more. -Good photos often rely on the surroundings just as much as the subject. A great sky can make or break an image. I was in luck!
When we arrived, I walked around looking at cars for my own interest for while, then broke off from the group to walk around on my own. I started walking towards the field because I liked the idea of grass under the car like the photo I saw and liked previously. As I walked, the first thing I noticed was an old barn / warehouse building that I've used as a backdrop before. I love it's weathered wood look and kept it in mind as something to use in a photo again. The only thing I needed was a nice looking car in the right spot...
The problem I often run into with car show photos is that interesting cars, according to the laws of averages, often have cars parked beside them. Then, you're left zooming in, using a head-on shot, or otherwise compromising the angle of the photo to eliminate or hide the other cars. ...Part of what I like so much about the photo I found on Flickr is the simplicity. One car, alone in the grass, a nice blue sky. That's about it. Nice lighting, a nice angle, that all helps as well, but the hardest part is finding a car with enough space around it to single it out like that...
In my case, the car show was packed. There were no cars that could be singled out. But, I did find an interesting car, on the end of a row, in the perfect spot in front of the barn, while the sky was still looking good, and I took my opportunity: (click on the photo to view larger versions and EXIF data).
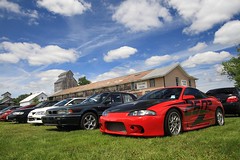
I'm very happy with this shot. I like the angle, the colors, the background, the sky... So many things came together just right -and not much of it was technical. Sometimes you just have to be in the right place at the right time and be looking for such an opportunity. I was primed to see this shot, and that's the frame of mind you have to be in when you're at an event to come away with images. Many times I find that I have to choose between being a participant in the event (looking at the cars for my own enjoyment, looking at people's setups, talking with friends, etc) or taking pictures. I can't do both at the same time. So, I often break off from our group for stretches of time to "be a photographer", then I rejoin the group later.
While researching drag racing photos, I took the time to look up some car show pics as well. Here's one that really stuck with me as one that I liked and would like to replicate: http://www.flickr.com/photos/motors/527999671/in/set-72157600304454278/
Now, back to Results:
On, Saturday, while driving to the car show I couldn't get over the sky. It was perfect for photos and I knew I'd want my polarizer out to enhance the blue sky and pop the white puffy clouds out even more. -Good photos often rely on the surroundings just as much as the subject. A great sky can make or break an image. I was in luck!
When we arrived, I walked around looking at cars for my own interest for while, then broke off from the group to walk around on my own. I started walking towards the field because I liked the idea of grass under the car like the photo I saw and liked previously. As I walked, the first thing I noticed was an old barn / warehouse building that I've used as a backdrop before. I love it's weathered wood look and kept it in mind as something to use in a photo again. The only thing I needed was a nice looking car in the right spot...
The problem I often run into with car show photos is that interesting cars, according to the laws of averages, often have cars parked beside them. Then, you're left zooming in, using a head-on shot, or otherwise compromising the angle of the photo to eliminate or hide the other cars. ...Part of what I like so much about the photo I found on Flickr is the simplicity. One car, alone in the grass, a nice blue sky. That's about it. Nice lighting, a nice angle, that all helps as well, but the hardest part is finding a car with enough space around it to single it out like that...
In my case, the car show was packed. There were no cars that could be singled out. But, I did find an interesting car, on the end of a row, in the perfect spot in front of the barn, while the sky was still looking good, and I took my opportunity: (click on the photo to view larger versions and EXIF data).
I'm very happy with this shot. I like the angle, the colors, the background, the sky... So many things came together just right -and not much of it was technical. Sometimes you just have to be in the right place at the right time and be looking for such an opportunity. I was primed to see this shot, and that's the frame of mind you have to be in when you're at an event to come away with images. Many times I find that I have to choose between being a participant in the event (looking at the cars for my own enjoyment, looking at people's setups, talking with friends, etc) or taking pictures. I can't do both at the same time. So, I often break off from our group for stretches of time to "be a photographer", then I rejoin the group later.
Thursday, August 16, 2007
Planning for an Event (Part 2) -Research
After you have a general idea of what to bring, it's time to start thinking about the kinds of shots you'll want to take. My subject this weekend will be cars. The event I'll spend the most time on is the drag racing on Sunday, so how will I capture the action?
If it wasn't a closed track (and a very relaxed event), I'd think about calling to see if I could get an access pass. But, I've been there before and don't feel this is necessary.
So, I reviewed last years photos. Most of the drag racing photos I took were taken from above, up in the stands. This makes me, as a viewer, feel disconnected with the racing that's going on. I feel like a spectator instead of "part of the action". So, this year I want to get closer. ...Last year my biggest telephoto lens was a 300mm. This year, I have a 500mm, so that'll help. I can stand way down the track and still get some close-up photos so the car will fill the frame. -A couple years ago, reviewing my photos revealed that empty stands behind the cars made it look like it was a small event (everyone tends to sit on one side of the track because the other side is hard to get to). So, last year I made an effort to take photos from the other side so you could see the crowd more and it worked out well.
When I'm done critiquing my own previous work, I want some new ideas. I know I've seen good drag racing photos in the past, but I can't remember the specifics of how they looked: the angle they were taken from, what lens may have been used, etc. So, it's time to do some searching. I'm a member of the P.O.T.N forums, and I know they have some talented motor sports photographers, so I hit them first and searched for posts within the "motorsports" forum, and with the word "drag" in them to eliminate photos of other kinds of racing: rally, road racing, etc. I came up with a few really good photos: 1, 2, 3 -some of which also had details about lenses, apertures, etc. Usually, however, I just search Google Images or Flickr.
...however you go about it, this prep works means you won't be wasting time thinking about angles, etc at the event. Now I know that the photos _I_ like of drag racing usually show the car head-on or sometimes from behind, but always filling the frame and shot fairly level with the car, not from above. Also, from the forum, I know that for burnout pics my 100mm macro lens set at f/2.8 is probably a good choice. -Got it. I know just what to do when I arrive!
Having an idea of the outcome you are looking for is one of those things that can improve your photography 100% overnight. And this, of course, goes for any kind of photography including portraits, kids soccer games, birthday parties, whatever!
Wednesday, August 15, 2007
Planning for an event (Part 1). -Gear preparation.
This Friday I'm leaving for an annual car event my husband and I attend every year. Aside from the fun of friends, our cars, and the racing, I also enjoy the event as a chance to take some pictures. ...I don't often get a full day's worth of photography in, muchless an entire weekend! So, today (Wednesday) I'm starting to prepare for the photography part of the event, and I thought I'd share my planning with you. Perhaps you can use some of it for your own outtings, or perhaps it'll prompt you to share your ideas in the comments section. So, here goes:
I have a formal checklist I've made that contains all of my photography equipment and other items I've found useful to have in my photography kit. You don't have to make a formal checklist if you aren't a "checklist" kind of person, but you should at least have an idea of what gear you'll be bringing.
Basic questions to ask yourself:
* Which camera body/bodies will you take? (Sometimes it's nice to have both an SLR and a point and shoot)
* Which lens(es) will you need? (Remember you can often rent lenses for Nikons and Canons relatively cheaply if you wish!)
* Accessories? (Filters, extra battery, extra memory, remote shutter release, flash(es), cleaning cloth, rocket blower, whole cleaning kit, props, ???)
* Will you need a tripod? Monopod? Table-top tripod? Gorrilapod?
* Do you need your laptop? (Remember: power cable, network/wireless card, USB cable, memory card reader, memory card adapters, ???)
* Do you need your battery charger as well?
Other things I like to have with me:
* A garbage bag to stuff my camera equipment in if I get stuck in a downpour unexpectedly.
* A piece of black and white cloth to use as backgrounds for macros.
* A pieces of tinfoil, folded up -to use as a reflector for macros.
* A flashlight for seeing camera settings at night (also useful for light painting!)
* Etc. -After I get back from an outing, I usually write stuff down that I wished I had so I can remember to bring it next time.
I have two camera bags right now -one is a Tamrac Velocity 7 sling bag that holds my camera with an attached lens plus 2 other lenses and most of my accessories. I carry this bag daily, it's compact and not too heavy, yet holds enough for me to capture most anything I come across. My other bag is a photo-backpack that will hold my Bigma (50-500mm lens, weights 6lbs by itself!) as well as all my other gear and it also has places on the sides and bottom for tripods, etc.
For this extended weekend trip, I'll be carrying my sling bag most of the time: during the drive there (we caravan with friends), at the car show on Saturday, for the party Saturday night, and for "walking around time" at the track on Sunday. I do plan to spend a good amount of time Sunday with my Bigma on a tripod or monopod, though, so I am bringing my whole kit. -I'll just have to switch out the Bigma and tripod/monopod with my sling bag at the track as needed.
I will also be bringing my laptop for instant viewing as well as for dumping photos onto when I fill up my memory cards. Last year I know I filled up a card a day at least, but I was shooting on RAW + jpeg. Lately I've just been shooting RAW. Still, though, when entire days are potentially filled with photo ops, it's best to be able to dump a card when you need to (or at least have a backup card at hand). I never want to miss a shot because I'm being conservative with the shutter button. The more photos you take, the more chances at a winner. Good photography does take skill, but there are often elements of luck as well no matter how good you are!
So, my planning for what to bring is rather simple, then. I'm bringing everything. :-)
Monday, August 13, 2007
"What kind of camera should I get?"
This is the most popular question that I get on my photography list. The answer, as you might suspect, is "it depends".
Are you happy with your current camera? If yes, then stop here -there's no need to upgrade! But, if there are things about your current setup that annoy you, then you may want to look into purchasing something that suits you better. -Read on!
First, I suggest making a list of things that you need out of a new camera. For example: Faster boot-up time (the time it takes from when you turn the camera on to when you can take the first photo, less shutter delay (the time it takes from when you push the button to when the camera actually takes the photo), or even stuff like a flash hot shoe, the ability to change lenses, an available underwater housing, etc. Whatever you feel your current setup is lacking and you NEED to have in your next camera -write it down!
Second, take a look at where you think this photography hobby of yours is going in the next 3 - 5 years (or however long you'd like to stick with your new camera). If you know you're serious about it and you'd like to become a pro (or achieve professional results), make sure the camera you choose will fit those goals or else you'll end up upgrading again much more quickly than you anticipated, which just wastes money in the long run!
Third, take a look at your budget and try to strike a balance between cost and features. Start looking at cameras in your price range, and actually go to a store and pick them up to make sure they feel good in your hand. People with large or small hands in particular need to do this to make sure that all buttons and dials can be reached easily or else you'll end up frustrated with your purchase down the line. You should eventually be able to use all the camera's features intuitively and without moving your eye from the eyepiece.
After getting an idea of cost, brands, and models, go to the following websites to read reviews so you can be assured you're making a wise investment in your new equipment:
* Steve's Digicams
* DP Review
Optionally, read user reviews as well for more information:
* Epinions
* Amazon
* ...and you can always google the camera brand, model, and the word "review" to get even more feedback on the cameras you are interested in
Once you have gone through all of that, you should be able to make an informed decision. If you choose to buy online, be very careful of some retailers who use deceptive practices like calling you to verify your order, then giving you the hard-sell on warranties and accessories (some of which should already come with your camera!). If you are unsure of the vendor you're thinking of buying from, read reviews for the vendor at VendorsReviewed.com or ResellerRatings.com. Or, do business with vendors who are known to be both fair and have decent prices as well, such as B&H Camera, Adorama or Amazon.
...I'll continue this topic with a post about point and shoots vs DSLR's soon!
If you want further help, feel free to post a comment here or join my Photography_Beginners Yahoogroup and ask for help. It'd be helpful to know what kinds of photography you're into as well as your budget and any specific brands and/or models you're particularly interested in.
Friday, August 3, 2007
Filters
Filters are thin, round pieces of glass surrounded by a threaded ring that allows it to be screwed onto the front part of a lens. They are usually used with SLR-type cameras, but are becoming more and more available for point and shoots and video cameras as well.
Many filters that were popular for film cameras can now be effectively reproduced in common image editing software such as Photoshop, Gimp, Adobe Elements, Paint.NET, etc. But, other filters' effects cannot be reproduced and you may, therefore, wish to carry some or all of these with you in your camera bag:
UV:
UV filters are clear and often have no effect on your photos other than maybe reducing haze a bit. So, why use them? Most people who use UV filters do so only to protect their lenses. If you may be shooting in rough conditions, it's a good idea to use a UV filter on your lens. A scratched UV filter is much cheaper to replace than it would be to repair your lens! I, like many others, use UV filters on my lenses most of the time. The argument against using UV filters is that many people opt for the cheaper ones, and are therefore buying expensive glass, only to put another element of cheap glass in front of it, therefore reducing the quality of the photos as a result. For this reason, when I'm shooting important shots, I remove my UV filters "just in case".
Neutral Density (ND):
These filters are basically sunglasses for your lens. All they do is remove light. -You may think you can do that with exposure compensation, but in really bright conditions, when you want a long shutter speed (say, for taking photos of waterfalls), a neutral density filter will allow you to use a much longer shutter speed than you otherwise would be able to -even with your ISO on it's lowest setting. If you plan on taking slow shutter speed shots during the day, this type of filter is definitely recommended.
Graduated Neutral Density (GND):
Big name, I know, but an easy enough concept. This filter is split down the middle (often half and half) -part of it is clear, the other part is gray (just like the neutral density filter). The purpose for this is apparent as soon as you run into the following problem: When you're shooting a landscape where the sky (and perhaps the background too) is very bright, but the foreground is either in shadow, or just darker. In this case you're often left sacrificing the sky by exposing for the foreground or taking 2 shots and combining them later. With this filter, you can use the ND part to tone down the sky, while placing the clear portion of the lens where the foreground is so that it gets exposed properly. The problem is, these filters are often split 50-50, so your horizon must be placed in the middle of the shot for the filter to work. You can, of course, get around that by going a bit wide and planning on cropping, but it's kind of annoying. (You can sometimes overcome this exposure issue with a polarized filter instead.)
Circular Polarized / Polarizing Filter:
This filter is slightly different from the others in the fact that it has a freely rotating front element on it. When you screw the filter on the front of your lens, you'll then need to rotate the ring on the front of the filter in order to control the effect of the polarizer. So, what's it good for? -It's used for many reasons: It will make a blue sky bluer (although this works best when you're shooting 90 degrees from the sun), it can enhance or eliminate reflections on water or glass, it can enhance the colors in a rainbow, and sometimes it can even out the exposure as in my example above for the graduated neutral density filter. The reason it can do that without being split down the middle like the GND is this: A polarizer can darken a blue sky to make it bluer, but it won't effect the grass and other objects in your photo. So, if you use a polarizer to darken the sky, often photos come out evenly exposed. An example of this is shown below:
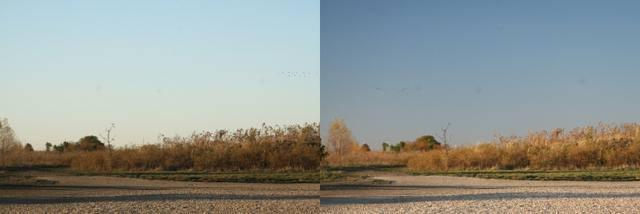
The photo on the left was taken without a polarizer, the photo on the right was taken with a circular polarizer. -See how because of the overly bright sky, the camera doesn't expose the foreground properly? The foreground is properly exposed when you tone down the sky with the polarized filter (like I did on the photo on the right).
In my opinion other filters such as star filters, softening filters, warming, cooling, and other "color filters", as well as many special effects filters like spot-focus, etc can all be achieved in software quite easily. You're free to use them, but many people choose to free up that bit of room in their bag instead.
Subscribe to:
Posts (Atom)