Canon 28-80mm f/3.5-5.6:
This was the kit lens that came with the Elan IIe. It's lightweight and plastic. I don't use it much. I suppose it could be a decent walkaround lens, but I don't really do much "walkaround" photography. I can't really say much more -I don't use it because it's not wide enough for landscapes and it's not telephoto enough for wildlife photos.
Canon 75-300mm f/4-5.6 IS USM:
I bought this lens while I was still using Auto on my Elan IIe and I was floored at the reach it gave me. I got years of use out of it before realizing how soft its photos were. I still use it here and there -I don't really have an adequate replacement for it, but I consider it a low-quality lens. Photos printed to 8x10 would probably look fine, but any larger and I fear the quality issue would become a problem. Note that this lens has since been upgraded, changed, and there are also several versions on the market (non-IS, non-USM, etc).
Canon 100 f/2.8:
Photos I've taken with this lens.
Feeling confident in my skills in other areas, I decided to tackle macros, so I bought this lens. When it arrived I learned how challenging macros can be! But, since then, I've mastered the art and found out how amazing this lens really is. Aside from your average insect or flower macro, this lens gives a shallow depth of field which can be used artistically, and it's also got good low-light performance due to the f/2.8.
Canon 10-22mm f/3.5-4.5:
Photos I've taken with this lens.
I got this lens as a gift from my husband and when I got it I wasn't sure I'd really ever use it. Wow was I wrong! I love this lens. It's not only good for landscapes, but it's also nice when you have no choice but to shoot closer to your subject than you want as well, and playing with the distortion it gives at 10mm is fun as well.
Sigma 50-500mm f/4.5-6.3 (aka the "Bigma"):
I got this lens as a gift from my husband as well, but I knew I'd use this one. 500mm! And it's much sharper than my Canon 75-300mm. I've talked to a few pro wildlife photographers who use Canon 100-400mm lenses and they say that the Bigma is not far off in quality. This lens is great for wildlife and shooting races, but it has one big downside: it weighs 4 pounds all by itself. This means a tripod or monopod is necessary if shooting for any length of time and carrying it around is a chore. Still, it's a great lens if you have the need for something like it. As an interesting side-note, I rented a Canon 70-200mm f/2.8 IS and did a sharpness test comparing it against my Bigma and the Bigma turned out to be sharper!
Sigma 30mm f/1.4:
Photos I've taken with this lens.
In an attempt to get a more shallow depth of field for car photography, which I thought I wanted to get into more, I bought this lens. It's extremely sharp, even at f/1.4 and it does a great job of giving a more shallow DOF than any of my previous lenses, which is awesome for either eliminating a distracting background, but it also performs very well in low-light environments so it's been great indoors as well.
Canon 50mm f/1.8 II:
Photos I've taken with this lens.
During my research before buying the Sigma 30mm, I found this lens, which was a fraction of the price at around $100. The only downside of the lens seemed to be it's construction, so I bought one of these as well just to see the difference between the two. There's no doubt the Sigma 30mm is built better. It's solid, metal, and has a smooth-moving and dampened focus ring. This lens, in contrast, is very light weight, made of plastic, and has the cheesiest focus ring I've ever seen -it's very thin and hard to grip, especially because it's at the very end of the lens. Still, this just might be the sharpest lens I own (it's either this or the Canon 100mm f/2.8) even at f/1.8! My husband and I tend to share the Sigma 30mm f/1.4 and the Canon f/1.8II and use them fairly interchangeably. It's great for getting a shallow depth of field and indoors in low light due to the f/1.8.
Canon MP-E 65mm f/2.8:
Photos I've taken with this lens.
This lens was another gift from my husband. It's not a beginner's lens, that's for sure. I had a hard time with macros when I started on my Canon 100mm, but this lens is several times harder to master. Sure, it goes up to 5X while the Canon 100mm is a maximum of 1:1, so there's that. The bigger the subject, the shallower the DOF, so the harder focusing is and timing the shutter press if you hand hold for macros like most of us do. But, on top of that this lens is "fixed focus". I find that most photographers I talk to that haven't used this lens have little to no idea of what that means, but it's pretty simple really. Take a prime like the Canon 100mm macro, set the focus so it's set to focus as close as possible and then don't move it. That's the MP-E 65mm in a nutshell. There is no focus ring. The focus is in one place that moves as you increase the size of the subject from 1X to 5X, so you are forced to change your focus by moving the camera closer or further away from your subject. At 1X you have to focus just a couple inches from your subject, higher magnifications require you to get closer. And if that's not hard enough to deal with, after 1X the viewfinder gets darker and darker at higher magnifications until at 4X you can barely see your subject indoors, and at 5X the viewfinder is nearly black. Outdoors is better, but still challenging. This, I've found out, is what the focusing lamps on my macro flash is for, but they timeout before I can focus most of the time so, I've just stuck to 1X to 3X so far. I've yet to find a subject that really requires anything higher than that, but I count myself as an advanced beginner with this lens still, so I'll add more if I find anything helpful to pass along.
Thursday, July 8, 2010
Monday, July 5, 2010
How to combine fireworks photos in Gimp
I took my first attempt at fireworks photos last night. I did okay with them, but I couldn't balance the light so that the fireworks came out looking good along with the foreground. Either the foreground was exposed well and the fireworks were blown out, or the foreground was all black and the fireworks came out nice. So, I went home a little disappointed.
While going through my photos I had an idea -combine 3 of the photos: the foreground, and some individual firework shots, and then I'd get something closer to what I had hoped for.
So, I opened a shot of the foreground that I had taken for test purposes in order to get a starting point for my exposure settings:

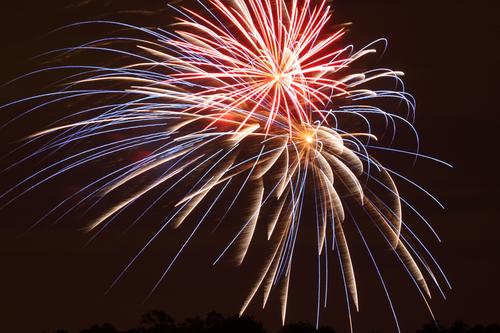
And two separate fireworks photos that I had taken:

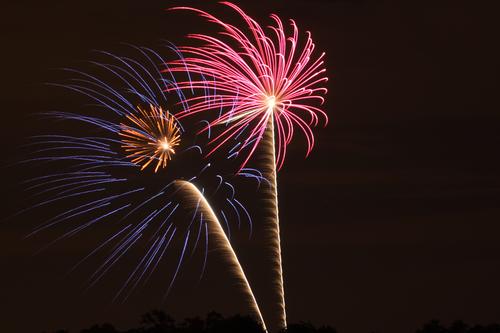
And I opened them in Gimp in different layers (with the background being the first or "background" layer).
I then set the Layer Mode to "Lighten Only" (you do this in the "Layers" window which you can open by clicking on the "Windows" menu > "Dockable Dialogs" > "Layers"). This is the key. "Lighten Only" means that only the parts of the firework layers that are brighter than the background layer will show up. This means the black sky is automatically ignored and just the fireworks show up in the image. No cutting or selecting required -neat huh?
After that it was just a matter of resizing and positioning the fireworks where I wanted them in the image and erasing the parts of the trails that overlapped the tree line so it'd look like they were coming from behind the trees.
When that all looked good, I flattened the image and then created a duplicate layer that I flipped and positioned so I'd get the reflection in the water of the fireworks. I erased the tree line in the new layer since I only wanted the fireworks to be reflected, then applied a "Motion Blur" to the layer so the reflection of the fireworks would be blurred just like the lights on the water.
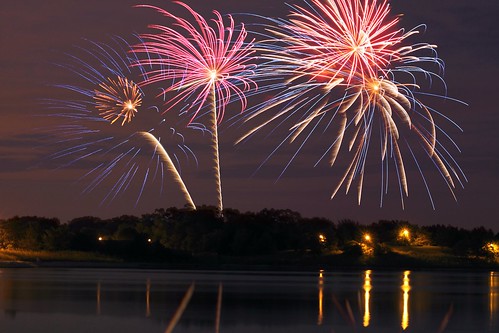
After that I was done. Here's the result:
While going through my photos I had an idea -combine 3 of the photos: the foreground, and some individual firework shots, and then I'd get something closer to what I had hoped for.
So, I opened a shot of the foreground that I had taken for test purposes in order to get a starting point for my exposure settings:

And two separate fireworks photos that I had taken:
And I opened them in Gimp in different layers (with the background being the first or "background" layer).
I then set the Layer Mode to "Lighten Only" (you do this in the "Layers" window which you can open by clicking on the "Windows" menu > "Dockable Dialogs" > "Layers"). This is the key. "Lighten Only" means that only the parts of the firework layers that are brighter than the background layer will show up. This means the black sky is automatically ignored and just the fireworks show up in the image. No cutting or selecting required -neat huh?
After that it was just a matter of resizing and positioning the fireworks where I wanted them in the image and erasing the parts of the trails that overlapped the tree line so it'd look like they were coming from behind the trees.
When that all looked good, I flattened the image and then created a duplicate layer that I flipped and positioned so I'd get the reflection in the water of the fireworks. I erased the tree line in the new layer since I only wanted the fireworks to be reflected, then applied a "Motion Blur" to the layer so the reflection of the fireworks would be blurred just like the lights on the water.
After that I was done. Here's the result:
Sunday, July 4, 2010
My Gear -Cameras
A commenter recently asked me to post my equipment list, so here's the first part:
Canon Elan IIe (film SLR):
My Dad and I bought it while I was in college and we "shared" it for years when I lived at home, then he passed it down to me a few years after I moved out of the house. It is still an excellent camera with most of the bells and whistles that my Canon 30D has, aside from the digital stuff, along with one none of my digital cameras have -it can automatically pick which autofocus point to use by following the movement of your eye. This feature requires some calibration to work, and it's not all that consistent, which is probably why they eventually dropped the feature in their products. I used this camera on it's various "Auto" modes while I was in college and for at least a year after it became "mine" before actually learning to use Manual Mode on it.
Canon 30D (mid-level DSLR):
My first digital SLR. I had decided I wanted a 5D because I was scared to buy a "cropped sensor" camera even though I had no idea what that meant. After a year of saving I had $1500 -half of what I needed for a 5D, but I was already so far behind the switch to digital and anxious to try it that I started researching what "crop sensor" meant to see if a 30D would work for me. I was surprised to learn that crop sensors are actually a benefit to photographers who shoot telephoto more than they do wide because they effectively add to the focal length of your lens. Since, at that time, I was mostly shooting wildlife photos (hence the name "Muddyboots Photography") I decided to go with the 30D and was very happy with it for 4 years. I still use it as a backup to my current camera, it's really nice to have two when you're at an event where you switch from telephoto to wide a lot.
Canon Rebel T1i/500D (budget-level DSLR):
A couple years ago I started getting into insect macros and I found myself struggling to hold the stem of a plant that an insect was on (to steady it) with one hand while operating my camera (one-handed) with the other. The 30D was just too big for my hands and I was jealous of my husband's 40D that had Live View on it, so took care of both issues by buying a T1i last year. -It took some getting used to to use the "Function" button needed to make up for the missing wheel. Otherwise, the camera's been great. There's no quality difference between the Rebel lineup and the 30D/40D/50D lineup, it's just a matter of body style. The Rebel body fits my hands better. I can now easily operate my camera one-handed, plus I have Live View, and video, so I'm thrilled!
Canon G11 (point and shoot):
Photos I've taken with this camera.
My old point and shoot died a few months ago. I hated that camera, but I got it because there was a cheap underwater housing for it, so it was a camera I could take when I went diving. But, I figured this might be the time to find a higher quality point and shoot camera that I wouldn't mind using when I didn't want to haul my SLR gear around with me, so I started doing some research. That was right before the G11 came out, so I was searching for information on the G10 -I loved the body and controls, but it's ISO performance above 200 was horrible, so I decided against it. Shortly after I made that decision, however, the G11 came out. Same body and controls, much better ISO performance, so I jumped on it. Underwater housings for it were about $170 the last time I looked, so it will fill that role as well when I have the money for Caribbean vacations again. I've since taken many photos with it and I must say I'm impressed. I recently printed this photo that I took with it set to ISO 400 at 11x14 and it's flawless without any noise correction at all!
Part II lenses) will be posted in the next day or II -stay tuned!
Cameras:
Canon Elan IIe (film SLR):
My Dad and I bought it while I was in college and we "shared" it for years when I lived at home, then he passed it down to me a few years after I moved out of the house. It is still an excellent camera with most of the bells and whistles that my Canon 30D has, aside from the digital stuff, along with one none of my digital cameras have -it can automatically pick which autofocus point to use by following the movement of your eye. This feature requires some calibration to work, and it's not all that consistent, which is probably why they eventually dropped the feature in their products. I used this camera on it's various "Auto" modes while I was in college and for at least a year after it became "mine" before actually learning to use Manual Mode on it.
Canon 30D (mid-level DSLR):
My first digital SLR. I had decided I wanted a 5D because I was scared to buy a "cropped sensor" camera even though I had no idea what that meant. After a year of saving I had $1500 -half of what I needed for a 5D, but I was already so far behind the switch to digital and anxious to try it that I started researching what "crop sensor" meant to see if a 30D would work for me. I was surprised to learn that crop sensors are actually a benefit to photographers who shoot telephoto more than they do wide because they effectively add to the focal length of your lens. Since, at that time, I was mostly shooting wildlife photos (hence the name "Muddyboots Photography") I decided to go with the 30D and was very happy with it for 4 years. I still use it as a backup to my current camera, it's really nice to have two when you're at an event where you switch from telephoto to wide a lot.
Canon Rebel T1i/500D (budget-level DSLR):
A couple years ago I started getting into insect macros and I found myself struggling to hold the stem of a plant that an insect was on (to steady it) with one hand while operating my camera (one-handed) with the other. The 30D was just too big for my hands and I was jealous of my husband's 40D that had Live View on it, so took care of both issues by buying a T1i last year. -It took some getting used to to use the "Function" button needed to make up for the missing wheel. Otherwise, the camera's been great. There's no quality difference between the Rebel lineup and the 30D/40D/50D lineup, it's just a matter of body style. The Rebel body fits my hands better. I can now easily operate my camera one-handed, plus I have Live View, and video, so I'm thrilled!
Canon G11 (point and shoot):
Photos I've taken with this camera.
My old point and shoot died a few months ago. I hated that camera, but I got it because there was a cheap underwater housing for it, so it was a camera I could take when I went diving. But, I figured this might be the time to find a higher quality point and shoot camera that I wouldn't mind using when I didn't want to haul my SLR gear around with me, so I started doing some research. That was right before the G11 came out, so I was searching for information on the G10 -I loved the body and controls, but it's ISO performance above 200 was horrible, so I decided against it. Shortly after I made that decision, however, the G11 came out. Same body and controls, much better ISO performance, so I jumped on it. Underwater housings for it were about $170 the last time I looked, so it will fill that role as well when I have the money for Caribbean vacations again. I've since taken many photos with it and I must say I'm impressed. I recently printed this photo that I took with it set to ISO 400 at 11x14 and it's flawless without any noise correction at all!
Part II lenses) will be posted in the next day or II -stay tuned!
Thursday, July 1, 2010
Auto Mode Cheat Sheet
Much can be done with a simple point and shoot camera. SLR users choose between two creative settings, aperture and shutter speed, to control depth of field (AKA background blur) and the blur or freezing of motion. Point and shoot cameras give you some control over your depth of field and also allow you to freeze most motion with the standard modes available on all cameras. Blurring motion on purpose can be done as well, but we'll get to that last. I want to really focus on the ease of the first three -those alone will give you the control you need to take most photos.
Portrait Mode (the icon looks like a woman's head):
This is how you blur the background.
-The closer you are to your subject, the more background blur you'll get.
-The farther away your background is, the more background blur you'll get.
Landscape Mode (the icon looks like mountains):
This is how you keep everything in the photo sharp (avoid background blur).
-Focus a third of the way into the distance of the photo to get everything from close to far in focus (mostly for landscape shots like flowers in the foreground, mountains in the background).
Sports Mode (icon looks like a person running):
This is how you freeze motion.
-In low light, freezing motion may not be possible. Changing to "P" mode may get you better results.
P Mode (icon is the letter "P"):
P Mode usually allows you to take control over your ISO. Some cameras may let you control ISO even in the various auto modes, either way should work.
-ISO controls how fast your camera records light to make a photo. 100 is slower than 800.
-Higher ISO's (like 800) mean your camera makes more mistakes. Those mistakes show up in your photos as "noise" or that grainy, static-like appearance you've probably seen before (usually when viewing a photo at 100%).
-Generally ISO is set as follows:
-ISO 100: Bright sun
-ISO 200: Overcast, but bright (you can still see shadows on the ground)
-ISO 400: Overcast with no shadows or bright indoor lighting
-ISO 800: Average indoor lighting
-To blur motion, choose an ISO lower than the lighting conditions you are in.
-To freeze motion, choose an ISO higher than the lighting conditions you are in.
Subscribe to:
Posts (Atom)