Okay, first let's talk about the situation. You're being asked to take a photo of one person against a white wall with a window to the camera's left (the model's right). The window has blinds on it so you can close or open them as you see fit. Outside it's bright, but cloudy so the light's fairly nicely diffused by the clouds, but since it's on the model's right side, it only lights half of her face. Overhead there is a 60W tungsten light bulb in a fairly normal (slightly diffused) ceiling fixture.
Here's a diagram:
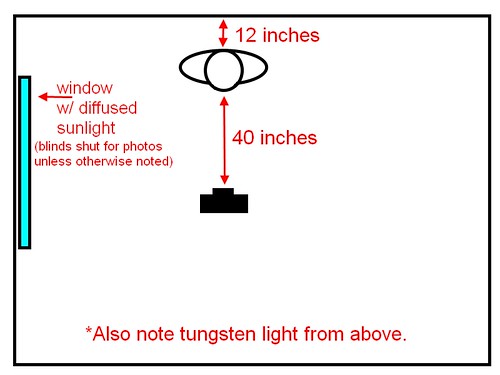
If you close the blinds and take a shot using only the room lighting (the tungsten bulb) here's what you get:

Note the fairly well-defined shadow under her nose and lips and also on her neck due to the lighting from above. Also, the light's not catching her eyes well since her brow is blocking most of the light from above.
If you open the blinds to allow the light from the window in you get this:

That's softened the shadow on the neck and under the lip, but it's created a shadow from her nose on the left side of her face and we really want more light on the left side too.
To get more light on her left side, we'll grab a reading lamp with a 100W equivalent daylight-balanced CFL in it and put it to the model's left (camera right). Here's the result:

Wow, the lamp is brighter than the window light, so now we have sharply defined shadows from the lamp on the model's right side from her chin and nose!
Perhaps we can tone down and diffuse the lamp light by putting something in front of the bulb? Let's try a piece of copy paper held in front of the bulb pointed at the model:

That softened the shadows on the face nicely. The shadow on the neck's still there, but I'd call this acceptable!
But what if there was no such reading lamp? Perhaps we could try flash instead? Here's one using the on-camera (pop-up) flash:

Whoa! That's harsh -check out the highlights in the hair, under the eyes, on the chin, and the sharp "chinstrap" shadow on the neck. This isn't very flattering light, it needs to be softened a LOT!
So, let's try putting something in front of the flash to help disperse the light better. A tissue or a paper towel would work, but all I could find was some toilet paper. Let's try to make due with that -I folded it a few times, then put it over the flash and here's the result:

That toned the highlights down, but only slightly and the more we diffuse the flash, the less light we get out of it and the worse the shadow under the nose will get due to the overhead light.
So, let's try a more powerful flash. Below is the result of attaching a Canon 580EX flash on ETTL and aimed directly at the model.

Not too surprisingly, just like the pop-up flash, the 580EX straight-on is too harsh.
Let's try attaching one of those cheap $5 diffusion caps to the flash head (keeping the flash pointed directly at the model):

Well, that diffused fairly well -the highlights are softer, but there's enough light to soften the shadow under the nose too. The shadow on the neck under the chin is still quite dark and well-defined, though.
Let's try taking the diffuser cap off and pointing the bare flash bulb at the ceiling instead.

Wow! That did a great job of getting rid of that "chin strap" effect of the sharp shadow on the neck under the chin! There's enough shadow to show definition, but they are soft so they aren't distracting. I'm counting this one as a keeper.
I have one more thing in my bag I'd like to try, a Lumiquest Pocket Bouncer. Let's attach that and try it with the default white surface.

Hmm... chin strap is back. The rest of the shadows look good, though.
...this article was really to spur some discussion, so feel free to comment here, on the individual photos on flickr, or on the mailing list. I'd be happy to try other techniques and take more sample photos as well as explain the how's and why's of the above photos if you have questions. Otherwise, stay tuned for part two of this article where we'll discuss white balance and the how's and why's of using gels on your flashes.
