The real issue here is that your camera has no idea what you are taking a picture of muchless what you want it to end up looking like. To determine how light or dark your photo will be, it's programed with a very simple goal in mind -make every photo average out to a pre-defined "average" tone (about the same shade as the palm of your hand). This works well most of the time, but not so much when you have a lot of really light or dark tones in your photo.
Here's a different way to put it: Your camera assumes that if the photo you are about to take a picture of was blurred 100%, it'd come out to be the same tone as the palm of your hand (tone = how light or dark the resulting color would be).
So, when you take a photo that's very light (like a snowman in a snow covered field) the camera has no idea why it's so bright and will darken it up so it comes out looking gray instead of white. Or when you take a picture of something dark (like silhouettes) they tend to come out lighter than you wanted (they come out gray instead of black) because the camera has to tone down all that black to make that "average tone". So, either way -with really light or really dark scenes, everything moves towards this medium-gray, but how do you fix it? It depends on what kind of camera you have!
FOR POINT AND SHOOTS OR SLR'S WITH EXPOSURE COMPENSATION:
Check your camera's manual to see if it offers exposure compensation in the mode you're using.
Exposure compensation lets you tell the camera to make the photo lighter or darker without jumping through hoops to "trick it" into doing so. Each camera works differently, but you should be able to either move an indicator on a graph that looks like this:
[-2...-1...0..+1..+2] (Nikons have the positive numbers to the left, but it doesn't really matter.)
or change the value of a number ie: "EV +1" or "EV -2".
When you move the numbers towards the negative side you're telling the camera to make the photo darker. Positive numbers mean the photo will come out lighter.
So, for silhouettes, you'll want to try maybe "-1" and see how that works. If it's still not dark enough try -1.5 or -2 -just keep playing with it 'til you're happy.
FOR POINT AND SHOOTS WITHOUT EXPOSURE COMPENSATION:
To get around your camera's "average tone" assumption, you'll have to trick your camera. If you want it darker, point it at something lighter -like the sky! Point your camera at the sky just above or next to whatever you want to be in silhouette and then push the shutter half-way to lock in the exposure. Then re-frame the shot to include whatever you want to appear in silhouette and push the button the rest of the way down to take the picture. (Pushing the shutter half-way usually locks in your focus as well as your exposure, so if your subject is close it may come out blurry -just experiment with it to see what distances work for your camera).
Monday, June 30, 2008
Friday, June 20, 2008
round the bend by rex dart: eskimo spy
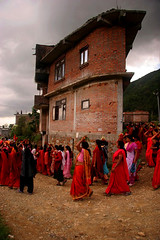
I saw this photo on Flickr and thought it was a great example of why I so often I've encourage new photographers to go out and seek others' work to get inspiration as well as to develop their own eye for what makes a photo good.
This photo caught my eye because it shows a side of the world and a culture I'm not familiar with. I like the warm tones, the repeating color that the women are wearing, the unusual building (that I thought was just the facade of some ruins at first), and the storm cloud looming overhead. There's a clash between the warm feeling and the impending storm that intrigues me. And the description of the photo says that this is an annual event and the women are all carrying flowers in pots on their heads. This adds another layer of mystery to the photo -why?
I find mystery in a photo helps hold the viewer's attention -they linger on it longer pondering those "whys". So, what kinds of events happen where you live that may be considered strange by the people in THIS photo? -I'm using this photo to look at my everyday life as an outsider and attempting to put myself in the shoes of a tourist as a venture into the world this weekend. Perhaps I'll be inspired to photograph something usual in an unusual way.
Monday, June 16, 2008
Why learn about aperture and shutter speed?
Auto modes do a good job of capturing the world as you see it. Most of the time, though, these kinds of photos are seen as "snapshots". The semi-manual modes (the "priority modes") on your camera can give you considerable control over your photos to produce the end-result that YOU want rather than just taking whatever comes out of the camera as-is.
So, here's some inspiration. (You can click on any of the photos to view a larger version, the EXIF data, leave comments, etc.)
Aperture Priority Mode:
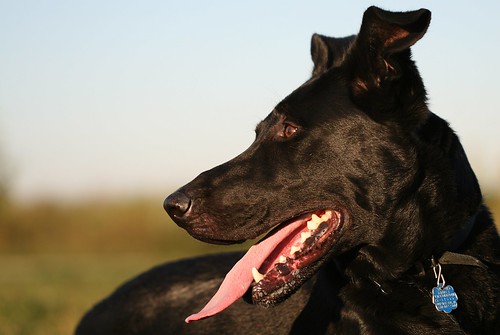
Small-numbered apertures (like f/4) will give you a more shallow depth of field. This can be useful when you have an ugly background like in the photo below where the background would have been a bunch of scrub brush in the distance at the local dog park:
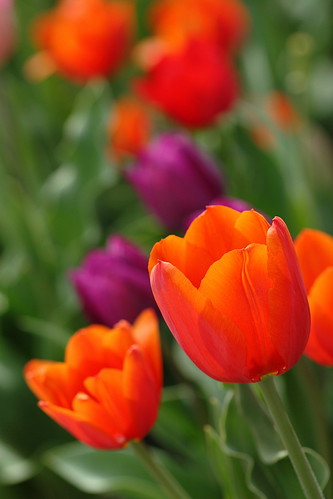
Another thing you can do with a shallow depth of field is place the viewer's attention on one specific thing like in this photo where I picked one particular tulip as the subject. Keeping the rest in-focus would have made the shot too busy and this one tulip (backlit so beautifully by the sun) would have gotten lost:
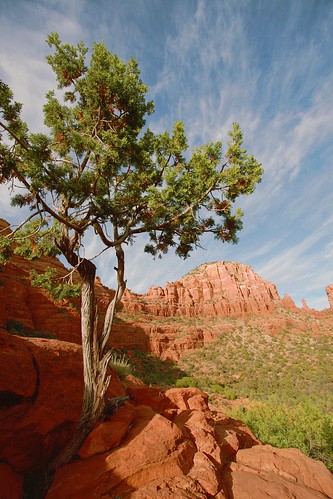
Large-numbered apertures give you larger depth of field, which allows everything in the shot to be in focus from near to far like this:
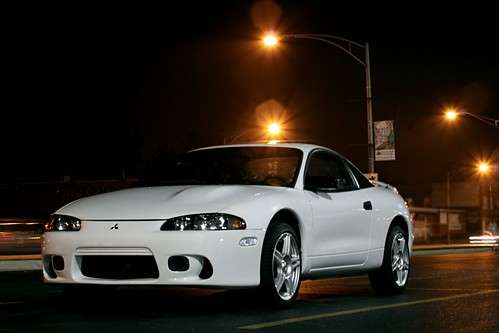
When taking shots at night, using a large-numbered aperture will give bright lights a star-like effect:
Shutter Speed Priority Mode:
A fast shutter speed will freeze action like this:

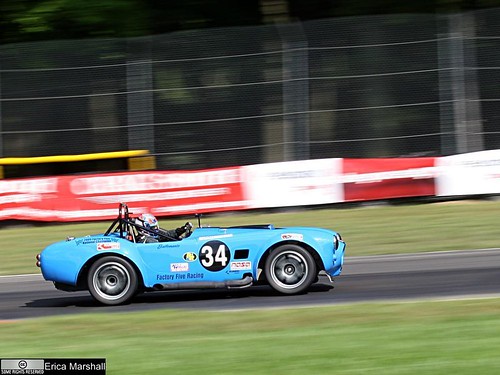
A slightly slower shutter speed like 1/60th to 1/125th can be hand held and moved along with something that's moving fast to create a "panned shot" like this one:
A slow shutter speed can be used for all sorts of things. The downside is you'll need a tripod for all of the following types of shots.
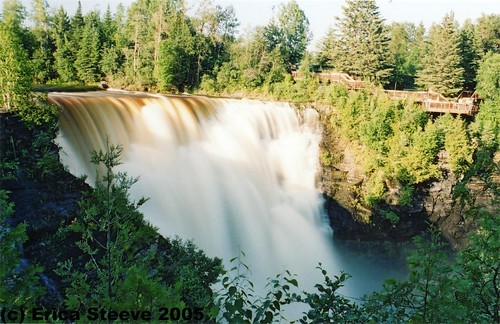
First, at about 1/6th to 1/8th of second you can blur the water in a waterfall to create a silky, milky water effect like this:
Or if you use 5 to 10 second exposures you can do light painting like this:

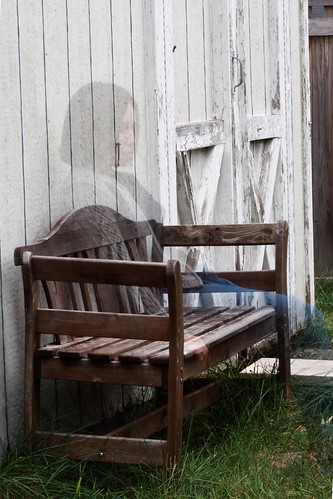
Or "ghostly" photos like this:
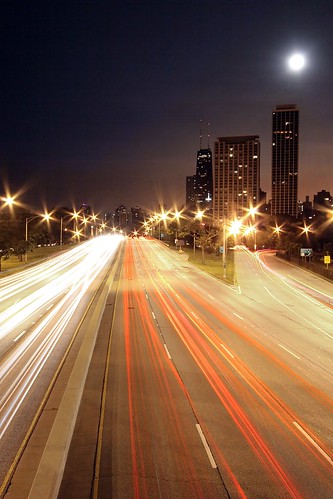
And even longer exposures can give interesting results when you have lights that move like on ferris wheels or moving traffic like this:
I hope this gives you an idea of the kinds of decisions that are open to you when you know how to use the creative controls on your camera. Learning to use them isn't that hard, but the rewards are pretty awesome.
So, here's some inspiration. (You can click on any of the photos to view a larger version, the EXIF data, leave comments, etc.)
Aperture Priority Mode:
Small-numbered apertures (like f/4) will give you a more shallow depth of field. This can be useful when you have an ugly background like in the photo below where the background would have been a bunch of scrub brush in the distance at the local dog park:
Another thing you can do with a shallow depth of field is place the viewer's attention on one specific thing like in this photo where I picked one particular tulip as the subject. Keeping the rest in-focus would have made the shot too busy and this one tulip (backlit so beautifully by the sun) would have gotten lost:
Large-numbered apertures give you larger depth of field, which allows everything in the shot to be in focus from near to far like this:
When taking shots at night, using a large-numbered aperture will give bright lights a star-like effect:
Shutter Speed Priority Mode:
A fast shutter speed will freeze action like this:
A slightly slower shutter speed like 1/60th to 1/125th can be hand held and moved along with something that's moving fast to create a "panned shot" like this one:
A slow shutter speed can be used for all sorts of things. The downside is you'll need a tripod for all of the following types of shots.
First, at about 1/6th to 1/8th of second you can blur the water in a waterfall to create a silky, milky water effect like this:
Or if you use 5 to 10 second exposures you can do light painting like this:
Or "ghostly" photos like this:
And even longer exposures can give interesting results when you have lights that move like on ferris wheels or moving traffic like this:
I hope this gives you an idea of the kinds of decisions that are open to you when you know how to use the creative controls on your camera. Learning to use them isn't that hard, but the rewards are pretty awesome.
Subscribe to:
Posts (Atom)