Think about it. Light is what photography is about. So, it's really important to notice it. The color, the direction, the shadows that result.
Next time you're driving an hour or so after sunrise or before sunset, notice the warm color and the long shadows. If you're driving North to South (or South to North), notice that one side of the road is in shadow and the other is bathed in beautiful warm light. Then ask yourself, in which direction would you want to look for photo opportunities?
The answer seems obvious in writing, but the majority of us have hundreds of sunset photos in our portfolios. Next time, try turning your back to the sunset and look for the photo ops that everyone else misses. The joy you get from being the one person in a crowd who's facing the "wrong" direction is a great bonus too! ;-)
Showing posts with label light. Show all posts
Showing posts with label light. Show all posts
Monday, May 17, 2010

Tuesday, March 9, 2010
White balance
Have you ever driven down a residential street or looked at an apartment complex at night and noticed how orange or blue the light is coming through some of the windows? Of course, it doesn't look orange or blue when we're in the room. -It's funny how hard it is to see the color of the light that surrounds us, but in order to become better at getting white balance right, that's exactly what we need to do.
To set up our options, I'll list the white balance options you'll find on most cameras:
* Auto
* Tungsten (aka incandescent or indoor)
* Fluorescent
* Flash
* Daylight
* Cloudy
* Shade
"Auto" is often wrong, so for the best accuracy you can set your white balance for the conditions you are in. For example, use:
* Tungsten: for normal "soft white" indoor lighting
* Fluorescent: for the long-tubed fluorescent lighting that you often find in garages and gyms
* Flash: for when you use flash
* Daylight: outside in sunlight
* Cloudy: outside in cloudy conditions
* Shade: outside in the shade
That will get you 90% of the way there -certainly close enough so that only minor tweaks might be needed in software to get your photo to look right.
If you want to understand what it is that the options are doing you'll be able to make better decisions in the field when the setting that matches your conditions isn't giving you what you want. It'll also let you use white balance settings to creatively add a color cast to your photo on purpose.
First, lets go over the color wheel really quick so we can remember what colors are opposites of each other:
* red - green
* orange - blue
* yellow - purple
* green - red
* blue - orange
* purple - yellow
So, when there's a color tint to the light, your white balance setting just adds the opposite color to the photo in an attempt to correct the tint to make white.
* Tungsten: the light is orange-tinted, so the camera corrects for it by adding blue
* Fluorescent: the light is blue/green-tinted, so the camera corrects for it by adding red/orange
* Flash: the light is blue, so the camera corrects for it by adding orange
* Daylight: the light is pure white, so it needs no correcting
* Cloudy: the light is slightly blue, so the camera corrects for it by adding a little orange
* Shade: the light is blue, so the camera corrects for it by adding orange
This means that by taking a photo in daylight with a white balance setting of "shade", your photo will have a very blue tint to it -this can artificially create the look of dusk in a photo taken in the middle of the day.
Of course, if you accidentally left your white balance on "Shade" and shot in the daylight maybe the blue cast wasn't what you're looking for -setting your white balance yourself is slightly risky because if you forget to set it when conditions change, your photos will not turn out as expected.
This subject inevitably leads some to ask -why not leave your white balance on "Auto" and correct for the color cast in software? The answer is ...well, it depends. If you shoot Jpg's, then dramatic color changes can degrade your image, so getting your white balance as close as possible is recommended. If you shoot in RAW, then yes you can adjust it in software with no degradation of the image -as long as you make your white balance adjustments in your RAW file without first converting it to a Jpg (which would defeat the point).
Saturday, January 2, 2010
Lighting techniques
Many times when shooting an event or while at a family function you'll be called upon to take a photo of a person or group against a wall; so this a good project for beginners to practice. I'm going to walk you through one sample situation and we'll discuss some different ways that you could take the photo and their good and bad points. Note that this is part one of a two part article. This part will discuss quality of light only. The next article will discuss the color of the light. You'll notice that there are different color casts to the example photos included below -please ignore them for now. I want to tackle one issue at a time so, for now, we'll be focusing on the quality of light only.
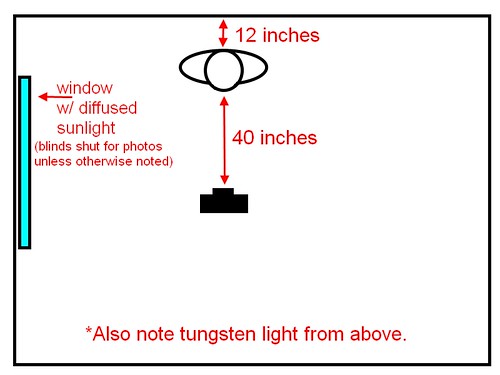


Okay, first let's talk about the situation. You're being asked to take a photo of one person against a white wall with a window to the camera's left (the model's right). The window has blinds on it so you can close or open them as you see fit. Outside it's bright, but cloudy so the light's fairly nicely diffused by the clouds, but since it's on the model's right side, it only lights half of her face. Overhead there is a 60W tungsten light bulb in a fairly normal (slightly diffused) ceiling fixture.
Here's a diagram:
If you close the blinds and take a shot using only the room lighting (the tungsten bulb) here's what you get:
Note the fairly well-defined shadow under her nose and lips and also on her neck due to the lighting from above. Also, the light's not catching her eyes well since her brow is blocking most of the light from above.
If you open the blinds to allow the light from the window in you get this:
That's softened the shadow on the neck and under the lip, but it's created a shadow from her nose on the left side of her face and we really want more light on the left side too.
To get more light on her left side, we'll grab a reading lamp with a 100W equivalent daylight-balanced CFL in it and put it to the model's left (camera right). Here's the result:
Wow, the lamp is brighter than the window light, so now we have sharply defined shadows from the lamp on the model's right side from her chin and nose!
Perhaps we can tone down and diffuse the lamp light by putting something in front of the bulb? Let's try a piece of copy paper held in front of the bulb pointed at the model:
That softened the shadows on the face nicely. The shadow on the neck's still there, but I'd call this acceptable!
But what if there was no such reading lamp? Perhaps we could try flash instead? Here's one using the on-camera (pop-up) flash:
Whoa! That's harsh -check out the highlights in the hair, under the eyes, on the chin, and the sharp "chinstrap" shadow on the neck. This isn't very flattering light, it needs to be softened a LOT!
So, let's try putting something in front of the flash to help disperse the light better. A tissue or a paper towel would work, but all I could find was some toilet paper. Let's try to make due with that -I folded it a few times, then put it over the flash and here's the result:
That toned the highlights down, but only slightly and the more we diffuse the flash, the less light we get out of it and the worse the shadow under the nose will get due to the overhead light.
So, let's try a more powerful flash. Below is the result of attaching a Canon 580EX flash on ETTL and aimed directly at the model.
Not too surprisingly, just like the pop-up flash, the 580EX straight-on is too harsh.
Let's try attaching one of those cheap $5 diffusion caps to the flash head (keeping the flash pointed directly at the model):
Well, that diffused fairly well -the highlights are softer, but there's enough light to soften the shadow under the nose too. The shadow on the neck under the chin is still quite dark and well-defined, though.
Let's try taking the diffuser cap off and pointing the bare flash bulb at the ceiling instead.
Wow! That did a great job of getting rid of that "chin strap" effect of the sharp shadow on the neck under the chin! There's enough shadow to show definition, but they are soft so they aren't distracting. I'm counting this one as a keeper.
I have one more thing in my bag I'd like to try, a Lumiquest Pocket Bouncer. Let's attach that and try it with the default white surface.
Hmm... chin strap is back. The rest of the shadows look good, though.
...this article was really to spur some discussion, so feel free to comment here, on the individual photos on flickr, or on the mailing list. I'd be happy to try other techniques and take more sample photos as well as explain the how's and why's of the above photos if you have questions. Otherwise, stay tuned for part two of this article where we'll discuss white balance and the how's and why's of using gels on your flashes.
Friday, February 27, 2009
Tips on dealing with backlighting
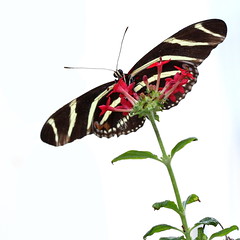
"Backlighting" just means that there's light behind your subject. An example of this would be lining your friends up in front of a sunset to take their photo -the sun would be behind your friends, so they'd be backlit.
What happens with a typical backlighting situation is that your camera sees all that light aimed towards it, so it makes the photo darker to compensate for the excess light. The problem is, the part you want exposed properly is in shadow because of all the light coming from behind, so when the camera darkens the photo, your subject comes out almost black.
There are a few ways to fix this. You can:
* Meter off of your subject instead of metering the whole scene.
* Use exposure compensation to brighten the photo.
* Use fill flash for portraits and other photos where your subject
is small enough and close enough for it to be effective
How these changes effect your background:
If you choose to meter off your subject or use exposure compensation to brighten them, remember that you'll be brightening the entire photo. This was what I intended for the butterfly shot at the top of this post, I wanted the sky to go white behind it. But, for sunset shots this will wash out the beautiful colors of your sunset. For portraits in front of sunsets, use flash. This will balance the light of the sun with the light of your flash and will allow more color to be kept in the sunset.
Subscribe to:
Posts (Atom)