Wednesday, October 15, 2008

How bad is Jpg's lossy compression?

My workflow is:
  • Take photo in RAW format
  • Open in DPP
  • Make any large changes to brightness, contrast, saturation and brightness that are necessary in DPP
  • Convert the image to jpg
  • (Optional) Open the jpg in noise reduction software, reduce noise, re-save as jpg.
  • Open the photo in Gimp and make the rest of the changes that are necessary.
As you can see, I often save an image in jpg format 2-3 times (sometimes more). Actually piping up and telling people about it has recently stirred a debate about how bad of an idea my workflow is. Let me be clear: I agree that saving as png or TIFF would be better because they are non-lossy formats, but when I use these formats I loose my EXIF data. Because I've seen no quality loss in my photos as a result of re-saving them as jpg's, I've just adopted this as my workflow. Prints up to 11x14 are done and consistently show no issues with it.

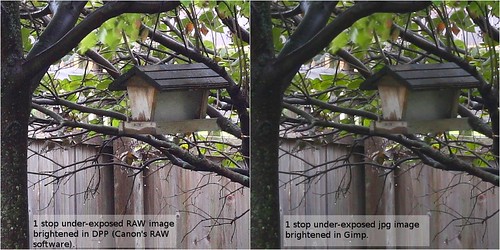
Understanding the risks of using jpg allow me to tailor my workflow to reduce the common issues in jpg quality loss. First, I make all big changes in brightness, etc in DPP where I'm working with the RAW file and not the jpg. And second, I always save the jpg in 100% quality.

But some people aren't convinced that this workflow can yield good results (even though they can see all my photos at their full size on my Flickr account). So, I took a photo in jpg (fine) format on my Canon 30D, opened it in Gimp and re-saved it as a jpg at 85% quality (remember, I usually save as 100%). Then I opened the image in Paint.NET and re-saved it a 2nd time as a jpg at 85% again. I alternated between Gimp and Paint.NET in case the programs could tell the image was unchanged and out-smarted me by not actually re-running the compression on the image for the next save. In the end I re-saved the image 10 times between the two programs. A 100% crop of the result is shown below along side the same crop from the original jpg for comparison:

Jpg quality loss test
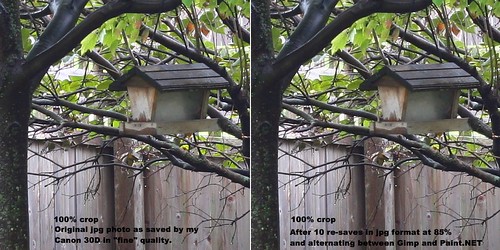
(click on the image to go to the Flickr page where you can see it at it's original size)

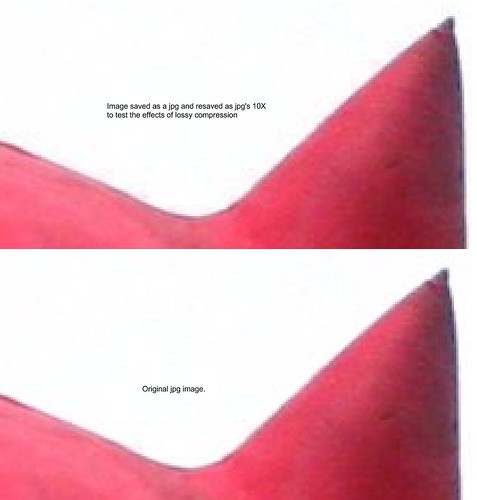
To be sure, there *is* a difference. Here's another comparison -done the exact same way, but at 800% magnification (when viewed at it's original size -click on the photo, then go to "All Sizes" > "Original" to view it at 800%):

Jpg lossy test #2

These tests show why I don't loose sleep over re-saving a jpg at 100% quality (all tests were done at 85% quality) one or two times in my workflow. ...I actually thought the difference would be much greater considering everything I've read via google on the matter!

I welcome discussion about the test itself as well as it's outcome in the comments here, on Flickr, or on the Photography_Beginners yahoogroup.

RAW vs Jpeg

I've encountered a lot of misconceptions about shooting RAW vs Jpg. I've heard people say that they've taken a shot in RAW format and another shot in Jpg and compared them and found no difference. This is true -there's little difference between the two as they come straight from the camera. The difference is clear, however, when you need to change the photo's brightness, white balance, saturation, or contrast.

To demonstrate this I put my Canon 30D on "RAW + Jpg (fine)" mode, which records both a RAW file and a Jpeg file with one push of the shutter button. I then took a picture that was underexposed by 1 stop. (Translation = it was deliberately taken so that it was a little too dark.) Then I opened the RAW file in DPP (Canon's RAW software and brightened it by 1 stop). Then I opened up the original Jpg file in Gimp and brightened it by 1 stop as well. I then took 100% crops (small pieces of the photo so they could be compared at full size) of both and here's the result:

Jpg vs RAW test
(click on the image to go to Flickr page where the full size version can be seen)

...I welcome critique of the test as well as discussion about the outcome in comments here, on my Flickr page, or on the Photography_Beginners yahoogroup.

Monday, October 13, 2008

Troubleshooting: Backlighting

The other day I was watching the sun rise over the lake in Chicago. It was a beautiful sight and while I was taking photos of the buildings reflecting the beautiful orange light, most of the people around me were lining their friends up in front of the sunrise and taking their photos.

There are thousands of people who do this every day, but unfortunately I think most of their photos will come out darker than they wanted. The problem is that, with their backs to a strong light source, the side of their body that face the camera is entirely in shadow. Also, the strong light source overwhelms the camera and it darkens the whole photo down to compensate, which makes those shadows even darker.

The fix? The easiest way to fix this is to turn the flash on and use fill flash to brighten your friends up to match the brightness of the sun in the background. With an advanced camera you'll have something called "exposure compensation", which is just a fancy way of saying that you can brighten or darken the photo yourself. This is the other way to fix this issue -just set the brightness up somewhere between "+1" and "+2". That should help as well.

Wednesday, October 8, 2008

Best time of day to take photos?

Many times we go out to take photos during mid-day when it's convenient for us, but photos taken at this time when the sun is it's brightest and high in the sky can result in a washed out look for colors as well as overly bright and overly dark areas because of the great difference in brightness of areas in the sun vs shade.

So, a little extra thought about lighting and it's effect on your photos can really help your photography. I just learned a great rule of thumb for when the lighting is best for photography:

"Shoot when your shadow is longer than you are tall"

The exception is overcast days. When it's bright, but overcast (meaning you can see your shadow, but it's a fuzzy blob on the ground rather than a sharp-lined silhouette) it's a great time to take close-up photos of flowers, insects, and any other photos that don't include the sky (because white or gray skies are pretty boring).

So, pay attention to your shadow to gage the lighting conditions and improve your photography!