First, you have to understand histograms. If you don't, read about them here:
http://photography.muddyboots.org/histogram
Then, check this out 'cause it's quite cool!
http://www.ironicsans.com/2007/09/idea_the_histogram_as_the_imag.html
Friday, September 28, 2007
Wednesday, September 26, 2007
Simplicity
So, I decided to break away from my botanical shots and just do whatever comes to mind. On my way home from work, I saw that there were already some leaves turning color, so out of habit or inspiration (who knows?) I decided to do an "Autumn Leaves" shot.
My concept was something along the lines of the gods of autumn painting the leaves their colors. What I really wanted to do was take my leaf skeletons (seen here), possibly paint them green, and then pour red and yellow paint onto them, catching the paint pour in the photo. But, that was a bit complicated -I wasn't sure how to stage it. So, I painted the leaf skeletons red, orange, and yellow instead, and then staged a shot where the paintbrush hung over the leaves by a thread I could clone out. I tried it 2 ways -with the paintbrush still to show detail, and with the brush swinging to get some motion blur. Neither worked in my opinion:
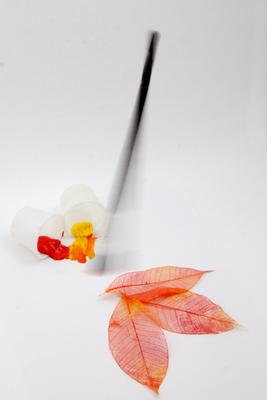
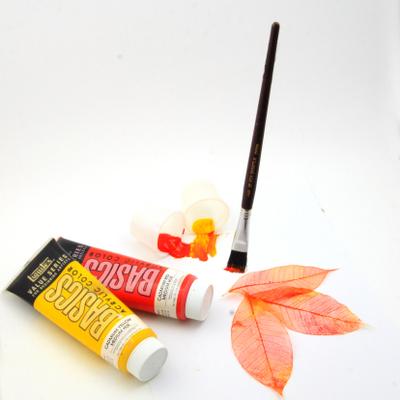
I thought the paint was too much and the leaves just weren't right. And the idea of the paintbrush hovering wasn't coming through because there was little to hint at such a 3-D space. So the next day I gathered a few colorful leaves -there weren't many, but I found a few, and I tried again. I thought this time I'd do something similar, but make the leaves more central since they are the main idea anyway. Unfortunately, I failed again.
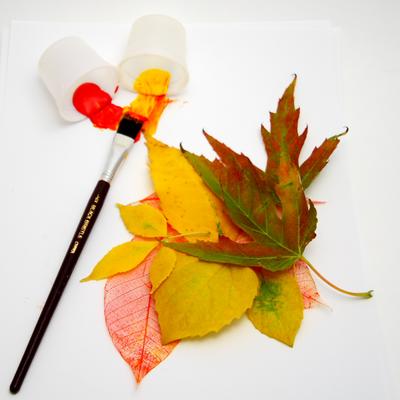
This one was getting a bit closer. It was less gimmicky, more about the leaves, but again -the paint buckets weren't showing up against the white. At this point, they were days old, the paint was dry, and they were very stuck to the white paper. I didn't really want to redo the photo with a black background and felt that the paintbrush would get lost if I did that anyway. So, I decided to lose the paint buckets. That left me with leaves and a brush. I arranged the items in several different ways, and eventually decided to simplify the shot by choosing just one leaf. As soon as I looked through the camera, I knew I was getting closer. Here's the end result:
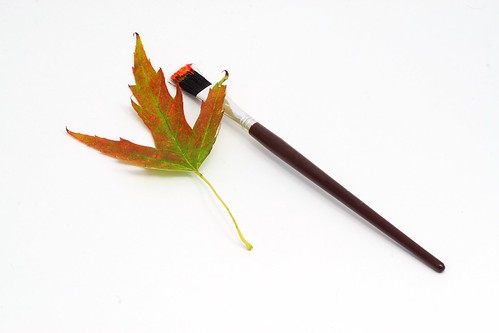
It looks quite nice large. I'm currently using it as my wallpaper and I think that although it underwent many changes, it still conveys the same feeling that I was hoping for when I first conceived of the project.
What do you think? Feel free to comment here, on the Photography_Beginners yahoogroup, or on Flickr.
My concept was something along the lines of the gods of autumn painting the leaves their colors. What I really wanted to do was take my leaf skeletons (seen here), possibly paint them green, and then pour red and yellow paint onto them, catching the paint pour in the photo. But, that was a bit complicated -I wasn't sure how to stage it. So, I painted the leaf skeletons red, orange, and yellow instead, and then staged a shot where the paintbrush hung over the leaves by a thread I could clone out. I tried it 2 ways -with the paintbrush still to show detail, and with the brush swinging to get some motion blur. Neither worked in my opinion:
I thought the paint was too much and the leaves just weren't right. And the idea of the paintbrush hovering wasn't coming through because there was little to hint at such a 3-D space. So the next day I gathered a few colorful leaves -there weren't many, but I found a few, and I tried again. I thought this time I'd do something similar, but make the leaves more central since they are the main idea anyway. Unfortunately, I failed again.

This one was getting a bit closer. It was less gimmicky, more about the leaves, but again -the paint buckets weren't showing up against the white. At this point, they were days old, the paint was dry, and they were very stuck to the white paper. I didn't really want to redo the photo with a black background and felt that the paintbrush would get lost if I did that anyway. So, I decided to lose the paint buckets. That left me with leaves and a brush. I arranged the items in several different ways, and eventually decided to simplify the shot by choosing just one leaf. As soon as I looked through the camera, I knew I was getting closer. Here's the end result:
It looks quite nice large. I'm currently using it as my wallpaper and I think that although it underwent many changes, it still conveys the same feeling that I was hoping for when I first conceived of the project.
What do you think? Feel free to comment here, on the Photography_Beginners yahoogroup, or on Flickr.
Monday, September 24, 2007
Adjusting the use of this blog a bit
Trying to tie myself to a weekly article has been a bit overwhelming lately with all kinds of other stuff going on in my life and my sporadic posts are generating very little traffic anyway. So, I'm moving my content back over to http://photography.muddyboots.org and will use this blog for personal stories about how I've created photos, current projects, and first-drafts of articles for the website.
I'll also post links to new articles on the site here since it's easier to watch the blog for updates rather than comb through the site looking for what's new.
So, if you've been reading -thanks and don't worry. The content will remain online and I will also continue adding to it. Just at a pace that'll allow me to push out more meaningful information rather than just posting to post something.
Anyway, seeya around!
Wednesday, September 12, 2007
Botanical Bathroom Project
I'm in the middle of painting my bathroom right now and while trying to decide what theme I'd like to go with in there, my Mom asked me if I could take some botanical shots for her bathroom. Hmm... I thought -there's an idea. So now, I'm looking to take at least three good botanical shots for us to use for our bathrooms.
At first I thought it'd be easy. I mean, what's more cliche' than botanical shots? -I immediately went to Bed Bath & Beyond and Linen's n' Things to see what they had for inspiration. I didn't find much. Searching for "botanical" on Flickr and Google Images didn't result in much either. The one place I did find some inspiring photos is allposters.com (that link will bring you to the botanical section).
So, I saved a few items that I liked from there:
* A set-up shot with twigs in a vase and a plate of rocks
* A set of 3 photos of curly things or 3 acorns (or anything of similar shape would work)
* A couple of pinecones in a comical arrangement
* A set of 3 matched studio shots of leaves
The most "doable" one is the last one. A kind of study of leaves resulting in a matched set of photos, all framed the same way. I think it'd be a nice clean look and it comes close to the photo that I took this weekend (although I think I'd like more recognizable leaves -Oak (although that local itch mite breakout makes me not wanna go anywhere near an Oak tree right now), Maple, and I like the fern... Maybe I can get one cheap at a garden shop.
Anyway, this project is "in progress" -I'll update this blog entry when I have some final images.
Monday, September 10, 2007
Auto Modes
Just wanna take somme good pictures without having to learn a bunch of technical mumbo-jumbo? Learning what the different auto modes on your camera really do can really help improve your photos.
- Auto (green square): it just finds middle of the road settings as far as I know... It "just works" in most situations, so if you find yourself in a whirlwind of activity or otherwise just don't want to worry about it, this mode will work. But you'll probably get better shots in other modes.
- Portrait (woman's head): blurs distracting backgrounds in front of and behind your subject -works well for a variety of shots, but your focus must be right on or your subject may be blurred as well. (For maximum background blur, the person or object you are focusing on should be within 20 feet of the camera.)
- Landscape (mountains): the opposite of Portrait, it makes sure the parts of the photo that are beyond whatever you are focusing on are in-focus as well
- Night (stars, moon): this mode tells the camera that it's flash won't reach far enough to illuminate everything you want to show up in the photo, so it'll use a longer shutter speed as well in order to get everything to show up in the photo. A tripod is a must in this mode.
- Macro (flower): tells the camera you need to focus much closer than usual. This mode usually results in a lot of foreground and background blur just like Portrait mode does, so be extra careful that your focus is correct!
- Sport (stick figure, running): the camera will choose a high shutter speed to freeze action. This will result in a short depth of field, much like Portrait Mode, so be careful of the focus! Sometimes its actually better to get a bit of blur in action shots to show movement. You may want to give the green square a try for sports. If you don't get any blur with the green square, you can try Landscape instead.
Wednesday, September 5, 2007
Rule of thirds -the short version
I know I've already done this, but I've made a little drawing that may help people "get" the rule of thirds thing a little quicker than my previous full-page article did. It is here: link.
Subscribe to:
Posts (Atom)