I'm offering my Manual Mode Course in one of two ways for November. You can take the course via email at your own pace or as a group starting November 9th. The cost, either way, is the same as always -$99.
All you need for the course is a camera capable of Program Mode ("P" on your mode dial), Aperture Priority ("A" or "Av"), Shutter Speed Priority ("S" or "Tv"), and Manual Mode "M") and a tripod. The tripod doesn't need to be fancy, a $25 Walmart one is just fine.
The course is set up in 4 parts. When done as a group it's a part a week for 4 weeks. It's light on reading and heavy on hands-on practice. If taking it as part of a group it'll happen as part of a mailing list this time around rather than the Flickr group used in the past. You'll need an hour for practice at least 2 nights a week (minimum) and a few hours over the weekend in order to get the practice and projects completed in order to get the most out of the course. It's a strenuous 4 weeks for many people with busy lives, which is why I'm now offering "at your own pace" lessons via private email as well.
If you're interested in taking the Manual Mode course, contact me at my name at muddyboots.org (that's Ee-are-eye-sea-ay at muddyboots.org or see this link), and please note that class space is limited in order to ensure my availability for questions, etc.
-Erica Marshall
Sunday, October 25, 2009
Tuesday, October 6, 2009
The windows of the soul
We connect with people (and other living things) through the eyes, so the eyes are the most important part of just about any portrait that you do. So, here's a few quick tips on getting better portraits by paying close attention to the eyes:
The Basics:
1. Make sure they are in focus. If you use autofocus, focus on the eyes. If you are focusing manually, then concentrate on getting them in focus.
2. Have your subject look into the camera, it creates a feeling of connection.
3. Shoot at eye level. This is one of the more well known "rules" of photography -if you're taking a photo of a toddler or a pet, sit or kneel on the floor to get on their level. If you have eye contact, though, I find that this rule can be broken effectively. Note that shooting up at a person or pet can make them look more powerful or important while shooting down at them makes them look smaller. (I find shooting down at people/pets more effective when the angle is more extreme -shooting straight down at a toddler or pet looking straight up, for example.) But shooting at eye level is always the safest.
Other tips:
4. Pay attention to the light. If you can get your subject at the right angle to the light their eyes will light up and the color in them will be greatly enhanced. Pay attention to the light and take advantage of it when you pose people, but also look for it when you're taking candids.
5. Make a connection. A tiny difference in the eyes can make the difference between a blank stare, sadness, happiness, anticipation, fear, etc. Generally when people hear "say cheese" they turn to the camera and give a cheesy smile with dread, embarrassment, fear, or no emotion in the eyes. You'll find genuine smiles (and the real emotion in the eyes that follow a real smile) will really light up your photos, so try to make a connection with your subject -if it's a person, try to talk a genuine smile out of them. For pets, you can often get anticipation in their eyes with a favorite toy or treat held up near the lens to get their attention.
Monday, September 21, 2009
NEW! Manual Mode CORRESPONDENCE Course!
I realize that we all live hectic lives and many people can't commit to a fast-paced 4 week Manual Mode Course. For that reason, I'm now offering the course via email. You can start any time (email me to confirm there's room and that I'll be available), and the cost is the same, $99.
The course materials are exactly the same, but the lessons will be emailed to you. Once you've completed the exercise photos for one lesson, I'll send you the next. There are 4 lessons total. As always, the lessons are light on reading and heavy on both guided and "free" practice exercises -because I believe that's the best way to learn.
All you need to take the course is a camera capable of Manual mode, Aperture Priority mode, and Shutter Speed Priority mode and a tripod (the $25 Wal-Mart ones work just fine).
After finishing the course via the Flickr Group (the old way, which is still available on a scheduled basis) or via email, once you've completed it you'll be invited to the invite-only Alumni group where you can talk with fellow students, post photos you've taken with your new skills, ask any photography-related questions you may have, and ask for critique on settings or your photos overall.
If you are interested in taking the Manual Mode course in either format, email me at my name at muddyboots.org (that's Eee-are-eye-sea-ay @muddyboots.org).
Wednesday, September 2, 2009
Researching the best budget all-around zoom lens
After my latest vacation I realized something. My camera bag is full of odd lenses, mostly primes, that have built up for various reasons. In my walk around kit I usually have a Canon 10-22mm, Canon 100mm f/2.8 macro, and a Sigma 30mm f/1.4. So, while my husband (who has a Sigma 17-70mm f/2.8-4.5) would photograph whatever was in front of us in a couple minutes, I'd take a few photos with one lens, then switch to another for a different view, and then sometimes even a third if I wanted close-ups or detail shots. It was truly frustrating.
Sure primes are sharper and yes, it's nice to have fast lenses, but honestly for walking around and taking tourist shots, perfection is unnecessary and avoiding frustration is my goal. I need my photography to be fun again. Lightening my load would be a big plus here too. So, I'm starting to look at budget all-around lenses. I don't expect them to be perfect optically. The larger the zoom range the better (within reason, optical quality DOES matter), oh and it must be CHEAP! I'm living on a part-time (read: every other weekend) Vet Tech position and my Manual Mode course income.
So, here's what I've found so far:
Click here for a spreadsheet of my research.
If you have experience with any of these lenses or any other advice, feel free to email me or leave a comment. It'll be awhile before I make a purchase -I just don't have the money together yet. It may end up being something I ask for at Xmas or my birthday. (December/January)
Thursday, August 6, 2009
Next Online Manual Mode Course To Start September 7th!
Leave a comment, email me at (e-are-eye-sea-ay-at-muddyboots.org), or contact me on flickr to be put on the list. The cost is $99 for the 4 week course. All you need is a camera capable of Aperture Priority, Shutter Speed Priority, and Manual modes and a tripod (the $25 WalMart ones work just fine).
A couple spaces are still available as of 9/2/2009, so if you want in, let me know!
A couple spaces are still available as of 9/2/2009, so if you want in, let me know!
Monday, July 6, 2009
7/20/2009 Online Manual Mode Class (FULL! ...but you can sign up now for the September class!)
I've taken my in-person Manual Mode lessons and developed an online Manual Mode course out of them. The first class will start July 20th. Cost for this first round of students will be $50 each for the complete 4-8 week course! (Due when the class list is announced.)
This class is full! Add a comment or email me if you'd be interested in the next class to be offered starting either 8/31 or 9/7.
Thanks for your interest!
This class is full! Add a comment or email me if you'd be interested in the next class to be offered starting either 8/31 or 9/7.
Thanks for your interest!
Saturday, May 9, 2009
Panned Shots
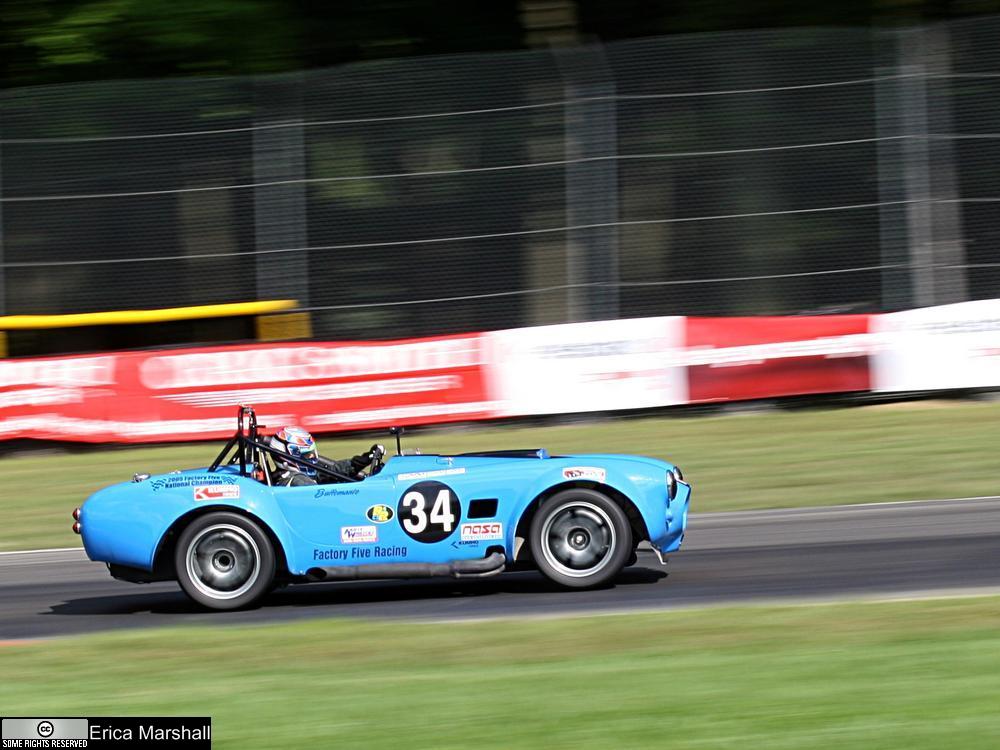
You frequently see these kinds of photos on the covers of magazines because, well, they're impressive. They work for all kinds of sports, and the effect isn't hard to do (although it does take some practice!).
Use: Shutter Speed Priority Mode
The easiest mode to use for these kinds of shots is "Shutter Speed Priority" mode, since a slow shutter speed is what gives the motion blur effect.
Start out using 1/125th of a second:
So, how slow is slow? -It depends on how fast your subject is moving and how far away from it you are, but generally, it's not as slow as you may think. The photo above was taken at 1/80th of a second.
With a fast-moving subject like a car, start with a shutter speed of 1/125 and adjust up or down to fit your needs. You basically want a speed that's slow enough to show obvious blurring of the background, but fast enough so your pan is as short as possible (to increase the chances of the subject being sharp).
Make sure there's something to blur in the background:
A background that's colorful or busy will show the blur better than a plain background (where there's not much to blur). Also consider that objects in the background that are closer to the subject will blur more than those that are further away. -You'll get a feel for this as you get some practice in different locations.
Good backgrounds -close trees, close buildings, close banners, or close stands of cheering fans.
Bad backgrounds -empty fields, empty streets, empty stands, and distant trees or buildings.
Technique:
This will take some practice, but be patient, it's worth it!
I'm writing this as if you're taking a panned photo of a car, but it'll work for other sports as well:
- Plant your feet about shoulder-width apart and at an angle that allows you to pan the section of track where you'll be taking the pictures.
- Do a couple of test pans (without taking a picture) to check your stance and get you in the rhythm of the car's motion for smoother panning later.
- Find the place on the track where you plan on taking the photo, set your focus there.
- (Optional:) If you can find some sort of landmark that you can easily see while you pan, this can be a big plus. (In my photo above I used that yellow-framed hole in the fence as my landmark. As I followed the car in my camera's viewfinder, when I saw that bit of yellow, I knew it was time to press the shutter button to take the photo.)
- Make sure your aperture is small enough (a large enough number) to have a deep enough depth of field to compensate for your focus being off a little bit.
- Start panning early, then when the car comes into view, follow it (early) in your camera's viewfinder. Keep the camera as steady as possible, and click the gently when you see your landmark. -Don't shake the camera when you press the button!
- Follow through with the pan after you hear the shutter close to keep everything as smooth as possible.
Other tips:
Don't rush it! -When you're starting out you should follow at least 5 or 6 cars before you even snap a shot. First, get your stance right and test it by following a couple cars with your camera. This also allows you to get used to how fast the cars are going (and therefore, how fast you'll be panning). Next, try to see how you want the car to end up in the frame, and then find one of the AF points in your viewfinder that'll match up with where you want the car to be so you can get the framing right.
After you've managed to follow a couple of cars and keep the pan steady, you know you're ready to fire off a test shot. After a photo has been taken, look at the result. Whether the car is sharp or not is not super-important yet; instead, look at the background -is it blurred enough? Too much? Adjust the shutter speed up or down as necessary, and continue taking photos until you're happy with the amount of blur (you want enough to show motion, but don't go overboard).
You may be asking: Why is "too much" blur bad? -Well, you'll get a heck of a lot of blur on a 1 second pan, but I challenge you to keep the subject in the EXACT same place in the frame for that long! In other words, the faster your shutter speed, the easier it is to keep the subject sharp. So, try for less blur as you start out and increase it as you get better at the technique.
Friday, April 24, 2009
Light painting how-to

The above image illustrates an effect known as "Light Painting". It's an effect you can achieve with your camera alone -no special software knowledge is necessary!
"Light painting" is a fun way to let your creativity flow. Kids love playing with it, but I've found that it's equally as entertaining to adults, turning them into kids after the first time they see the effect for themselves. But besides being fun, it's a great exercise on just how light interacts with your film or sensor to create an image, so here's how it's done...
What you need:
- A tripod
- A light source such as a flashlight, sparkler, etc. "Erica" in the above image was written with a $2 one-LED flashlight
- A camera, with a flash (on-camera flash is fine), that will allow you to select a long shutter speed.
Setup:
You need the environment to be almost, if not totally, dark for this to work. Set up your tripod with your camera mounted on it, and set the camera on Manual Mode ("M" on Canon cameras), then set a shutter speed of 10 seconds (on Canons you want it to look like 5" or 10" -the quote mark indicates FULL seconds rather than fractions of seconds like 1/5sec or 1/10sec which are displayed as just 5 or 10).
This long shutter speed is required to give you enough time for the camera to take a still shot of you (while the flash fires) and then for you to draw or write whatever you want with the flashlight or other light source after that. If you find 10 seconds too long or too short you can change it later.
Set the aperture to f/11 -this will give you a fairly deep depth of field in case your focus is off (which is easy to do in the dark).
Set your ISO to 400.
Now have your subject take his/her place (you may want to mark the spot so you don't have to keep re-focusing), and then have them put their flashlight on their face so you can focus on them. -If you're doing a self portrait, get a stand in (a broom?) or just guess and take some practice shots 'til you get it right.
When you're all set up, make sure your subject has the flashlight (or other light source) ready and have them stand in front of the camera in whatever (still) pose you'd like them to appear in. Then, press the shutter. (If this is a self portrait, turn the camera timer on, press the shutter and run into your position, pose and wait for it to take your picture.)
At this point, the flash will fire and light up the subject in his/her pose. As soon as the flash is done the subject can begin to draw or write with the flashlight (or whatever) until the shutter closes (you'll be able to hear it close) or until they are finished. If they are finished before the shutter closes, they should run out of the area that the camera is focused on so that neither they nor the light source will continue to be recorded on the film or sensor. (If they run, they'll need to turn off or cover the light source while they move so that it does not continue to be recorded as they run!)
**NOTE:** If your subject is going to write something, they'll have to write it backwards since they are facing the camera. -You may want to have them practice it beforehand!
After the shutter closes, review the image on your LCD to make sure it isn't over or under-exposed. If you can see blurring ghostly images of the subject while he/she was writing or drawing, then you'll need to lower the ISO to 100 or 200 and/or find a darker environment to take the photos in. If the picture is too dark, try increasing the ISO to 800. -If you are shooting film, just make sure it's as dark as possible.
Why it works:
Cameras simply record light. Bright lights take much less time to be recorded than faint light does. So, when the flash fires it records the image of the subject onto the film or sensor very quickly because the flash lights them up so much more than when it goes off. And after the flash is complete, the shutter remains open, but since it's so dark, images will take a looong time to record. So, while the subject moves, you won't be able to see them or their movements on the photo when it's complete. All you'll see is the movement of the flashlight (or whatever), since light is all that a camera records.
When you dial in the settings you may notice that the camera's light meter says the photo's exposure will be way off, but you can ignore it. The camera's light meter has no idea that we don't care about the fact that the background won't be recorded and it also doesn't know that the flashlight's going to appear and that that's really what we want to see, etc. The settings I've chosen just rely on the fact that bright light is recorded quickly, so neither of them matter much and there's really no balancing to be done between them like there is during the daytime. This is why the shutter speed of 10 seconds can be changed without having to worry about how it'll effect exposure it won't (at least not by much).
Try it tonight!
Chances are that once you see the effect for yourself and how easy it is to achieve you'll probably take a ton of shots using the effect in different ways. You can use a self-timer if you want to practice these shots on your own, but this is a really fun way to take shots of people during a camping trip, etc. The last time I did it in a group of 30-somethings, everyone was lining up saying "me next" and "ooh! I have another idea!". -It's a ton of fun, you gotta try it!Monday, April 20, 2009
Book: Pricing Photography
If you are thinking or even just hoping to one day sell an image commercially, you should seriously think about getting this book:
Pricing Photography: The Complete Guide to Assignment & Stock Prices
It tells you what kinds of questions you need answered before you come up with a price for your image and then gives you an idea of what price range is expected given it's anticipated use. It also helps you avoid some legal pitfalls with wording of PO's, contracts, and the like.
(Buying the book via this link will give me a small commission and does not effect the price you will pay for it.)
Sunday, April 19, 2009
Avoiding blur due to camera shake
If you're without a tripod, at the highest ISO you're willing to shoot at and you're still getting shutter speeds that are too low to hand-hold your only options are to optimize your stance in order to be as stable as possible to eliminate camera shake. Here are some examples of stable shooting positions you can try:
First, slowly squeeze the shutter button:
The first thing to pay attention to when you are taking photos at low shutter speeds is how you are pressing the shutter button. Many people don't realize it, but they often jerk or move the entire camera when they push it. If you are reading this at home, grab your camera, line it up with the line where your ceiling meets the wall and watch as you press the button. If you move the camera, practice until you eliminate that movement.
Second, relax:
Tense muscles lead to shake due to muscle fatigue, so keep it loose. If you feel a muscle getting tired, burning, or shaking you are doing it wrong. Find a position that's comfortable and your shots will be more stable.
Third, breathe:
Another common problem is the natural tendency to hold your breath, but this will also lead to shake. Instead, take a slightly deeper than normal breath, then slowly let the air out as you gently press the shutter button.
Now on to stable positions to take photos:
Click on any of the photos below to see larger versions of them.
A normal stance:

Your feet should be about shoulder-width apart and your arms should be relaxed.
A slightly more stable stance uses an "elbow tripod" like this:

When people try this stance they tend to press their elbows together too hard. Remember to keep it loose, not tense. Your elbows should be just touching and resting on your chest/stomach, so it'll cause your hips to come forward and your shoulders back a little bit, but it should be comfortable. There should be no squeezing or tension in the position at all.
If there's something horizontal to rest the camera on:
You can rest the camera directly on a chair, fence, car, or any other horizontal surface you can find. If the camera doesn't rest at the angle you'd like you can put your hand under it or prop it up on a towel, blanket, sweatshirt, or anything else you might have handy.
If you have a vertical pole you can use it as a brace:
This works well with stop sign poles and the like. Just grab the pole with your left hand, then use your forearm as a stable horizontal surface to rest your camera on. I use this position a lot for macro photography because it allows me to move the camera back and forth in tiny increments to get the depth of field exactly where I want it.
If there's a wall you can use it like this:
Press the camera against the wall with just enough force to keep it there (again, nothing should be tense to avoid shake due to muscle fatigue).
Another option is to kneel:
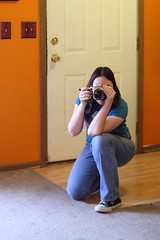
Kneel in a stable position, then use your knee to rest your elbow on. Keep it comfortable and relaxed.
Or use a sitting position like this one:
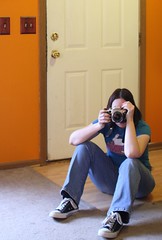
Sitting is more stable than kneeling because you can create a tripod by resting both elbows on both knees. Keep it comfortable and don't let your knees fall outward or you'll be using your inner thigh muscles to keep them up and that will lead to shake from muscle fatigue pretty quickly.
Even more stable is the prone position shown here:
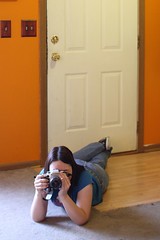
Here your "elbow tripod" rests directly on the ground. If the perspective works and you're willing to lay down this is a very stable position. Even more stable, if necessary, is resting your arm on the ground, then putting your camera on your arm, but this will give you an even lower perspective.
If all else fails, try burst:
If you use the above techniques and still can't get a stable shot, try putting your camera on "burst" so that holding the shutter button down will have the camera take several photos in a row. Many times the 2nd or 3rd photo will show less shake than the 1st. (This is especially helpful if you can't seem to press the shutter without moving the camera.)
First, slowly squeeze the shutter button:
The first thing to pay attention to when you are taking photos at low shutter speeds is how you are pressing the shutter button. Many people don't realize it, but they often jerk or move the entire camera when they push it. If you are reading this at home, grab your camera, line it up with the line where your ceiling meets the wall and watch as you press the button. If you move the camera, practice until you eliminate that movement.
Second, relax:
Tense muscles lead to shake due to muscle fatigue, so keep it loose. If you feel a muscle getting tired, burning, or shaking you are doing it wrong. Find a position that's comfortable and your shots will be more stable.
Third, breathe:
Another common problem is the natural tendency to hold your breath, but this will also lead to shake. Instead, take a slightly deeper than normal breath, then slowly let the air out as you gently press the shutter button.
Now on to stable positions to take photos:
Click on any of the photos below to see larger versions of them.
A normal stance:
Your feet should be about shoulder-width apart and your arms should be relaxed.
A slightly more stable stance uses an "elbow tripod" like this:
When people try this stance they tend to press their elbows together too hard. Remember to keep it loose, not tense. Your elbows should be just touching and resting on your chest/stomach, so it'll cause your hips to come forward and your shoulders back a little bit, but it should be comfortable. There should be no squeezing or tension in the position at all.
If there's something horizontal to rest the camera on:
You can rest the camera directly on a chair, fence, car, or any other horizontal surface you can find. If the camera doesn't rest at the angle you'd like you can put your hand under it or prop it up on a towel, blanket, sweatshirt, or anything else you might have handy.
If you have a vertical pole you can use it as a brace:
This works well with stop sign poles and the like. Just grab the pole with your left hand, then use your forearm as a stable horizontal surface to rest your camera on. I use this position a lot for macro photography because it allows me to move the camera back and forth in tiny increments to get the depth of field exactly where I want it.
If there's a wall you can use it like this:
Press the camera against the wall with just enough force to keep it there (again, nothing should be tense to avoid shake due to muscle fatigue).
Another option is to kneel:
Kneel in a stable position, then use your knee to rest your elbow on. Keep it comfortable and relaxed.
Or use a sitting position like this one:
Sitting is more stable than kneeling because you can create a tripod by resting both elbows on both knees. Keep it comfortable and don't let your knees fall outward or you'll be using your inner thigh muscles to keep them up and that will lead to shake from muscle fatigue pretty quickly.
Even more stable is the prone position shown here:
Here your "elbow tripod" rests directly on the ground. If the perspective works and you're willing to lay down this is a very stable position. Even more stable, if necessary, is resting your arm on the ground, then putting your camera on your arm, but this will give you an even lower perspective.
If all else fails, try burst:
If you use the above techniques and still can't get a stable shot, try putting your camera on "burst" so that holding the shutter button down will have the camera take several photos in a row. Many times the 2nd or 3rd photo will show less shake than the 1st. (This is especially helpful if you can't seem to press the shutter without moving the camera.)
Friday, April 10, 2009
Shooting RAW
Jpg vs RAW:
The jpg file format was created to make images smaller through something called "compression", and more specifically, "lossy compression". What this means is that it actually makes some changes to the file so it's smaller. So, if a patch of blue sky had 12 different shades of blue before your camera saved the file as a jpg, it'd end up with maybe just 4 different shades of blue afterwards.
That sounds bad, right? And here's where people will start to tell you that RAW has more detail than jpg. The fact is, though, that in order to print the photo, upload it to the web, or email it to your friend you're likely going to have to convert it to jpg anyway, so the loss is pretty much inevitable. Besides, our eyes can only tell the difference between 7 million different colors while RAW files contain billions or even trillions of different colors!
So, what's the advantage of shooting RAW?
Well, when editing a photo, all those extra colors mean a lot. To avoid talking about millions of colors, let's think about it in terms of crayons. If you have a box of 32 different colored crayons you may only have 4 different shades of gray between white and black. So, if you want to lighten an image or darken it, you only have 2 shades to move, up or down before you get "black" or "white". But, if you have a box of 64 different colors, you may have 4 shades to move up or down before getting "white" or "black". The same goes for RAW -all those extra colors mean extra data in the shadows or highlights so, when you go to dramatically lighten shadowed areas or darken highlights you have a lot more room to move with RAW than you do with jpg.
RAW and fake HDR:
Raw files contain enough information to create an HDR photo from a single RAW file rather than from 3 to 5 jpgs. This means that taking photos in the middle of the day when the light is really harsh and the shadows are really dark isn't a problem anymore! You can take one RAW photo, brighten it by one to two stops, and darken it to the same degree, than run it through HDR software and the shadows and highlights will both be softened so you get this:

instead of this:

Summary:
* RAW allows you extra room to darken, lighten, or change the color cast in your image.
* RAW files will be larger, about the same size in megabites as your camera has megapixels, so a 10MP camera will have RAW files around 10MB each.
* RAW files require conversion (usually to jpg) before you can upload them to the web, print them, or email them to friends.
* JPG cannot be lightened or darkened to the same degree as a RAW file can.
* JPG files are smaller than RAW files, so you'll get more shots in jpg on your memory card than you can with RAW.
* JPG files can be opened by any image editing software, uploaded directly to the web, or printed with no conversion needed.
RAW workflow:
RAW files can't be opened by many programs, but your camera should have come with software that can open RAW files, do some basic editing on them, then convert them to jpg. Photoshop, Photoshop Elements, and Picasa can open some RAW files. Updates may be necessary to these programs if you have a fairly new camera.
Generally, though, you'll open the file in it's RAW format, make changes to the brightness, white balance, curves, contrast, saturation, etc on the entire image, then convert the image to jpg for further processing, and from there you can work with the file like you would any other jpg image. Because the main advantage of RAW is the ability to use that extra data to make color or brightness changes, that's really all most RAW software can do.
So, when do I shoot RAW?
This, of course, is up to you. I shoot RAW 99% of the time because sometimes I make mistakes and take a photo that's not exposed well and RAW gives me a better chance to save those images. This doesn't make me lazy -my goal is always to get it right in the camera, but a safety net is always nice! The boat photo I used as an example was taken in horribly harsh mid-day light while I was on vacation and had no time to wait for evening or morning light. It wasn't until I was home that I remembered that I could do an HDR technique on it to try to make the shadow areas less dark and it worked! This is why I shoot RAW all the time.
Many fellow photographers laugh at me, though. They find RAW to be tedious because of the extra step involved in processing every image. I don't find it to be a big deal. So, I'd recommend trying it and seeing if you mind the extra step. If you do, you're in the majority, so don't worry. Just remember that if you're unsure about your white balance or exposure, or if youthink you might want to try an HDR technique to improve the balance of light areas to dark areas in a photo, just switch to RAW or RAW+jpg for a safety net. For day-to-day photos for practice or images that you're pretty sure you can get right in the camera, stick with jpg to avoid that extra step!
Example of RAW vs Jpg after brightening an image:
A while back I posted the results of a test I did by taking a photo in RAW and in jpg, then brightening both by the same amount. The RAW file retained it's detail, but the jpg lost some detail as a result of the brightening:
Link
The jpg file format was created to make images smaller through something called "compression", and more specifically, "lossy compression". What this means is that it actually makes some changes to the file so it's smaller. So, if a patch of blue sky had 12 different shades of blue before your camera saved the file as a jpg, it'd end up with maybe just 4 different shades of blue afterwards.
That sounds bad, right? And here's where people will start to tell you that RAW has more detail than jpg. The fact is, though, that in order to print the photo, upload it to the web, or email it to your friend you're likely going to have to convert it to jpg anyway, so the loss is pretty much inevitable. Besides, our eyes can only tell the difference between 7 million different colors while RAW files contain billions or even trillions of different colors!
So, what's the advantage of shooting RAW?
Well, when editing a photo, all those extra colors mean a lot. To avoid talking about millions of colors, let's think about it in terms of crayons. If you have a box of 32 different colored crayons you may only have 4 different shades of gray between white and black. So, if you want to lighten an image or darken it, you only have 2 shades to move, up or down before you get "black" or "white". But, if you have a box of 64 different colors, you may have 4 shades to move up or down before getting "white" or "black". The same goes for RAW -all those extra colors mean extra data in the shadows or highlights so, when you go to dramatically lighten shadowed areas or darken highlights you have a lot more room to move with RAW than you do with jpg.
RAW and fake HDR:
Raw files contain enough information to create an HDR photo from a single RAW file rather than from 3 to 5 jpgs. This means that taking photos in the middle of the day when the light is really harsh and the shadows are really dark isn't a problem anymore! You can take one RAW photo, brighten it by one to two stops, and darken it to the same degree, than run it through HDR software and the shadows and highlights will both be softened so you get this:
instead of this:
Summary:
* RAW allows you extra room to darken, lighten, or change the color cast in your image.
* RAW files will be larger, about the same size in megabites as your camera has megapixels, so a 10MP camera will have RAW files around 10MB each.
* RAW files require conversion (usually to jpg) before you can upload them to the web, print them, or email them to friends.
* JPG cannot be lightened or darkened to the same degree as a RAW file can.
* JPG files are smaller than RAW files, so you'll get more shots in jpg on your memory card than you can with RAW.
* JPG files can be opened by any image editing software, uploaded directly to the web, or printed with no conversion needed.
RAW workflow:
RAW files can't be opened by many programs, but your camera should have come with software that can open RAW files, do some basic editing on them, then convert them to jpg. Photoshop, Photoshop Elements, and Picasa can open some RAW files. Updates may be necessary to these programs if you have a fairly new camera.
Generally, though, you'll open the file in it's RAW format, make changes to the brightness, white balance, curves, contrast, saturation, etc on the entire image, then convert the image to jpg for further processing, and from there you can work with the file like you would any other jpg image. Because the main advantage of RAW is the ability to use that extra data to make color or brightness changes, that's really all most RAW software can do.
So, when do I shoot RAW?
This, of course, is up to you. I shoot RAW 99% of the time because sometimes I make mistakes and take a photo that's not exposed well and RAW gives me a better chance to save those images. This doesn't make me lazy -my goal is always to get it right in the camera, but a safety net is always nice! The boat photo I used as an example was taken in horribly harsh mid-day light while I was on vacation and had no time to wait for evening or morning light. It wasn't until I was home that I remembered that I could do an HDR technique on it to try to make the shadow areas less dark and it worked! This is why I shoot RAW all the time.
Many fellow photographers laugh at me, though. They find RAW to be tedious because of the extra step involved in processing every image. I don't find it to be a big deal. So, I'd recommend trying it and seeing if you mind the extra step. If you do, you're in the majority, so don't worry. Just remember that if you're unsure about your white balance or exposure, or if youthink you might want to try an HDR technique to improve the balance of light areas to dark areas in a photo, just switch to RAW or RAW+jpg for a safety net. For day-to-day photos for practice or images that you're pretty sure you can get right in the camera, stick with jpg to avoid that extra step!
Example of RAW vs Jpg after brightening an image:
A while back I posted the results of a test I did by taking a photo in RAW and in jpg, then brightening both by the same amount. The RAW file retained it's detail, but the jpg lost some detail as a result of the brightening:
Link
Thursday, April 2, 2009
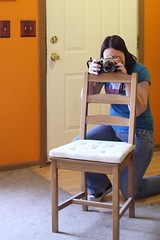
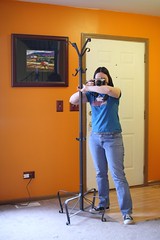
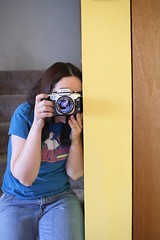
Image Editing How-To: Creating a twin
- Set your camera up on a tripod
- Take the first picture. (These are self portraits, so I used my camera's timer to trip the shutter.)
- Change positions, clothes... whatever you choose, but leave the camera EXACTLY where it was for the first photo.
- Take the second picture.
- Open both photos in Gimp (free here or use whatever software you like)
- Select the clone tool (the icon looks like a stamper or you can find it under the "Tools" menu by selecting "Paint Tools" then "Clone").
- Put the clone tool's cursor on the verson of the photo that you want to copy FROM
- Hold the "Control" key down (it may be labelled "Ctrl" on your keyboard) and click on some easily defined point that appears in both photos -I used the point of the lamp shade here.
- Move to the photo you want to clone the 2nd image ONTO
- Put the clone tool's cursor at exactly the same point as you did before -DON'T hold the Control key down this time, though!
- Click and hold the button down to "Paint" the 2nd image into the first. If you let up on the mouse button, be careful to put it back in the same spot when you click it again, or you'll have to go back and do the Ctrl + click thing again.
- This works best with a simple background so that if you're off by a little bit it won't matter or you can fix minor issues using the "Smudge" tool.
Wednesday, March 11, 2009
Gimp: Fixing Posterization
The following photo was taken by auntyre1 on Flickr and was used with her permission:

(Click on the photo to view it larger, see the EXIF, etc.)
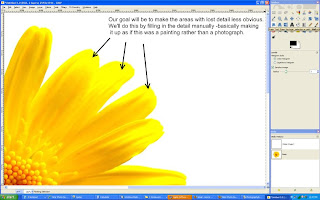
I love everything about this photo from the perfectly white background to the soft shadows that define it's textures. The only thing wrong with it is the areas of lost detail in the highlights. When this banding and loss of detail occurs in a photo it's called "posterization" and the aim of this article is to help auntyre1 to fix it.
Fixing a photo like this requires talent more akin to painting than to photography, so for many photographers this will take a lot of time and practice, but it's well worth the effort to save a photo like this one, so here's how I'd go about it.
The first thing to do would be to open the photo in Gimp and zoom in to see it at 100%. From there we need to pick an area to start working on and I picked the petals at approximately 1 o'clock.
(Click on the photo to view it full size.)
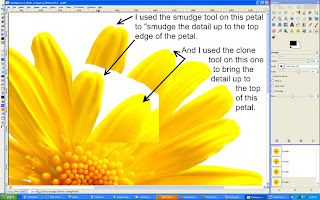
There are 2 ways of bringing detail into the posterized portion of the image, and I'd probably use them both depending on the area I was working on. The first and probably easiest way is to use the "Smudge" tool (in Gimp this looks like a hand pointing downward). You use this tool by placing it on the photo and dragging it, which will bring a portion of the color from where you started in the direction you drag it, just like smudging paint or pencil on paper. Play with the opacity of the tool (which can be changed on the toolbox window under all those icons when the "Smudge" tool is selected). If your smudges are too obvious, just turn the opacity down until it starts blending smoothly.
The other way of adding detail to the petals is to use the "Clone" tool (which looks like a stamper). With this tool, you hold the "Control" key down (which may be labelled "Ctrl" on your keyboard) and click in the area you want to copy FROM. Then let go of the "Control" key, and use your mouse to click and drag, which will paint what's in one area to the other area. I'd use this in a similar manner as the smudge tool to bring the detail from the part of the petal that's further down up towards the tip of the petal. This is a more effective tool if you have a lot of blank area to fill in with detail. The smudge tool is best for smaller areas.
Here's a screenshot to show where I used these two tools as well as my result with them:
(Click on the photo to view it full size.)
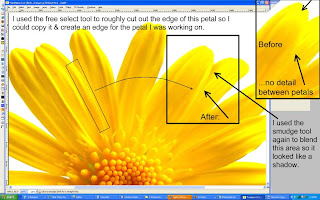
After you get the detail filled in you'll notice that there isn't a clearly defined edge to the 2nd petal I was working on in the example above. Unfortunately, there are no other petals at the same angle that we can use to clone that edge in and making an edge where there wasn't one before is hard to do in a believable manner if you try to paint it in by hand. But there is a pretty easy way to do it...
Look for an edge that's about the right shape elsewhere in the photo. (See screenshot below for the one I chose.):
(Click on the photo to view it full size.)
So, there are the basic techniques for fixing this image and others like it. You just have to keep using those tools and techniques to finish the entire flower. Yes, it'll take some time, especially if you aren't familiar with these tools yet. They all take some practice to use well. But, like I said before, this photo is worth it. If you start getting frustrated, walk away and come back to it later. You'll learn a lot if you stick with it. And, if you get stuck, let me know and I can help you with whatever you are stuck on or expand on some of the tips and techniques to use whatever tool's giving you problems more effectively.
And, please auntyre1, send me an email when you complete your editing. I'd love to see how it comes out!
(Click on the photo to view it larger, see the EXIF, etc.)
I love everything about this photo from the perfectly white background to the soft shadows that define it's textures. The only thing wrong with it is the areas of lost detail in the highlights. When this banding and loss of detail occurs in a photo it's called "posterization" and the aim of this article is to help auntyre1 to fix it.
Fixing a photo like this requires talent more akin to painting than to photography, so for many photographers this will take a lot of time and practice, but it's well worth the effort to save a photo like this one, so here's how I'd go about it.
The first thing to do would be to open the photo in Gimp and zoom in to see it at 100%. From there we need to pick an area to start working on and I picked the petals at approximately 1 o'clock.

(Click on the photo to view it full size.)
There are 2 ways of bringing detail into the posterized portion of the image, and I'd probably use them both depending on the area I was working on. The first and probably easiest way is to use the "Smudge" tool (in Gimp this looks like a hand pointing downward). You use this tool by placing it on the photo and dragging it, which will bring a portion of the color from where you started in the direction you drag it, just like smudging paint or pencil on paper. Play with the opacity of the tool (which can be changed on the toolbox window under all those icons when the "Smudge" tool is selected). If your smudges are too obvious, just turn the opacity down until it starts blending smoothly.
The other way of adding detail to the petals is to use the "Clone" tool (which looks like a stamper). With this tool, you hold the "Control" key down (which may be labelled "Ctrl" on your keyboard) and click in the area you want to copy FROM. Then let go of the "Control" key, and use your mouse to click and drag, which will paint what's in one area to the other area. I'd use this in a similar manner as the smudge tool to bring the detail from the part of the petal that's further down up towards the tip of the petal. This is a more effective tool if you have a lot of blank area to fill in with detail. The smudge tool is best for smaller areas.
Here's a screenshot to show where I used these two tools as well as my result with them:

(Click on the photo to view it full size.)
After you get the detail filled in you'll notice that there isn't a clearly defined edge to the 2nd petal I was working on in the example above. Unfortunately, there are no other petals at the same angle that we can use to clone that edge in and making an edge where there wasn't one before is hard to do in a believable manner if you try to paint it in by hand. But there is a pretty easy way to do it...
Look for an edge that's about the right shape elsewhere in the photo. (See screenshot below for the one I chose.):
- Use the "Free Select" tool (looks like a lasso) to select just that edge.
- Go to "Edit" > "Copy" (or Ctrl + C)
- Create a new layer by going to the "Layer" menu and selecting "New Layer". Keep the default of "Transparency" for layer type, and click "OK" to create the new layer.
- You'll automatically be taken to the new layer, so just go to "Edit" > "Paste" (or Ctrl + V) to paste that petal edge onto the photo.
- Click and drag that petal over to the place we want to put it (I know the angle's wrong, that's ok)
- Click on the "Rotate" tool. It looks like a little box with arrows indicating rotation on it.
- Then click on the petal edge (because that's the part we want to rotate) and a "Rotate" window will appear. Ignore it for now.
- Click on one side or the other of that petal edge and drag it left or right to rotate it into the position that'll match the edgeless petal. Click "Rotate" when you get it where you want it.
- Chances are, unless you are REALLY good the petal edge isn't EXACTLY where you want it yet. Click on the "Move Tool" (looks like a "plus sign" made with arrows going up & down and left & right).
- With the Move Tool selected you can drag the petal edge to get it where you want it.
- If you're like me you'll have to go back to the Rotate Tool and tweak it a bit more to get it to line up perfectly. Just keep tweaking it until it's right.
- If you have any areas that look like they'll be hard to blend into the existing petals, use the Eraser Tool to erase them. It won't be perfect, we'll blend the old and new together in a minute...
- When you have it like you want it, go to the "Image" menu and choose "Flatten Image" to merge the layers together so we can work on making the new and old areas seamless.
- Use the Smudge Tool to blend the new petal edge into the existing petals around it.

(Click on the photo to view it full size.)
So, there are the basic techniques for fixing this image and others like it. You just have to keep using those tools and techniques to finish the entire flower. Yes, it'll take some time, especially if you aren't familiar with these tools yet. They all take some practice to use well. But, like I said before, this photo is worth it. If you start getting frustrated, walk away and come back to it later. You'll learn a lot if you stick with it. And, if you get stuck, let me know and I can help you with whatever you are stuck on or expand on some of the tips and techniques to use whatever tool's giving you problems more effectively.
And, please auntyre1, send me an email when you complete your editing. I'd love to see how it comes out!
Friday, March 6, 2009
Friday, February 27, 2009
Tips on dealing with backlighting
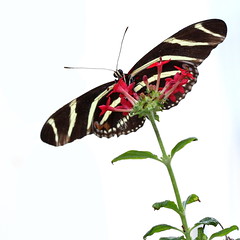
"Backlighting" just means that there's light behind your subject. An example of this would be lining your friends up in front of a sunset to take their photo -the sun would be behind your friends, so they'd be backlit.
What happens with a typical backlighting situation is that your camera sees all that light aimed towards it, so it makes the photo darker to compensate for the excess light. The problem is, the part you want exposed properly is in shadow because of all the light coming from behind, so when the camera darkens the photo, your subject comes out almost black.
There are a few ways to fix this. You can:
* Meter off of your subject instead of metering the whole scene.
* Use exposure compensation to brighten the photo.
* Use fill flash for portraits and other photos where your subject
is small enough and close enough for it to be effective
How these changes effect your background:
If you choose to meter off your subject or use exposure compensation to brighten them, remember that you'll be brightening the entire photo. This was what I intended for the butterfly shot at the top of this post, I wanted the sky to go white behind it. But, for sunset shots this will wash out the beautiful colors of your sunset. For portraits in front of sunsets, use flash. This will balance the light of the sun with the light of your flash and will allow more color to be kept in the sunset.
Tuesday, February 17, 2009
Copyrights, protecting your photos, and CC licensing.
You automatically have copyright on your photo as soon as you click the shutter button on your camera. The problem lies in proving it if your image is stolen. If you have the RAW file, if the EXIF is attached and your camera's serial number is in it (although this can be faked), or if you only post a crop or a version that's smaller than the original and you keep the full size on file, you're good. ...the problem is, most of the time when your work is stolen you'll never know and if you don't know about it, you can't take legal action against them.
As far as not allowing your work to be stolen, if it's on the web it can be taken. Many photo hosting sites try to put protections in like not allowing right-clicks, but there are well known workaround for getting around that (google "right click blocked" without the quotes and look at the 3rd result).
Your options are:
...for the record I don't do any of this. It's too intrusive to the viewer and doesn't allow normal people who like my photos to download them to use them for their wallpaper, etc. So, I give many of my copyright protections away by using a Creative Commons license that allows people to download or use my photos on their blogs, etc as long as they are using it for personal use. I've tried to sell my photos, but I found that it takes too much marketing (which I hate). So, this way, people do the marketing FOR me because part of my Creative Commons license says that they need to attribute the photo to me including the url for my website that advertises my photography lessons and product photography work.
The upsides of giving my copyright protections away have been amazing! My photos have been used on all kinds of blogs, some popular enough to be dugg. They've also been used by travel sites, one's supposed to be put on a brochure although I haven't heard back from them in a long
time, but they've been on news sites, and I've been contacted about getting 2 of my photos published in books as well. To me, the trade's been well worth it.
For more on Creative Commons licensing check out: http://creativecommons.org ...their licenses are customizable so you can keep or give away whatever rights you choose.
As far as not allowing your work to be stolen, if it's on the web it can be taken. Many photo hosting sites try to put protections in like not allowing right-clicks, but there are well known workaround for getting around that (google "right click blocked" without the quotes and look at the 3rd result).
Your options are:
- Watermark it: Put a graphic or text (like your name) over thephoto. There is software that can remove watermarks if they are clear or even if they are opaque if they are over sky or grass, so for maximum protection they need to be put over important parts of the photos (like facial or building details that can't be "figured out" or"faked" by software).
- Post only really tiny photos that aren't worth stealing.
...for the record I don't do any of this. It's too intrusive to the viewer and doesn't allow normal people who like my photos to download them to use them for their wallpaper, etc. So, I give many of my copyright protections away by using a Creative Commons license that allows people to download or use my photos on their blogs, etc as long as they are using it for personal use. I've tried to sell my photos, but I found that it takes too much marketing (which I hate). So, this way, people do the marketing FOR me because part of my Creative Commons license says that they need to attribute the photo to me including the url for my website that advertises my photography lessons and product photography work.
The upsides of giving my copyright protections away have been amazing! My photos have been used on all kinds of blogs, some popular enough to be dugg. They've also been used by travel sites, one's supposed to be put on a brochure although I haven't heard back from them in a long
time, but they've been on news sites, and I've been contacted about getting 2 of my photos published in books as well. To me, the trade's been well worth it.
For more on Creative Commons licensing check out: http://creativecommons.org ...their licenses are customizable so you can keep or give away whatever rights you choose.
Tuesday, February 10, 2009
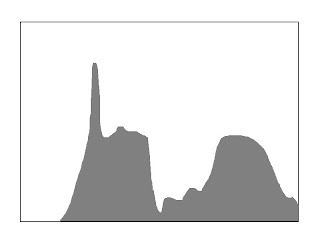
Adjusting curves by a photo's histogram
Because you can adjust the brightness of your monitor, how do you know if your photo is light or dark? Judging exposure on your computer monitor, unless it's calibrated, is not a good idea. Luckily, there's a tool that can help us judge if our photo is too light or too dark -it's called a histogram. If you are unfamiliar with reading histograms, read this article.
So, let's open this photo in Gimp: (feel free to download it to follow along)
http://www.flickr.com/photos/15059459@N02/3269890274/
Then, open the Curves tool:
(click on image to view it larger)
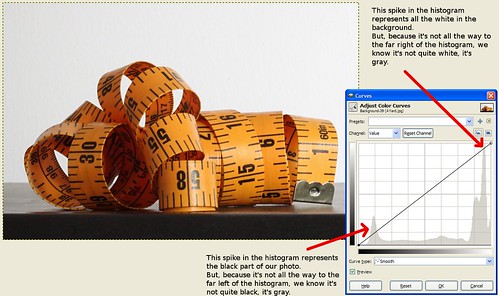
In the background of the Curves tool you can see the image's histogram. For this image, I wanted the white background to be pure white, meaning I wanted it intentionally over-exposed so it lost it's detail. That means, I expected the white spike on the right side of the graph to spill off the right side of the graph instead of being so far into the graph on that side.
I can also see that the spike on the left representing the black parts of the photo is too far in as well.
To fix the white, click on the far right hand part of the curves line and drag it to the left until it's in the middle of the "white spike". Essentially what you're doing here is making the histogram end in the middle of that white spike. In this case, to get the far left side of the photo to become pure white you actually need to drag the curve line past the middle of the spike as shown in the final screenshot below.
For the black, we're not aiming to loose the detail like we wanted to do with the white, so we're just going to drag the curve line on that side to the right until it touches the point where the data just begins on the left side of the histogram.
The result should look like this:
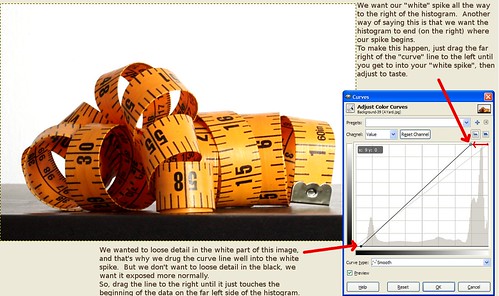
...now the white is pure white instead of gray and the black part at the bottom doesn't look so washed out.
So, let's open this photo in Gimp: (feel free to download it to follow along)
http://www.flickr.com/photos/15059459@N02/3269890274/
Then, open the Curves tool:
(click on image to view it larger)
In the background of the Curves tool you can see the image's histogram. For this image, I wanted the white background to be pure white, meaning I wanted it intentionally over-exposed so it lost it's detail. That means, I expected the white spike on the right side of the graph to spill off the right side of the graph instead of being so far into the graph on that side.
I can also see that the spike on the left representing the black parts of the photo is too far in as well.
To fix the white, click on the far right hand part of the curves line and drag it to the left until it's in the middle of the "white spike". Essentially what you're doing here is making the histogram end in the middle of that white spike. In this case, to get the far left side of the photo to become pure white you actually need to drag the curve line past the middle of the spike as shown in the final screenshot below.
For the black, we're not aiming to loose the detail like we wanted to do with the white, so we're just going to drag the curve line on that side to the right until it touches the point where the data just begins on the left side of the histogram.
The result should look like this:
...now the white is pure white instead of gray and the black part at the bottom doesn't look so washed out.
Histogram basics
Histograms don't look that hard. Many people make assumptions about them based on reading similar graphs in the past, but this leads to so many people thinking it's the shape of the data that matters when, in truth, all that matters most of the time is the far left edge and far right edge of the graph.
So, let's start over. Here's what you need to know:
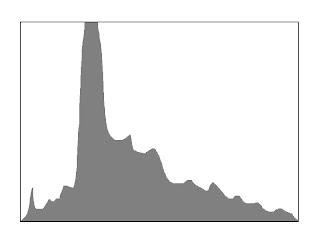
Proper exposure:
Too dark (under-exposed):
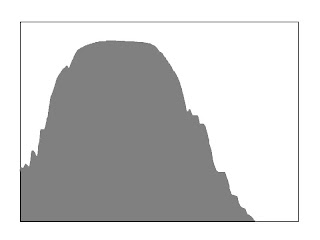
Too bright (over-exposed):
So, let's start over. Here's what you need to know:
- The far left edge of the graph represents black
- The far right edge of the graph represents white
- The middle is all the shades of gray in-between (and for color photos, just think about them being converted to black and white before being represented on the graph)
- If the data peters off to zero at the edges of both ends of the graph, your exposure is perfect.
- If the data gets chopped off on the left side and peters off to zero on the right before reaching the far right edge, your photo is too dark or "underexposed".
- If the data gets chopped off on the right side and peters off to zero on the left before reaching the far left edge, your photo is too bright or "overexposed".
Proper exposure:

Too dark (under-exposed):

Too bright (over-exposed):

Thursday, January 29, 2009
Help for lens shoppers!
If you are looking at getting a new lens, no matter what kind it is you might be overwhelmed by the lens descriptions. Do you need a Canon 75-300mm f/4-5.6 USM IS AF for $600 or will a Canon 100-300 f/5.6-6.7 AF for $130 do? And what will you get if you go for a Sigma 100-300 f/4 EX DG IF HSM for $1065?
Hopefully, if you're lens shopping you have a purpose in mind. Make sure you really think about what it is about your current lens(es) that is making you look for a new lens. What will the new lens be used for the most? Will there be other uses? What kind of lighting situations will it be used in? And are there features you want in a new lens?
Focal length:
This is usually the first part of the lens description followed by "mm" as in the bolded part here:
Canon 75-300mm f/4-5.6 USM IS AF
The smaller the number, the farther away your subject will appear and the more of your surroundings will fit into a shot. "Wide" lenses (10mm to 30mm) are often used for landscapes, "Normal" or "Standard" lenses are 30mm to 50mm and come close to what we see normally with our eyes. For this reason, they are often used for portrait work and as general walk-around lenses. Telephoto lenses are anything 100mm and up. They are used for wildlife, candids, and other situations where you want or need to take photos at a distance.
Zoom Lenses:
When you see two numbers like you do above "75-300mm" that means it's a zoom lens. These are the lenses most of us are familiar with. They'll make the subject appear closer or further away as we turn a ring on the lens.
Primes / Fixed Lenses:
If you see just one number, the lens is a "prime", otherwise known as a "fixed" or "standard" lens. These lenses don't "zoom". In order to make the subject appear closer or further away, you'll need to "zoom with your feet", in other words, move yourself closer or further away.
People choose primes because you can usually get better quality and "faster lenses" for much cheaper this way. (We'll discuss "fast" lenses later.) Usually people purchase something like a fast 30mm or 50mm prime for portrait work.
Maximum Aperture:
After the focal length there's usually a "f/" followed by a number or two numbers. The maximum aperture is bolded in the example below:
Canon 75-300mm f/4-5.6 USM IS AF
If you aren't using manual mode yet you can see some of my other articles for the specifics on aperture, but here's the quick and dirty -the lower the numbers after the "f/" the "faster" the lens is. f/4-5.6 is not all that fast, the example lens is fairly average. When you get into f/2.8 or even all the way down to f/1.0 with some specialty primes, those are what are considered "fast".
"Fast" lenses will give you 2 advantages. First, the lower that number, the better low-light performance you'll get. This is really why they are called "fast" -the lower your aperture number, the faster shutter speed you'll be able to achieve, so if you take photos of, say indoor sporting events or dance recitals a fast lens can help you avoid blur due to camera or subject movement.
The side-effect from using really low-numbered apertures like f/2.8 or 1.4 is a really shallow depth of field. So, if you like those photos with really smoothly blurred backgrounds and a sharp subject, those are done with small numbered apertures. This is very nice for portrait work, but when you are shooting indoor sporting events this will mean your focus has to be EXACT in order for you to get a sharp shot. Focus is very important because at these low-valued apertures your depth of field is so shallow.
Brand:
This usually comes first in the lens description. In the examples above it was Canon, but I included a Sigma lens in the first paragraph of this article as well. Nikon, Olympus, and other camera makers obviously make lenses for their systems as well, but Sigma, Tamron, Tokina, and others are 3rd party lens makers that make lenses for at least Canon and Nikon.
Personally, I consider Canon and Sigma whenever I go to buy a lens. I own both makes of lenses and feel that in some cases Sigma is just as good as Canon, but it does depend on the specific lens you are looking at. I know other photographers who are happy with their Tamron lenses, but I've never found one of quality for my own use. No matter what the make, you'll need to do your homework before buying a lens because quality will differ greatly depending on the lens you are looking at -even with Canon! (...unless you buy all "L" glass.) If you are on a budget, though, 3rd party lenses are worth considering!
The Alphabet Soup:
After the basic lens description ("Canon 75-300mm f/4-5.6") comes a bunch of letters. I'll try to define as many as I can here:
http://imaging.nikon.com/products/imaging/lineup/lens/glossary.htm
More Sigma lens definitions:
http://www.sigmaphoto.com/lenses/lenses.asp
Lens Test Data:
The final step in lens shopping is to look at comparisons between similar lenses. Google searches may result in many test shots, searches on Flickr can show you samples of what others have done with the lens, and these are really good things to do, but the best way to compare lenses is to look at the sites below:
Hopefully, if you're lens shopping you have a purpose in mind. Make sure you really think about what it is about your current lens(es) that is making you look for a new lens. What will the new lens be used for the most? Will there be other uses? What kind of lighting situations will it be used in? And are there features you want in a new lens?
Focal length:
This is usually the first part of the lens description followed by "mm" as in the bolded part here:
Canon 75-300mm f/4-5.6 USM IS AF
The smaller the number, the farther away your subject will appear and the more of your surroundings will fit into a shot. "Wide" lenses (10mm to 30mm) are often used for landscapes, "Normal" or "Standard" lenses are 30mm to 50mm and come close to what we see normally with our eyes. For this reason, they are often used for portrait work and as general walk-around lenses. Telephoto lenses are anything 100mm and up. They are used for wildlife, candids, and other situations where you want or need to take photos at a distance.
Zoom Lenses:
When you see two numbers like you do above "75-300mm" that means it's a zoom lens. These are the lenses most of us are familiar with. They'll make the subject appear closer or further away as we turn a ring on the lens.
Primes / Fixed Lenses:
If you see just one number, the lens is a "prime", otherwise known as a "fixed" or "standard" lens. These lenses don't "zoom". In order to make the subject appear closer or further away, you'll need to "zoom with your feet", in other words, move yourself closer or further away.
People choose primes because you can usually get better quality and "faster lenses" for much cheaper this way. (We'll discuss "fast" lenses later.) Usually people purchase something like a fast 30mm or 50mm prime for portrait work.
Maximum Aperture:
After the focal length there's usually a "f/" followed by a number or two numbers. The maximum aperture is bolded in the example below:
Canon 75-300mm f/4-5.6 USM IS AF
If you aren't using manual mode yet you can see some of my other articles for the specifics on aperture, but here's the quick and dirty -the lower the numbers after the "f/" the "faster" the lens is. f/4-5.6 is not all that fast, the example lens is fairly average. When you get into f/2.8 or even all the way down to f/1.0 with some specialty primes, those are what are considered "fast".
"Fast" lenses will give you 2 advantages. First, the lower that number, the better low-light performance you'll get. This is really why they are called "fast" -the lower your aperture number, the faster shutter speed you'll be able to achieve, so if you take photos of, say indoor sporting events or dance recitals a fast lens can help you avoid blur due to camera or subject movement.
The side-effect from using really low-numbered apertures like f/2.8 or 1.4 is a really shallow depth of field. So, if you like those photos with really smoothly blurred backgrounds and a sharp subject, those are done with small numbered apertures. This is very nice for portrait work, but when you are shooting indoor sporting events this will mean your focus has to be EXACT in order for you to get a sharp shot. Focus is very important because at these low-valued apertures your depth of field is so shallow.
Brand:
This usually comes first in the lens description. In the examples above it was Canon, but I included a Sigma lens in the first paragraph of this article as well. Nikon, Olympus, and other camera makers obviously make lenses for their systems as well, but Sigma, Tamron, Tokina, and others are 3rd party lens makers that make lenses for at least Canon and Nikon.
Personally, I consider Canon and Sigma whenever I go to buy a lens. I own both makes of lenses and feel that in some cases Sigma is just as good as Canon, but it does depend on the specific lens you are looking at. I know other photographers who are happy with their Tamron lenses, but I've never found one of quality for my own use. No matter what the make, you'll need to do your homework before buying a lens because quality will differ greatly depending on the lens you are looking at -even with Canon! (...unless you buy all "L" glass.) If you are on a budget, though, 3rd party lenses are worth considering!
The Alphabet Soup:
After the basic lens description ("Canon 75-300mm f/4-5.6") comes a bunch of letters. I'll try to define as many as I can here:
- AF -AutoFocus
- EF or EF-S -"EF" means it'll fit any Canon camera wether it's full frame or a crop sensor. These lenses are required if you have a full frame camera (a Canon 1D or 5D). "EF-S" lenses fit only crop sensor cameras. These include Canon's Rebel lineup (XT, XTi, XSi, XS), and the 10D, 20D, 30D, 40D, and 50D's. The "EF-S" lenses are usually a little cheaper, but if you decide to move to a 1D or 5D someday, you won't be able to use them on your full frame camera.
- HSM -Sigma's version of "USM", it's an autofocus mechanism that's faster, focuses better than non-HSM in low light, and it's quieter than non-HSM lenses as well.
- IF -Internal Focus, these lenses will not have rotating front elements and they won't change length while you are focusing. This is a good thing for macro photography where if the lens moves while you focus there's a risk of the front of the lens hitting your subject as you focus.
- IS -"Image Stabalized", this means the lens will compensate for some movement as you take photos. This helps in low-light situations when camera shake often ruins photos. It's not magic, but it'll help give you a stop or two advantage depending on the lens. Some lenses have dual IS motors so you can turn on just vertical IS or both vertical and horizontal compensation. The ability to turn off horizontal compensation is nice for automotive photography since it can help keep panned shot sharp.
- "L" -If you see an "L" tacked on to the end of a lens description like "Canon 70-200mm f/2.8L" it designates the lens as one of Canon's pro line lenses. If it's a telephoto, it'll be white like you see on the sidelines of many sporting events. If it's a wide-angle lens it'll just have a red ring that designates it as an "L", but either way "L" lenses are generally of excellent quality, but are also very expensive.
- Macro -These lenses will focus closer than non-macro lenses. True macro lenses will give you 1:1 size ratios although some "macro" lenses won't do 1:1, so if you really want to get into macros, make sure you verify whether the lens you're looking at will do 1:1.
- MF -Manual Focus
- OS -"Optically Stabalized", Sigma's equivilent of the "IS" designation for Canon lenses
- Rotating front element: One thing to watch out for on cheaper lenses is a front element that rotates. This will make it difficult to use a circular polarizer filter on the lens.
- USM -"Ultra Sonic Motor", this is an autofocus mechanism made by Canon that's fast, focuses better than non-USM in low light, and it's quieter than non-USM lenses as well.
- VR -"Vibration Reduction", Nikon's designation for image stabalized lenses
http://imaging.nikon.com/products/imaging/lineup/lens/glossary.htm
More Sigma lens definitions:
http://www.sigmaphoto.com/lenses/lenses.asp
Lens Test Data:
The final step in lens shopping is to look at comparisons between similar lenses. Google searches may result in many test shots, searches on Flickr can show you samples of what others have done with the lens, and these are really good things to do, but the best way to compare lenses is to look at the sites below:
- http://photozone.de the best site for lens reviews, they test center and edge sharpness, vignette, and chromatic aberration
- http://www.the-digital-
picture.com/Reviews/ there's a nifty tool on this site that allows you to compare lens sharpness tests side-by-side - http://www.dpreview.com/
lensreviews/
Tuesday, January 27, 2009
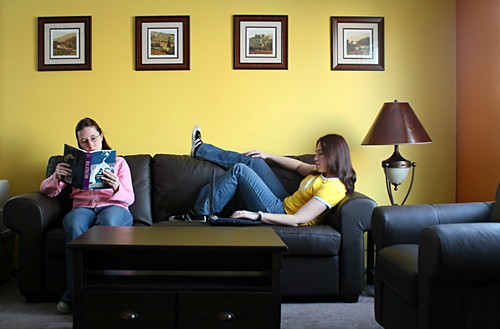
Photos to learn from: Day 223 - O Brother
The poses for both children are perfect here. As a "big sister" to a "little brother" this really conveys what I felt many times in childhood -annoyance at my little brother!
The lighting is suberb. Just like the flower photo, there's enough definition with shadow to show contours, but no sharp shadow lines -they are all very soft and not distracting.
The background is simple. The low perspective helps with that. It also lets us connect with the girl better. Generally, shooting at eye-level with your subject will help your photos a lot.
The wide-angle gives a lot of depth to the photo and the fact that the line from the corner of the 2 walls divides the children adds to the photo in a subtle way as well.
...I'm not usually a big fan of "kid" photos because most people just try to capture their kids as they are, but this one is creative and really strikes me (personally) emotionally with memories of my own childhood. Thinking of capturing an emotion in addition to a photo will bring your work to the next level and make it more interesting to a general audience.
Photos to learn from: A cala copout
This is a simple flower shot, but what makes it exceptional in my mind is the fact that most of us would never think to let such so much of the flower fall outside the frame like the photographer has done here.
The reason that cropping the flower is okay here is that the flower isn't so much the subject as is shape. -It's almost an abstract. That gentle S-curve that's accentuated by the plain and contrasting black background is what makes this shot -and (IMO) is what the shot is about.
The lighting is also superb. There are shadows to show 3-dimensional shape, but they are very soft -there are no sharp lines where they begin or end. It's all very subtle and perfect.
Exercise: Take a simple subject like a flower, a fork, a shoe -whatever you have lying around and take at least 50 shots of it from different angles. Aspire to 50, and push yourself. You'll be surprised how creative you can be if you push yourself!
...feel free to post photos that you find to be exceptional on Flickr here for us all to see & we can discuss what makes them great and the lessons we can take from them. Explore is a great place to go to find inspirational photos.
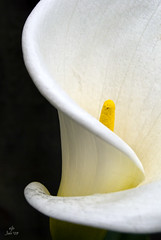
Friday, January 23, 2009
How I learned manual mode
Here's a secret for all of you who are frustrated trying to learn manual mode. ...it took me at least 3 REAL tries (in addition to numerous half-hearted attempts) before I learned how to use manual mode. Know how I finally did it? I tackled it one piece at a time. I limited my reading to what the numbers meant for aperture and shutter speed and with the aim that all I cared about was how the different aperture settings would effect my photos, and what shutter speeds would be fast enough so I didn't need a tripod. And I wrote down short notes to help me when I had my camera in hand:
Aperture:
small numbers = shallow depth of field = more light
large numbers = deep depth of field = less light
Shutter Speed:
60mm or less = minimum of 1/60th
over 60mm = 1/lens (100mm = 1/100, 500mm - 1/500, etc)
That's it -that note and your camera's manual are all you need for your first outing. Put your camera on Aperture Priority mode, go outside during the day when there's a lot of light, and practice on anything you can find. Aperture Priority mode is great -all you do is set the aperture you want, the camera will find the shutter speed to match it, so as long as the shutter speed is fast enough (according to the note above), you're fine -shoot away! If the shutter speed is not fast enough, increase your ISO.
With time you'll get a feel for how aperture effects your photos, how your shutter speed changes when you change the aperture, and how ISO effects your settings as well. It's a great, slow way to learn.
When you're comfortable with aperture, explore other people's photos and find things to experiment with as far as shutter speed goes -there's light painting, silky/milky waterfall effects, ghost effects, etc that involve shutter speed. The more you experiment, the more you'll learn.
This slow way of learning by doing worked much better than reading and studying for me because there's just so much to learn at the beginning. You can read and understand 10 pages of material, but when you pick up the camera it all seems to blur while you try to figure out which of those numbers are what setting, and which buttons and dials effect what. Learning one thing at a time, slowly, worked much better for me. If you're frustrated trying to learn manual mode and feeling overwhelmed, this way of learning may work better for you as well.
Tuesday, January 6, 2009
Manual Mode Cheat Sheet
Exposure & your light meter:
* Exposure means how bright or dark your photo is.
* "Correct" exposure means that the photo came out as dark or light as you intended.
* The light meter on your camera will show you your exposure.
* The light meter on your camera looks like this:
[-2...-1...0..+1..+2]
* "0" on your light meter usually gives you a "correct exposure".
* Exposing for positive numbers like "+1", "+1.5", "+2", etc will make the photo BRIGHTER.
* Exposing for negative numbers like "-1", "-1.5", "-2", etc will make the photo DARKER.
Aperture:
* Aperture adjusts how large of an opening your lens makes to let light in.
* Low numbers like f/4 = larger opening = more light = a more shallow depth of field
* High numbers like f/20 = smaller opening = less light = a deeper depth of field
* Depth of field means how much of the photo is in focus. See examples below:
Shallow depth of field:
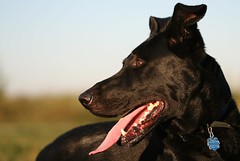
(click for larger version)
Deep depth of field:
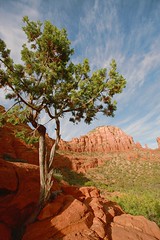
(click for larger version)
Shutter Speed:
* "500" in the viewfinder means a shutter speed of 1/500
* Shutter speeds of 1/60th or less can't usually be handheld, put your camera on a tripod
* For telephoto lenses, even faster shutter speeds are needed to handhold the camera, a rule of thumb is for a 100mm lens you need 1/100 or faster, 300mm = 1/300 or faster, 500mm = 1/500 or faster, etc.
* 1/6 or 1/8 is good for blurring waterfalls
* 1/125 can be used for panned shots of cars
* 1/500 will stop most action
* The slower your shutter speed, the more light you get.
* The faster your shutter speed, the less light you get.
ISO:
* ISO determines how fast your image is recorded
* ISO 100 will record light the slowest (less light)
* ISO 800 will record light 8x faster than ISO 100 (more light)
* Higher ISO's will result in more noise or "graininess" in your image.
Each setting effects the rest. Once you find settings that give you a "correct" exposure ("0" on your exposure meter), you can change your settings to find a more "creatively correct" exposure.
If you change the aperture from f/4 to f/5.6 you'd be SUBTRACTING light by 1 stop. You could ADD back a stop of light by increasing the ISO from 100 to 200, or by choosing a slower shutter speed like 1/30 instead of 1/60.
A great way of seeing how aperture and shutter speed relate to one another is to play with this camera simulator for awhile. And note that ISO relates to aperture and shutter speed in the same way.
...but don't worry too much about calculating the exposure like the examples above. Eventually you'll want to know how to do it, but for now you can just change the settings, watch the exposure meter, and aim for "0" (or whatever gives you the brightness you want, but "0" is a good place to start if you're unsure -it'll at least get you close and you can adjust from there).
Feel free to print this or copy and paste parts of it to keep in your camera bag as a quick reference. I kept a cheat sheet like this with me for at least 6 months after learning to shoot in manual mode.
* Exposure means how bright or dark your photo is.
* "Correct" exposure means that the photo came out as dark or light as you intended.
* The light meter on your camera will show you your exposure.
* The light meter on your camera looks like this:
[-2...-1...0..+1..+2]
* "0" on your light meter usually gives you a "correct exposure".
* Exposing for positive numbers like "+1", "+1.5", "+2", etc will make the photo BRIGHTER.
* Exposing for negative numbers like "-1", "-1.5", "-2", etc will make the photo DARKER.
Aperture:
* Aperture adjusts how large of an opening your lens makes to let light in.
* Low numbers like f/4 = larger opening = more light = a more shallow depth of field
* High numbers like f/20 = smaller opening = less light = a deeper depth of field
* Depth of field means how much of the photo is in focus. See examples below:
Shallow depth of field:
(click for larger version)
Deep depth of field:
(click for larger version)
Shutter Speed:
* "500" in the viewfinder means a shutter speed of 1/500
* Shutter speeds of 1/60th or less can't usually be handheld, put your camera on a tripod
* For telephoto lenses, even faster shutter speeds are needed to handhold the camera, a rule of thumb is for a 100mm lens you need 1/100 or faster, 300mm = 1/300 or faster, 500mm = 1/500 or faster, etc.
* 1/6 or 1/8 is good for blurring waterfalls
* 1/125 can be used for panned shots of cars
* 1/500 will stop most action
* The slower your shutter speed, the more light you get.
* The faster your shutter speed, the less light you get.
ISO:
* ISO determines how fast your image is recorded
* ISO 100 will record light the slowest (less light)
* ISO 800 will record light 8x faster than ISO 100 (more light)
* Higher ISO's will result in more noise or "graininess" in your image.
Each setting effects the rest. Once you find settings that give you a "correct" exposure ("0" on your exposure meter), you can change your settings to find a more "creatively correct" exposure.
If you change the aperture from f/4 to f/5.6 you'd be SUBTRACTING light by 1 stop. You could ADD back a stop of light by increasing the ISO from 100 to 200, or by choosing a slower shutter speed like 1/30 instead of 1/60.
A great way of seeing how aperture and shutter speed relate to one another is to play with this camera simulator for awhile. And note that ISO relates to aperture and shutter speed in the same way.
...but don't worry too much about calculating the exposure like the examples above. Eventually you'll want to know how to do it, but for now you can just change the settings, watch the exposure meter, and aim for "0" (or whatever gives you the brightness you want, but "0" is a good place to start if you're unsure -it'll at least get you close and you can adjust from there).
Feel free to print this or copy and paste parts of it to keep in your camera bag as a quick reference. I kept a cheat sheet like this with me for at least 6 months after learning to shoot in manual mode.
Subscribe to:
Posts (Atom)