Saturday, January 2, 2010

Lighting techniques

Many times when shooting an event or while at a family function you'll be called upon to take a photo of a person or group against a wall; so this a good project for beginners to practice. I'm going to walk you through one sample situation and we'll discuss some different ways that you could take the photo and their good and bad points. Note that this is part one of a two part article. This part will discuss quality of light only. The next article will discuss the color of the light. You'll notice that there are different color casts to the example photos included below -please ignore them for now. I want to tackle one issue at a time so, for now, we'll be focusing on the quality of light only.


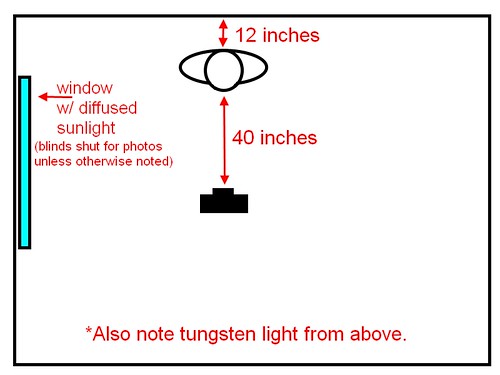
Okay, first let's talk about the situation. You're being asked to take a photo of one person against a white wall with a window to the camera's left (the model's right). The window has blinds on it so you can close or open them as you see fit. Outside it's bright, but cloudy so the light's fairly nicely diffused by the clouds, but since it's on the model's right side, it only lights half of her face. Overhead there is a 60W tungsten light bulb in a fairly normal (slightly diffused) ceiling fixture.

Here's a diagram:
Setup for model shots

If you close the blinds and take a shot using only the room lighting (the tungsten bulb) here's what you get:
Overhead tungsten bulb only
Note the fairly well-defined shadow under her nose and lips and also on her neck due to the lighting from above. Also, the light's not catching her eyes well since her brow is blocking most of the light from above.

If you open the blinds to allow the light from the window in you get this:
Overhead tungsten plus diffused side-light from a window
That's softened the shadow on the neck and under the lip, but it's created a shadow from her nose on the left side of her face and we really want more light on the left side too.

To get more light on her left side, we'll grab a reading lamp with a 100W equivalent daylight-balanced CFL in it and put it to the model's left (camera right). Here's the result:
Window side-light w/ lamp to fill shadows
Wow, the lamp is brighter than the window light, so now we have sharply defined shadows from the lamp on the model's right side from her chin and nose!

Perhaps we can tone down and diffuse the lamp light by putting something in front of the bulb? Let's try a piece of copy paper held in front of the bulb pointed at the model:
Window side-light with diffused lamp to fill shadows
That softened the shadows on the face nicely. The shadow on the neck's still there, but I'd call this acceptable!

But what if there was no such reading lamp? Perhaps we could try flash instead? Here's one using the on-camera (pop-up) flash:
On-camera (pop-up) flash
Whoa! That's harsh -check out the highlights in the hair, under the eyes, on the chin, and the sharp "chinstrap" shadow on the neck. This isn't very flattering light, it needs to be softened a LOT!

So, let's try putting something in front of the flash to help disperse the light better. A tissue or a paper towel would work, but all I could find was some toilet paper. Let's try to make due with that -I folded it a few times, then put it over the flash and here's the result:
Pop-up flash diffused w/ toilet paper
That toned the highlights down, but only slightly and the more we diffuse the flash, the less light we get out of it and the worse the shadow under the nose will get due to the overhead light.

So, let's try a more powerful flash. Below is the result of attaching a Canon 580EX flash on ETTL and aimed directly at the model.
Canon 580EX flash on camera pointed at model
Not too surprisingly, just like the pop-up flash, the 580EX straight-on is too harsh.

Let's try attaching one of those cheap $5 diffusion caps to the flash head (keeping the flash pointed directly at the model):
Canon 580EX w/ $5 diffuser cap pointed at model
Well, that diffused fairly well -the highlights are softer, but there's enough light to soften the shadow under the nose too. The shadow on the neck under the chin is still quite dark and well-defined, though.

Let's try taking the diffuser cap off and pointing the bare flash bulb at the ceiling instead.
Canon 580EX flash on camera pointed at ceiling
Wow! That did a great job of getting rid of that "chin strap" effect of the sharp shadow on the neck under the chin! There's enough shadow to show definition, but they are soft so they aren't distracting. I'm counting this one as a keeper.

I have one more thing in my bag I'd like to try, a Lumiquest Pocket Bouncer. Let's attach that and try it with the default white surface.
Canon 580EX with Pocket bouncer using white surface
Hmm... chin strap is back. The rest of the shadows look good, though.


...this article was really to spur some discussion, so feel free to comment here, on the individual photos on flickr, or on the mailing list. I'd be happy to try other techniques and take more sample photos as well as explain the how's and why's of the above photos if you have questions. Otherwise, stay tuned for part two of this article where we'll discuss white balance and the how's and why's of using gels on your flashes.

Sunday, October 25, 2009

November's Online Manual Mode Course

I'm offering my Manual Mode Course in one of two ways for November. You can take the course via email at your own pace or as a group starting November 9th. The cost, either way, is the same as always -$99.

All you need for the course is a camera capable of Program Mode ("P" on your mode dial), Aperture Priority ("A" or "Av"), Shutter Speed Priority ("S" or "Tv"), and Manual Mode "M") and a tripod. The tripod doesn't need to be fancy, a $25 Walmart one is just fine.

The course is set up in 4 parts. When done as a group it's a part a week for 4 weeks. It's light on reading and heavy on hands-on practice. If taking it as part of a group it'll happen as part of a mailing list this time around rather than the Flickr group used in the past. You'll need an hour for practice at least 2 nights a week (minimum) and a few hours over the weekend in order to get the practice and projects completed in order to get the most out of the course. It's a strenuous 4 weeks for many people with busy lives, which is why I'm now offering "at your own pace" lessons via private email as well.

If you're interested in taking the Manual Mode course, contact me at my name at muddyboots.org (that's Ee-are-eye-sea-ay at muddyboots.org or see this link), and please note that class space is limited in order to ensure my availability for questions, etc.

-Erica Marshall

Tuesday, October 6, 2009

The windows of the soul

We connect with people (and other living things) through the eyes, so the eyes are the most important part of just about any portrait that you do. So, here's a few quick tips on getting better portraits by paying close attention to the eyes:

The Basics:

1. Make sure they are in focus. If you use autofocus, focus on the eyes. If you are focusing manually, then concentrate on getting them in focus.

2. Have your subject look into the camera, it creates a feeling of connection.

3. Shoot at eye level. This is one of the more well known "rules" of photography -if you're taking a photo of a toddler or a pet, sit or kneel on the floor to get on their level. If you have eye contact, though, I find that this rule can be broken effectively. Note that shooting up at a person or pet can make them look more powerful or important while shooting down at them makes them look smaller. (I find shooting down at people/pets more effective when the angle is more extreme -shooting straight down at a toddler or pet looking straight up, for example.) But shooting at eye level is always the safest.

Other tips:

4. Pay attention to the light. If you can get your subject at the right angle to the light their eyes will light up and the color in them will be greatly enhanced. Pay attention to the light and take advantage of it when you pose people, but also look for it when you're taking candids.

5. Make a connection. A tiny difference in the eyes can make the difference between a blank stare, sadness, happiness, anticipation, fear, etc. Generally when people hear "say cheese" they turn to the camera and give a cheesy smile with dread, embarrassment, fear, or no emotion in the eyes. You'll find genuine smiles (and the real emotion in the eyes that follow a real smile) will really light up your photos, so try to make a connection with your subject -if it's a person, try to talk a genuine smile out of them. For pets, you can often get anticipation in their eyes with a favorite toy or treat held up near the lens to get their attention.

Monday, September 21, 2009

NEW! Manual Mode CORRESPONDENCE Course!

I realize that we all live hectic lives and many people can't commit to a fast-paced 4 week Manual Mode Course. For that reason, I'm now offering the course via email. You can start any time (email me to confirm there's room and that I'll be available), and the cost is the same, $99.

The course materials are exactly the same, but the lessons will be emailed to you. Once you've completed the exercise photos for one lesson, I'll send you the next. There are 4 lessons total. As always, the lessons are light on reading and heavy on both guided and "free" practice exercises -because I believe that's the best way to learn.

All you need to take the course is a camera capable of Manual mode, Aperture Priority mode, and Shutter Speed Priority mode and a tripod (the $25 Wal-Mart ones work just fine).

After finishing the course via the Flickr Group (the old way, which is still available on a scheduled basis) or via email, once you've completed it you'll be invited to the invite-only Alumni group where you can talk with fellow students, post photos you've taken with your new skills, ask any photography-related questions you may have, and ask for critique on settings or your photos overall.


If you are interested in taking the Manual Mode course in either format, email me at my name at muddyboots.org (that's Eee-are-eye-sea-ay @muddyboots.org).

Wednesday, September 2, 2009

Researching the best budget all-around zoom lens

After my latest vacation I realized something. My camera bag is full of odd lenses, mostly primes, that have built up for various reasons. In my walk around kit I usually have a Canon 10-22mm, Canon 100mm f/2.8 macro, and a Sigma 30mm f/1.4. So, while my husband (who has a Sigma 17-70mm f/2.8-4.5) would photograph whatever was in front of us in a couple minutes, I'd take a few photos with one lens, then switch to another for a different view, and then sometimes even a third if I wanted close-ups or detail shots. It was truly frustrating.

Sure primes are sharper and yes, it's nice to have fast lenses, but honestly for walking around and taking tourist shots, perfection is unnecessary and avoiding frustration is my goal. I need my photography to be fun again. Lightening my load would be a big plus here too. So, I'm starting to look at budget all-around lenses. I don't expect them to be perfect optically. The larger the zoom range the better (within reason, optical quality DOES matter), oh and it must be CHEAP! I'm living on a part-time (read: every other weekend) Vet Tech position and my Manual Mode course income.

So, here's what I've found so far:
Click here for a spreadsheet of my research.

If you have experience with any of these lenses or any other advice, feel free to email me or leave a comment. It'll be awhile before I make a purchase -I just don't have the money together yet. It may end up being something I ask for at Xmas or my birthday. (December/January)

Thursday, August 6, 2009

Next Online Manual Mode Course To Start September 7th!

Leave a comment, email me at (e-are-eye-sea-ay-at-muddyboots.org), or contact me on flickr to be put on the list. The cost is $99 for the 4 week course. All you need is a camera capable of Aperture Priority, Shutter Speed Priority, and Manual modes and a tripod (the $25 WalMart ones work just fine).

A couple spaces are still available as of 9/2/2009, so if you want in, let me know!

Monday, July 6, 2009

7/20/2009 Online Manual Mode Class (FULL! ...but you can sign up now for the September class!)

I've taken my in-person Manual Mode lessons and developed an online Manual Mode course out of them. The first class will start July 20th. Cost for this first round of students will be $50 each for the complete 4-8 week course! (Due when the class list is announced.)

This class is full! Add a comment or email me if you'd be interested in the next class to be offered starting either 8/31 or 9/7.

Thanks for your interest!