Thursday, June 3, 2010

"Stops" of light

As you get into photography you'll hear people talking about "stops" or "stops of light". Grasping what this actually means can be tricky, so let me attempt to explain it here...

If you have an SLR style camera it probably has a graph that looks like this on it in the viewfinder and perhaps also on other displays on the camera:
[-2...-1...0..+1..+2]
* NOTE that on Nikons the positive numbers are on the left and the negative numbers are on the right.
This graph is your exposure meter. "0" on the graph usually represents correct exposure. The other numbers measure "stops" of light. If you are on Manual Mode and you set your ISO, aperture, and shutter speed and the exposure meter indicates "+1" that means that you have one "stop" of light more than what is generally considered "correct exposure". Sometimes you want this, sometimes you don't. If you are aiming for "0", you can easily add or, in this case, subtract a "stop" of light as long as you know how to calculate "stops" for each of the 3 settings. Don't worry -it sounds like math, but it's really easy -you'll see.

With ISO, a move from ISO 100 to ISO 200 is one "stop" of light. And a move from ISO 200 to ISO 400 is also one "stop" of light. Each time you double the ISO number, you add a "stop" of light to the photo. So your ISO "stops" are:
  • ISO 100 <-- less light
  • ISO 200
  • ISO 400
  • ISO 800
  • ISO 1600 <-- more light
So, a move from ISO 100 to ISO 800 is 3 stops -easy right? If you set your ISO to "100" and your exposure meter showed "-2" and you wanted to expose for "+1" you could change your ISO to 800 and you'd be good to go. See how that works? Not too difficult.

Shutter speed stops are kind of the opposite. When you half the number you are adding a stop of light. This makes sense because 1/2 of a second is longer than 1/4 of a second and it makes sense that when the shutter is open longer, it's letting more light in. So, here are the shutter speed stops:

  • 1 second <-- more light
  • 1/2 second
  • 1/4 second
  • 1/8 second
  • 1/16 second
  • 1/30 second
  • 1/60 second
  • 1/125 second
  • 1/250 second
  • 1/500 second
  • 1/1000 second <-- less light
* Note that the halving and doubling of shutter speed stops are often rounded.

So, if your set your ISO and aperture to what you wanted and then set your shutter speed to 1/125 and your exposure meter indicated "+2" (over exposure) when you were wanting an exposure of "0" -you could change your shutter speed to 1/500 to decrease your exposure by 2 stops and get your correct exposure.

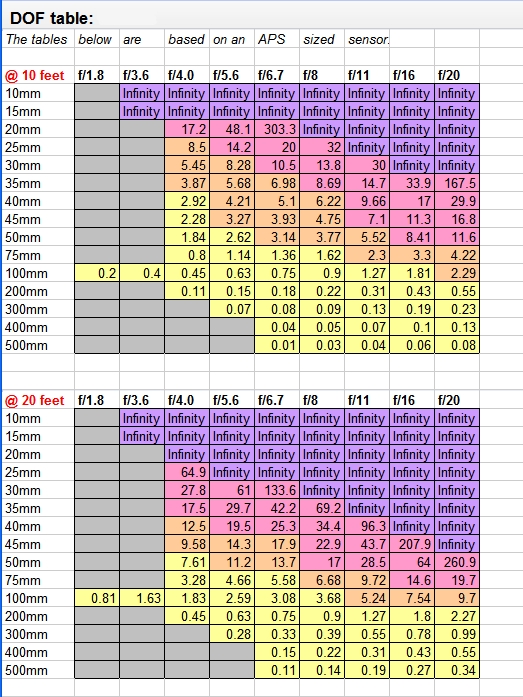
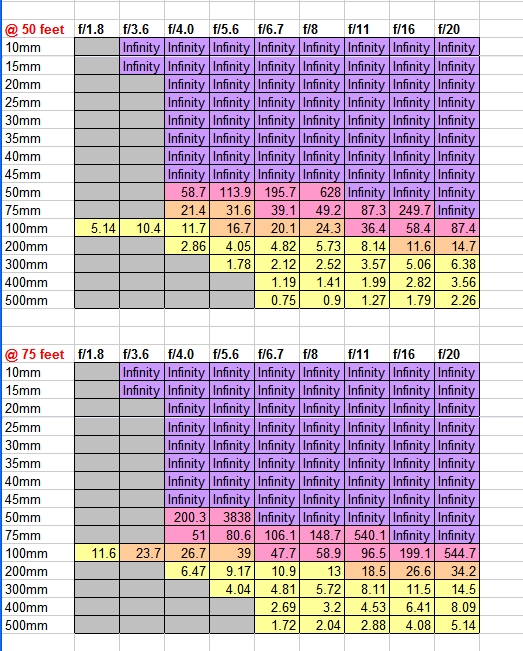
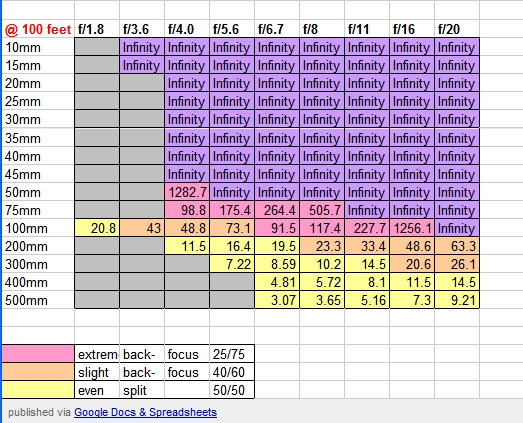
There's a reason I've left aperture for last. This is the one that most people have trouble with, but we'll work it out. If all else fails, just print this page out and stick it in your camera bag until you've got it worked out through practice.

Aperture controls how far open the blades on your lens go in order to let light in when a photo is taken. They can open just a tiny pin-hole or open up all the way, perhaps the size of a small marble or even a big one depending on the lens you have.

The geek who decided on how these different levels of opening would be defined decided to do something that makes most of us go "huh?" -he used the focal length (the size of the lens in millimeters -for example, a "50mm lens") and expressed the size of the aperture hole as a fraction of the size of the lens. ...I know, I know -I told you you'd say "huh?". It's okay if you don't understand or can't remember this. It makes no real difference in your photography. I only included it to make you understand that apertures are fractions. That's also why they are written as "f/4". So, just like other fractions, as the aperture value (f/8 for example) get's smaller the size of the hole gets larger. Just think of it as a fraction -just like shutter speed. 1/8th of a pie is larger than 1/16th of a pie. 1/8th of a second is longer than 1/16th of a second. And likewise f/8 is larger than f/16. And a larger hole lets more light in. So, f/8 lets more light in than f/16. Got it? ...if not, just memorize or print the aperture stops and learn it through practice. This trips a lot of people up, so don't be too hard on yourself if you are confused.

Ready for the 2nd confusing thing about aperture? Halving the aperture value (f/16 to f/8 for example) results in the addition of 2 stops of light. So, aperture stops are as follows:
  • f/1.4 <-- more light
  • f/2
  • f/2.8
  • f/4
  • f/5.6
  • f/8
  • f/11
  • f/16
  • f/22 <-- less light
* Note that available aperture values are determined by your lens. Not all lenses are capable of all of the above apertures.

So, if you set your ISO and shutter speed and had an aperture of f/16 your exposure meter indicated an exposure of "-1" and you wanted to expose for "0", changing your aperture to f/11 would get you the exposure you were looking for.

Wednesday, June 2, 2010

Neutral Density Filters

Neutral Density or "ND" filters come in 2 types: graduated, where they fade from clear to gray, or normal which are all gray. This article will be focused on the more popular completely gray ones, but once you understand the concept it's not difficult to figure out how to use the graduated ones as well.

As I said before, ND filters are completely gray and they come in different strengths. Many manufacturers label their filters 0.3, 0.6, and 0.9 while others may label them 1X, 2X, and 3X. Either way, they block 1 "stop" of light, 2 "stops" of light, or 3 "stops" of light respectively. -More on that later.

If you take a series of photos, each with a different strength filter, then one more photo without an ND filter at all, you might be surprised to find out that none of the photos would look any different from the others. Think about it this way, your camera can adjust for shade or indoor lighting vs bright sunlight, right? Well, it adjusts for the darkness that results from the filter in the exact same way.

So why would you use an ND filter then?
ND filters cut the amount of light that enters your lens. This may not effect the look of your photo, but it does effect the settings for shutter speed, aperture, and ISO that the photo is taken with. Let me give you an example of when you'd use an ND filter:

Let's say it's really bright outside and you are shooting a waterfall. You want to blur the motion of the water to get a milky effect like this. So, you set your camera to the lowest ISO you can, which we'll say is 100. And you set your aperture to f/16 (a sharp, high-number to cut down on the amount of light in your photo), and the shutter speed that you have to use to get the photo properly exposed is 1/45. -That's likely to be too high to blur the water much at all! ...so you disregard the sharpness loss of setting your aperture to f/22 which eliminates 1 stop of light. That will give you a shutter speed of 1/30 -still not enough to blur the water and (as is the case with many lenses) that's the highest aperture you can set with the lens you are using, so there's nothing else you can do via settings to get a lower shutter speed to blur the waterfall. ...but when an ND filter will help you!

* A 0.3 or "1X" filter will eliminate 1 stop of light which would give you a shutter speed of 1/22.
* A 0.6 or "2X" filter will eliminate 2 stops of light. ...that'd get you a shutter speed of 1/15. Now we're getting closer...
* Your 0.9 or "3X" filter will eliminate 3 stops of light. ...that'd get you a shutter speed of 1/11. ...that would do it if it's a fast-flowing waterfall.

I find ND filters that remove 3 stops of light or so to be the most useful. Also note that if you have a set of filters you can stack them to get an additive effect.

* If you stack the 0.3 and the 0.9 that'd remove 4 stops of light which would give you a shutter speed of 1/8 which usually blurs waterfalls very well.
* Stacking all 3 would reduce the light by 6 stops which would give you 1/4.
* ...but note that stacking creates more glass to shoot through, likely lowering your image quality. High-quality filters may be okay, though, especially if you don't crop the photo or print it at it's maximum size.

Monday, May 17, 2010

Light, Direction

Think about it. Light is what photography is about. So, it's really important to notice it. The color, the direction, the shadows that result.

Next time you're driving an hour or so after sunrise or before sunset, notice the warm color and the long shadows. If you're driving North to South (or South to North), notice that one side of the road is in shadow and the other is bathed in beautiful warm light. Then ask yourself, in which direction would you want to look for photo opportunities?

The answer seems obvious in writing, but the majority of us have hundreds of sunset photos in our portfolios. Next time, try turning your back to the sunset and look for the photo ops that everyone else misses. The joy you get from being the one person in a crowd who's facing the "wrong" direction is a great bonus too! ;-)

Wednesday, April 14, 2010

Shooting The Moon

Your camera gets confused when you have a really dark background (the sky) with a really bright spot on it (the moon). -It doesn't know what's more important: the dark sky, or the bright moon, so it'll often "compromise", which will make the moon too bright.

Fix #1: Spot Metering

Using "spot" metering to tell the camera which part of the scene you want it to expose for (more info on how exposure is determined here), works well, but not all cameras offer spot metering.

If your camera has it it'll make moon shots really easy. Simply select spot metering, then put the moon in the center of the frame (there should be an indicator for where the exact center-point is), hold the shutter button half-way down to activate the camera's meter and lock-in the settings for proper exposure, then re-frame the shot and press the shutter button the rest of the way down to take the photo.

Here's my result using Spot Metering (click photo to see a larger version):

Fix #2: Center-Weighted Metering and Exposure Compensation

If you don't have spot metering it's not a big deal, you can use Center-Weighted metering instead. It may not get you 100% of the way there, but you can use Exposure Compensation to make up for the difference.

If you know that the camera will over-expose the moon (make it brighter than you want it), then all you have to do is tell it to make it a bit darker with "exposure compensation".

If you have an SLR, your meter probably gives you a graph that looks like this:
[-2..-1..0..+1..+2]

If you have a "point and shoot", your camera may give you the value like "-1.2", but either way, "0" is "correct exposure" according to your camera. -That's what it'd choose if you set it to "Auto". But, you know that those settings make the moon too bright, so change the settings to give you a negative number, like -1, then take a photo and see how it comes out. Keep making adjustments until you find what works best for you. Just remember: Negative numbers make the photo darker, positive numbers make it lighter. (Setting the camera to +1 will help photos of snow turn out white instead of gray.)

If you have a digital camera you should be able to use exposure compensation with an "Auto" or "Semi-Auto" mode (see your camera's manual for how to do this). If you have a "point and shoot" film camera this probably won't be possible, but you can try pointing your camera down a well-lit street (make sure your focus is really far away), press the shutter button half-way down and hold it there, point the camera back at the moon, then press the shutter button the rest of the way to take the picture. This should make the moon a little darker than it would have otherwise come out...

For more on Exposure Compensation, click here.

Friday, April 9, 2010

How to Determine Your Depth of Field

There's more to background blur than aperture!

Sometimes it seems like the amount of background blur that you get in a given shot is completely random. I mean, the guideline that the larger the aperture (or the lower the aperture value), the more blur you get is a good one, but it doesn't always work, does it? ...or when it does work, you get varying amounts of background blur, even when using the same aperture value!

The reason for the variation is: There's more to background blur than aperture.

Your distance from the subject (the point of focus) as well as the focal length of your lens makes a big difference in how much background blur you'll get on a given shot.

* NOTE: (Focal length just means how much you're "zoomed in" -it's measured in millimeters, like "100mm".)

So, whitout further delay...

Here's a table to help you determine DOF:

(Click on the tables to view a less crowded and more printable version of the tables.)


These are actually just screenshots of my tables because the ones I made on Google Spreadsheets won't print in color. If you want to view the actual spreadsheet, click here.


Using the spreadsheet:

Print it out (preferably in color), and keep it in your camera bag.

Note that there are 4 tables, each for subjects at different distances from the camera. Use the first table when focusing on a subject that's about 10 feet away, the 2nd for a subject @ 20 feet, etc...


Similar tools, links:

There's a free DOF calculator for Palm OS available. If you have a Palm Pilot, it may be more convenient for you: Click here to go to the program's site. -I've never downloaded or used this software, so this is not an endorsement, use at your own risk.

Alternatively, you can search for online calculators (this is the one I used) or other DOF calculators that you can download for various portable devices. There are also cards you can buy with this information on them, but I find it easier to just print it out myself, study it and refer to it as necessary.

Questions? Comments? Email me on the Photography_Beginner'syahoogroup or use my info on this site's homepage.

Tuesday, March 9, 2010

White balance

Have you ever driven down a residential street or looked at an apartment complex at night and noticed how orange or blue the light is coming through some of the windows? Of course, it doesn't look orange or blue when we're in the room. -It's funny how hard it is to see the color of the light that surrounds us, but in order to become better at getting white balance right, that's exactly what we need to do.

To set up our options, I'll list the white balance options you'll find on most cameras:
* Auto
* Tungsten (aka incandescent or indoor)
* Fluorescent
* Flash
* Daylight
* Cloudy
* Shade

"Auto" is often wrong, so for the best accuracy you can set your white balance for the conditions you are in. For example, use:
* Tungsten: for normal "soft white" indoor lighting
* Fluorescent: for the long-tubed fluorescent lighting that you often find in garages and gyms
* Flash: for when you use flash
* Daylight: outside in sunlight
* Cloudy: outside in cloudy conditions
* Shade: outside in the shade

That will get you 90% of the way there -certainly close enough so that only minor tweaks might be needed in software to get your photo to look right.

If you want to understand what it is that the options are doing you'll be able to make better decisions in the field when the setting that matches your conditions isn't giving you what you want. It'll also let you use white balance settings to creatively add a color cast to your photo on purpose.

First, lets go over the color wheel really quick so we can remember what colors are opposites of each other:
* red - green
* orange - blue
* yellow - purple
* green - red
* blue - orange
* purple - yellow

So, when there's a color tint to the light, your white balance setting just adds the opposite color to the photo in an attempt to correct the tint to make white.

* Tungsten: the light is orange-tinted, so the camera corrects for it by adding blue
* Fluorescent: the light is blue/green-tinted, so the camera corrects for it by adding red/orange
* Flash: the light is blue, so the camera corrects for it by adding orange
* Daylight: the light is pure white, so it needs no correcting
* Cloudy: the light is slightly blue, so the camera corrects for it by adding a little orange
* Shade: the light is blue, so the camera corrects for it by adding orange

This means that by taking a photo in daylight with a white balance setting of "shade", your photo will have a very blue tint to it -this can artificially create the look of dusk in a photo taken in the middle of the day.

Of course, if you accidentally left your white balance on "Shade" and shot in the daylight maybe the blue cast wasn't what you're looking for -setting your white balance yourself is slightly risky because if you forget to set it when conditions change, your photos will not turn out as expected.


This subject inevitably leads some to ask -why not leave your white balance on "Auto" and correct for the color cast in software? The answer is ...well, it depends. If you shoot Jpg's, then dramatic color changes can degrade your image, so getting your white balance as close as possible is recommended. If you shoot in RAW, then yes you can adjust it in software with no degradation of the image -as long as you make your white balance adjustments in your RAW file without first converting it to a Jpg (which would defeat the point).


Thursday, February 18, 2010

Ghostly effect using slow shutter speed

Do you believe in ghosts?

Intro:

When you use a slow shutter speed light is recorded slowly. This is a great opportunity to get creative! You can use this simple technique to create a "ghostly" image, and after you master it you can use it for all sorts of artistic photography. The only limit is your imagination!

Setup:

You will need:

  • Your camera, mounted on a tripod or set on something very steady.
  • A low-light setting in which to take the photo (if there's too much light, its difficult to get the shutter speeds low enough for this to work.) I did mine in the evening as the sun was setting.
  • A person (you can use yourself, but it'll require some running around).

Camera Settings:

  • Turn your flash off.
  • Put your camera in Shutter Speed Priority mode. (In this mode, you can choose the shutter speed, but the camera will do the rest so the photo will come out properly exposed, etc.)
  • Set the time for 10 seconds if you can. If your camera indicates that 10 seconds is too long, make sure your ISO is at 100. If it can go lower, set it lower. If not, reduce the time to the lowest it'll allow.

Taking the photo:

This will require a little trial and error to get the timing right, but the following should get you most of the way there:

  • If you are using another person as your subject, have them get in place.
  • When you're ready to take the photo, click the shutter. And yell "Start" (or some other agreed upon word).
  • Your subject will need to be completely still for 5 seconds. Either have them do the countdown in their head, or you can do it and yell out to them when the time's up... whatever.
  • At the end of the 5 seconds, have the subject run out of the frame as fast as possible. -It's best to run at a right angle to the camera (either to the left or right of the camera, but not towards it).
  • 5 more seconds will pass, then you'll hear the shutter close and you're done.
  • Check the results, you may need to try again and either decrease or increase the amount of time the subject stays in the shot. The more time they are there, the more "solid" they will look.
  • If you are taking a photo of yourself, just click the shutter, run into the shot and take position as fast as possible, then do your count, and run out. You'll basically need to get into position in about 2.5sec, stay for 5 sec, then run out of the frame in 2.5sec.