Sunday, July 4, 2010

My Gear -Cameras

A commenter recently asked me to post my equipment list, so here's the first part:

Cameras:

Canon Elan IIe (film SLR):
My Dad and I bought it while I was in college and we "shared" it for years when I lived at home, then he passed it down to me a few years after I moved out of the house. It is still an excellent camera with most of the bells and whistles that my Canon 30D has, aside from the digital stuff, along with one none of my digital cameras have -it can automatically pick which autofocus point to use by following the movement of your eye. This feature requires some calibration to work, and it's not all that consistent, which is probably why they eventually dropped the feature in their products. I used this camera on it's various "Auto" modes while I was in college and for at least a year after it became "mine" before actually learning to use Manual Mode on it.

Canon 30D (mid-level DSLR):
My first digital SLR. I had decided I wanted a 5D because I was scared to buy a "cropped sensor" camera even though I had no idea what that meant. After a year of saving I had $1500 -half of what I needed for a 5D, but I was already so far behind the switch to digital and anxious to try it that I started researching what "crop sensor" meant to see if a 30D would work for me. I was surprised to learn that crop sensors are actually a benefit to photographers who shoot telephoto more than they do wide because they effectively add to the focal length of your lens. Since, at that time, I was mostly shooting wildlife photos (hence the name "Muddyboots Photography") I decided to go with the 30D and was very happy with it for 4 years. I still use it as a backup to my current camera, it's really nice to have two when you're at an event where you switch from telephoto to wide a lot.

Canon Rebel T1i/500D (budget-level DSLR):
A couple years ago I started getting into insect macros and I found myself struggling to hold the stem of a plant that an insect was on (to steady it) with one hand while operating my camera (one-handed) with the other. The 30D was just too big for my hands and I was jealous of my husband's 40D that had Live View on it, so took care of both issues by buying a T1i last year. -It took some getting used to to use the "Function" button needed to make up for the missing wheel. Otherwise, the camera's been great. There's no quality difference between the Rebel lineup and the 30D/40D/50D lineup, it's just a matter of body style. The Rebel body fits my hands better. I can now easily operate my camera one-handed, plus I have Live View, and video, so I'm thrilled!

Canon G11 (point and shoot):
Photos I've taken with this camera.
My old point and shoot died a few months ago. I hated that camera, but I got it because there was a cheap underwater housing for it, so it was a camera I could take when I went diving. But, I figured this might be the time to find a higher quality point and shoot camera that I wouldn't mind using when I didn't want to haul my SLR gear around with me, so I started doing some research. That was right before the G11 came out, so I was searching for information on the G10 -I loved the body and controls, but it's ISO performance above 200 was horrible, so I decided against it. Shortly after I made that decision, however, the G11 came out. Same body and controls, much better ISO performance, so I jumped on it. Underwater housings for it were about $170 the last time I looked, so it will fill that role as well when I have the money for Caribbean vacations again. I've since taken many photos with it and I must say I'm impressed. I recently printed this photo that I took with it set to ISO 400 at 11x14 and it's flawless without any noise correction at all!


Part II lenses) will be posted in the next day or II -stay tuned!

Thursday, July 1, 2010

Auto Mode Cheat Sheet

Much can be done with a simple point and shoot camera. SLR users choose between two creative settings, aperture and shutter speed, to control depth of field (AKA background blur) and the blur or freezing of motion. Point and shoot cameras give you some control over your depth of field and also allow you to freeze most motion with the standard modes available on all cameras. Blurring motion on purpose can be done as well, but we'll get to that last. I want to really focus on the ease of the first three -those alone will give you the control you need to take most photos.

Portrait Mode (the icon looks like a woman's head):
This is how you blur the background.
-The closer you are to your subject, the more background blur you'll get.
-The farther away your background is, the more background blur you'll get.

Landscape Mode (the icon looks like mountains):
This is how you keep everything in the photo sharp (avoid background blur).
-Focus a third of the way into the distance of the photo to get everything from close to far in focus (mostly for landscape shots like flowers in the foreground, mountains in the background).

Sports Mode (icon looks like a person running):
This is how you freeze motion.
-In low light, freezing motion may not be possible. Changing to "P" mode may get you better results.

P Mode (icon is the letter "P"):
P Mode usually allows you to take control over your ISO. Some cameras may let you control ISO even in the various auto modes, either way should work.
-ISO controls how fast your camera records light to make a photo. 100 is slower than 800.
-Higher ISO's (like 800) mean your camera makes more mistakes. Those mistakes show up in your photos as "noise" or that grainy, static-like appearance you've probably seen before (usually when viewing a photo at 100%).
-Generally ISO is set as follows:
-ISO 100: Bright sun
-ISO 200: Overcast, but bright (you can still see shadows on the ground)
-ISO 400: Overcast with no shadows or bright indoor lighting
-ISO 800: Average indoor lighting
-To blur motion, choose an ISO lower than the lighting conditions you are in.
-To freeze motion, choose an ISO higher than the lighting conditions you are in.

Saturday, June 26, 2010

6 Things I learned from my first big photography sale.

I recently made my first "big" photography sale to Bicycling Magazine who licensed two of my photos for their magazine. Below are some lessons I learned from the experience.


1. Flickr's a great place to advertise and potentially sell your work.
Active selling is not allowed on Flickr, but many people have found sales through the site and at least one member has even found a sponsorship by a Fortune 500 company!

2. Tagging is key.
On Flickr "tags" are basically search terms. List anything and everything you can think of that relates to your photo so people (including those who may want to buy or publish your photo) can find it. Be sure to include location terms if it's relavent. Some of my friends have sold photos to local historical societies or city halls based solely on location.

3. You don't have to be the best photographer if you capture something unique.
If you take photos of flowers or landscapes or tourist destinations, watch out, the competition in those genres is tough -there are just so many people taking similar pictures that your chances of standing out are very small unless you're very VERY good. But, if you have a photo of a nightime bicycle event like I did -there's not much competition and that paid off for me. Many of my friends have had similar sales due soley to being one of very few who had a photo of something that someone wanted (and was willing to pay for) like local historical buildings or an unexpected newsworthy event that didn't get general media coverage. Heck, I made a small sale because a store wanted a photo of an apple wearing shoes -istockphoto didn't have one, but I did!

4. It's not about the camera.
One of the photos that Bicycling magazine published was taken with an Olympus C5000 -a really horrible 5 MP point and shoot camera with terrible low-light performance (and it was a night shot!). So, don't worry if you don't have the most expensive SLR on the market ...or even if you don't have an SLR at all! Whatever you have is good enough, just learn to use it to it's fullest advantage and work on learning to compose an image well.

5. Creative Commons licensing does not hurt your ability to sell your photos.
Both of my Bicycling magazine photos were licensed with a Creative Commons Attribution Non-Commercial Share-Alike license. This license allows people to download and use my photo for free for non-commercial use including as their computer or phone wallpaper, or even on their personal blogs or websites (as long as they meet the requirements of the license).

So many people see the use of their photos as theft, but I see it as an advertising opportunity. I have anyone that uses my photo not only attribute the photo to me, but also include my website. And Flickr's guildlines say they must link back to the photo's Flickr page. This helps me advertise my photography lessons and also gain new audiences for my Flickr stream.

6. It helps to be professional and know your prices up front.
Under every photo I display on Flickr is a little blurb of text that explains the license the photo carries, the necessary attribution, and a link to my website for information on commercial use. On my website are my prices and the magazine's first email to me said that my listed price was fine with them. It also helps to have the ability to create an invoice and a W9 (in the US) available to send ASAP for publishers that may be on a tight deadline. For those who photograph people and wish to sell them, a release is also something you'll need on file.

Monday, June 21, 2010

Metering Modes Explained

We're going to start with the basics of exposure. Your camera is pre-programmed to assume that every photo that you take should be of an "average tone". The word "tone" confuses some people, but it just means a shade of color. So, light blue and light purple would be the same tone as would dark blue and dark purple. Get it?

The reason your camera makes that "average tone" assumption is pretty simple -it isn't smart enough to know what's in front of it. How can a camera tell if it's pointed at a white wall with dim light hitting it or a gray wall with really bright light hitting it? The answer is -it doesn't. It will assume that the wall is an "average tone" and your photo will come out an average gray tone either way.

Once you understand the camera's assumption you can use it to your advantage by anticipating and correcting for the camera's mistakes in judgement about a scene.

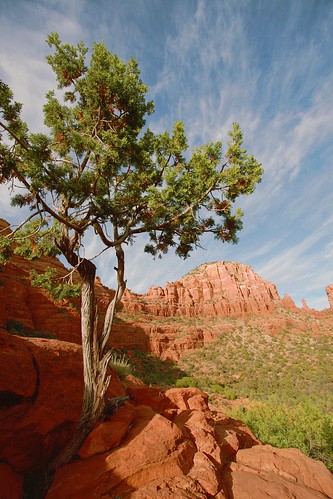
Let's pretend that this is the scene in front of you:
Sedona Tree

This is a pretty typical photo, so the camera's default metering should get it right. But, we're going to walk through exactly how the camera makes the decision of what the level of brightness should be for this scene to get a feel for how it works in more challenging photography situations.

"Evaluative" or "matrix" metering:
When you have your metering set to "scene", "matrix", or "evaluative" mode (they all mean the same thing, but different camera makers use different terms) what the camera does is it takes a look at the entire scene, averages it out, and decides on the correct brightness for the entire photo. For typical photos like the one above this default mode works very well since the majority of the photo is made up of colors of an "average" tone. But if the scene contains a lot of lighter than average or darker than average tones it won't work nearly as well.

Let's take a look at a scene where the camera's assumption about the scene being of "average tone" is wrong:

Odd Apple

The background of this photo is white. Not only that, but the background makes up more than 50% of the photo, so that's a lot of white! If the camera assumes that the scene as a whole should be of an "average tone" what you're likely to end up with if you take this shot with the default settings is something like this:


Hopefully that makes sense. ...the camera doesn't know the background is white. All it knows is that the scene should be of an "average tone". So, to compensate for all that bright white, it tones the whole photo down and makes the white look gray.

That's why, when your scene is not of "average tone", you need to choose one of the other metering modes that your camera offers. Your choices of metering modes usually include "spot" and "center weighted".

"Spot Metering":
"Spot metering" is usually my preference since it gives you the most control. The idea is rather simple, you just point your center autofocus point at something in your scene of "average tone" and your camera will only use that exact point to determine your exposure.

So, if in the apple photo above you pointed your center AF point at the apple, the scene would likely come out correctly with the white background appearing white instead of gray as it would if you used "evaluative" or "matrix" metering. If you pointed your center AF point at the white background, you could expect the photo to turn out the same or darker than what you'd get using "evaluative" or "matrix" metering.

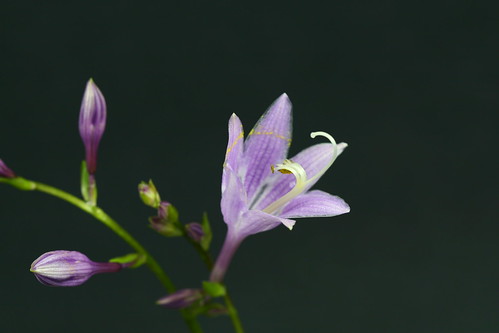
Let's try one more. Here's a new scene:
Hosta Flower, Unedited

What would you expect to get if you use "evaluative" or "matrix" metering for this scene?
What would you meter off of if using "spot" metering when taking this photo?
...the answers are at the bottom of this article.

"Center-weighted" metering:
"Center-weighted" metering uses a fairly large circle in the middle of your scene to determine exposure while ignoring the tones at the edges of the photo. Since it's not clear what is and is not included in this circle where your exposure is evaluated, this mode doesn't give you the same level of control as "spot" metering does. So, I tend to use "evaluative" when I want to let the camera do the work, or "spot" when I feel I need to take control over the exposure for the shot. "Center-weighted" is kindof an in-between mode that I just don't find all that useful.

Answers:
So, if you took the photo of the purple flower on the black background in "evaluative" or "matrix" metering mode, you'd expect the camera to try to make all that black more of an "average tone". That means, it'd brighten it up to make it gray instead of black; so, you'd get a washed out version of the photo. If, however, you used "spot" metering and metered off of the open purple flower you'd likely get the black background to come out black as it did in the photo above.

Questions? Leave a comment or ask about it on my "photography_beginners" mailing list!

Thursday, June 3, 2010

"Stops" of light

As you get into photography you'll hear people talking about "stops" or "stops of light". Grasping what this actually means can be tricky, so let me attempt to explain it here...

If you have an SLR style camera it probably has a graph that looks like this on it in the viewfinder and perhaps also on other displays on the camera:
[-2...-1...0..+1..+2]
* NOTE that on Nikons the positive numbers are on the left and the negative numbers are on the right.
This graph is your exposure meter. "0" on the graph usually represents correct exposure. The other numbers measure "stops" of light. If you are on Manual Mode and you set your ISO, aperture, and shutter speed and the exposure meter indicates "+1" that means that you have one "stop" of light more than what is generally considered "correct exposure". Sometimes you want this, sometimes you don't. If you are aiming for "0", you can easily add or, in this case, subtract a "stop" of light as long as you know how to calculate "stops" for each of the 3 settings. Don't worry -it sounds like math, but it's really easy -you'll see.

With ISO, a move from ISO 100 to ISO 200 is one "stop" of light. And a move from ISO 200 to ISO 400 is also one "stop" of light. Each time you double the ISO number, you add a "stop" of light to the photo. So your ISO "stops" are:
  • ISO 100 <-- less light
  • ISO 200
  • ISO 400
  • ISO 800
  • ISO 1600 <-- more light
So, a move from ISO 100 to ISO 800 is 3 stops -easy right? If you set your ISO to "100" and your exposure meter showed "-2" and you wanted to expose for "+1" you could change your ISO to 800 and you'd be good to go. See how that works? Not too difficult.

Shutter speed stops are kind of the opposite. When you half the number you are adding a stop of light. This makes sense because 1/2 of a second is longer than 1/4 of a second and it makes sense that when the shutter is open longer, it's letting more light in. So, here are the shutter speed stops:

  • 1 second <-- more light
  • 1/2 second
  • 1/4 second
  • 1/8 second
  • 1/16 second
  • 1/30 second
  • 1/60 second
  • 1/125 second
  • 1/250 second
  • 1/500 second
  • 1/1000 second <-- less light
* Note that the halving and doubling of shutter speed stops are often rounded.

So, if your set your ISO and aperture to what you wanted and then set your shutter speed to 1/125 and your exposure meter indicated "+2" (over exposure) when you were wanting an exposure of "0" -you could change your shutter speed to 1/500 to decrease your exposure by 2 stops and get your correct exposure.

There's a reason I've left aperture for last. This is the one that most people have trouble with, but we'll work it out. If all else fails, just print this page out and stick it in your camera bag until you've got it worked out through practice.

Aperture controls how far open the blades on your lens go in order to let light in when a photo is taken. They can open just a tiny pin-hole or open up all the way, perhaps the size of a small marble or even a big one depending on the lens you have.

The geek who decided on how these different levels of opening would be defined decided to do something that makes most of us go "huh?" -he used the focal length (the size of the lens in millimeters -for example, a "50mm lens") and expressed the size of the aperture hole as a fraction of the size of the lens. ...I know, I know -I told you you'd say "huh?". It's okay if you don't understand or can't remember this. It makes no real difference in your photography. I only included it to make you understand that apertures are fractions. That's also why they are written as "f/4". So, just like other fractions, as the aperture value (f/8 for example) get's smaller the size of the hole gets larger. Just think of it as a fraction -just like shutter speed. 1/8th of a pie is larger than 1/16th of a pie. 1/8th of a second is longer than 1/16th of a second. And likewise f/8 is larger than f/16. And a larger hole lets more light in. So, f/8 lets more light in than f/16. Got it? ...if not, just memorize or print the aperture stops and learn it through practice. This trips a lot of people up, so don't be too hard on yourself if you are confused.

Ready for the 2nd confusing thing about aperture? Halving the aperture value (f/16 to f/8 for example) results in the addition of 2 stops of light. So, aperture stops are as follows:
  • f/1.4 <-- more light
  • f/2
  • f/2.8
  • f/4
  • f/5.6
  • f/8
  • f/11
  • f/16
  • f/22 <-- less light
* Note that available aperture values are determined by your lens. Not all lenses are capable of all of the above apertures.

So, if you set your ISO and shutter speed and had an aperture of f/16 your exposure meter indicated an exposure of "-1" and you wanted to expose for "0", changing your aperture to f/11 would get you the exposure you were looking for.

Wednesday, June 2, 2010

Neutral Density Filters

Neutral Density or "ND" filters come in 2 types: graduated, where they fade from clear to gray, or normal which are all gray. This article will be focused on the more popular completely gray ones, but once you understand the concept it's not difficult to figure out how to use the graduated ones as well.

As I said before, ND filters are completely gray and they come in different strengths. Many manufacturers label their filters 0.3, 0.6, and 0.9 while others may label them 1X, 2X, and 3X. Either way, they block 1 "stop" of light, 2 "stops" of light, or 3 "stops" of light respectively. -More on that later.

If you take a series of photos, each with a different strength filter, then one more photo without an ND filter at all, you might be surprised to find out that none of the photos would look any different from the others. Think about it this way, your camera can adjust for shade or indoor lighting vs bright sunlight, right? Well, it adjusts for the darkness that results from the filter in the exact same way.

So why would you use an ND filter then?
ND filters cut the amount of light that enters your lens. This may not effect the look of your photo, but it does effect the settings for shutter speed, aperture, and ISO that the photo is taken with. Let me give you an example of when you'd use an ND filter:

Let's say it's really bright outside and you are shooting a waterfall. You want to blur the motion of the water to get a milky effect like this. So, you set your camera to the lowest ISO you can, which we'll say is 100. And you set your aperture to f/16 (a sharp, high-number to cut down on the amount of light in your photo), and the shutter speed that you have to use to get the photo properly exposed is 1/45. -That's likely to be too high to blur the water much at all! ...so you disregard the sharpness loss of setting your aperture to f/22 which eliminates 1 stop of light. That will give you a shutter speed of 1/30 -still not enough to blur the water and (as is the case with many lenses) that's the highest aperture you can set with the lens you are using, so there's nothing else you can do via settings to get a lower shutter speed to blur the waterfall. ...but when an ND filter will help you!

* A 0.3 or "1X" filter will eliminate 1 stop of light which would give you a shutter speed of 1/22.
* A 0.6 or "2X" filter will eliminate 2 stops of light. ...that'd get you a shutter speed of 1/15. Now we're getting closer...
* Your 0.9 or "3X" filter will eliminate 3 stops of light. ...that'd get you a shutter speed of 1/11. ...that would do it if it's a fast-flowing waterfall.

I find ND filters that remove 3 stops of light or so to be the most useful. Also note that if you have a set of filters you can stack them to get an additive effect.

* If you stack the 0.3 and the 0.9 that'd remove 4 stops of light which would give you a shutter speed of 1/8 which usually blurs waterfalls very well.
* Stacking all 3 would reduce the light by 6 stops which would give you 1/4.
* ...but note that stacking creates more glass to shoot through, likely lowering your image quality. High-quality filters may be okay, though, especially if you don't crop the photo or print it at it's maximum size.

Monday, May 17, 2010

Light, Direction

Think about it. Light is what photography is about. So, it's really important to notice it. The color, the direction, the shadows that result.

Next time you're driving an hour or so after sunrise or before sunset, notice the warm color and the long shadows. If you're driving North to South (or South to North), notice that one side of the road is in shadow and the other is bathed in beautiful warm light. Then ask yourself, in which direction would you want to look for photo opportunities?

The answer seems obvious in writing, but the majority of us have hundreds of sunset photos in our portfolios. Next time, try turning your back to the sunset and look for the photo ops that everyone else misses. The joy you get from being the one person in a crowd who's facing the "wrong" direction is a great bonus too! ;-)