I'm offering my Manual Mode Course in one of two ways for November. You can take the course via email at your own pace or as a group starting November 9th. The cost, either way, is the same as always -$99.
All you need for the course is a camera capable of Program Mode ("P" on your mode dial), Aperture Priority ("A" or "Av"), Shutter Speed Priority ("S" or "Tv"), and Manual Mode "M") and a tripod. The tripod doesn't need to be fancy, a $25 Walmart one is just fine.
The course is set up in 4 parts. When done as a group it's a part a week for 4 weeks. It's light on reading and heavy on hands-on practice. If taking it as part of a group it'll happen as part of a mailing list this time around rather than the Flickr group used in the past. You'll need an hour for practice at least 2 nights a week (minimum) and a few hours over the weekend in order to get the practice and projects completed in order to get the most out of the course. It's a strenuous 4 weeks for many people with busy lives, which is why I'm now offering "at your own pace" lessons via private email as well.
If you're interested in taking the Manual Mode course, contact me at my name at muddyboots.org (that's Ee-are-eye-sea-ay at muddyboots.org or see this link), and please note that class space is limited in order to ensure my availability for questions, etc.
-Erica Marshall
Sunday, October 25, 2009
Tuesday, October 6, 2009
The windows of the soul
We connect with people (and other living things) through the eyes, so the eyes are the most important part of just about any portrait that you do. So, here's a few quick tips on getting better portraits by paying close attention to the eyes:
The Basics:
1. Make sure they are in focus. If you use autofocus, focus on the eyes. If you are focusing manually, then concentrate on getting them in focus.
2. Have your subject look into the camera, it creates a feeling of connection.
3. Shoot at eye level. This is one of the more well known "rules" of photography -if you're taking a photo of a toddler or a pet, sit or kneel on the floor to get on their level. If you have eye contact, though, I find that this rule can be broken effectively. Note that shooting up at a person or pet can make them look more powerful or important while shooting down at them makes them look smaller. (I find shooting down at people/pets more effective when the angle is more extreme -shooting straight down at a toddler or pet looking straight up, for example.) But shooting at eye level is always the safest.
Other tips:
4. Pay attention to the light. If you can get your subject at the right angle to the light their eyes will light up and the color in them will be greatly enhanced. Pay attention to the light and take advantage of it when you pose people, but also look for it when you're taking candids.
5. Make a connection. A tiny difference in the eyes can make the difference between a blank stare, sadness, happiness, anticipation, fear, etc. Generally when people hear "say cheese" they turn to the camera and give a cheesy smile with dread, embarrassment, fear, or no emotion in the eyes. You'll find genuine smiles (and the real emotion in the eyes that follow a real smile) will really light up your photos, so try to make a connection with your subject -if it's a person, try to talk a genuine smile out of them. For pets, you can often get anticipation in their eyes with a favorite toy or treat held up near the lens to get their attention.
Monday, September 21, 2009
NEW! Manual Mode CORRESPONDENCE Course!
I realize that we all live hectic lives and many people can't commit to a fast-paced 4 week Manual Mode Course. For that reason, I'm now offering the course via email. You can start any time (email me to confirm there's room and that I'll be available), and the cost is the same, $99.
The course materials are exactly the same, but the lessons will be emailed to you. Once you've completed the exercise photos for one lesson, I'll send you the next. There are 4 lessons total. As always, the lessons are light on reading and heavy on both guided and "free" practice exercises -because I believe that's the best way to learn.
All you need to take the course is a camera capable of Manual mode, Aperture Priority mode, and Shutter Speed Priority mode and a tripod (the $25 Wal-Mart ones work just fine).
After finishing the course via the Flickr Group (the old way, which is still available on a scheduled basis) or via email, once you've completed it you'll be invited to the invite-only Alumni group where you can talk with fellow students, post photos you've taken with your new skills, ask any photography-related questions you may have, and ask for critique on settings or your photos overall.
If you are interested in taking the Manual Mode course in either format, email me at my name at muddyboots.org (that's Eee-are-eye-sea-ay @muddyboots.org).
Wednesday, September 2, 2009
Researching the best budget all-around zoom lens
After my latest vacation I realized something. My camera bag is full of odd lenses, mostly primes, that have built up for various reasons. In my walk around kit I usually have a Canon 10-22mm, Canon 100mm f/2.8 macro, and a Sigma 30mm f/1.4. So, while my husband (who has a Sigma 17-70mm f/2.8-4.5) would photograph whatever was in front of us in a couple minutes, I'd take a few photos with one lens, then switch to another for a different view, and then sometimes even a third if I wanted close-ups or detail shots. It was truly frustrating.
Sure primes are sharper and yes, it's nice to have fast lenses, but honestly for walking around and taking tourist shots, perfection is unnecessary and avoiding frustration is my goal. I need my photography to be fun again. Lightening my load would be a big plus here too. So, I'm starting to look at budget all-around lenses. I don't expect them to be perfect optically. The larger the zoom range the better (within reason, optical quality DOES matter), oh and it must be CHEAP! I'm living on a part-time (read: every other weekend) Vet Tech position and my Manual Mode course income.
So, here's what I've found so far:
Click here for a spreadsheet of my research.
If you have experience with any of these lenses or any other advice, feel free to email me or leave a comment. It'll be awhile before I make a purchase -I just don't have the money together yet. It may end up being something I ask for at Xmas or my birthday. (December/January)
Thursday, August 6, 2009
Next Online Manual Mode Course To Start September 7th!
Leave a comment, email me at (e-are-eye-sea-ay-at-muddyboots.org), or contact me on flickr to be put on the list. The cost is $99 for the 4 week course. All you need is a camera capable of Aperture Priority, Shutter Speed Priority, and Manual modes and a tripod (the $25 WalMart ones work just fine).
A couple spaces are still available as of 9/2/2009, so if you want in, let me know!
A couple spaces are still available as of 9/2/2009, so if you want in, let me know!
Monday, July 6, 2009
7/20/2009 Online Manual Mode Class (FULL! ...but you can sign up now for the September class!)
I've taken my in-person Manual Mode lessons and developed an online Manual Mode course out of them. The first class will start July 20th. Cost for this first round of students will be $50 each for the complete 4-8 week course! (Due when the class list is announced.)
This class is full! Add a comment or email me if you'd be interested in the next class to be offered starting either 8/31 or 9/7.
Thanks for your interest!
This class is full! Add a comment or email me if you'd be interested in the next class to be offered starting either 8/31 or 9/7.
Thanks for your interest!
Saturday, May 9, 2009
Panned Shots
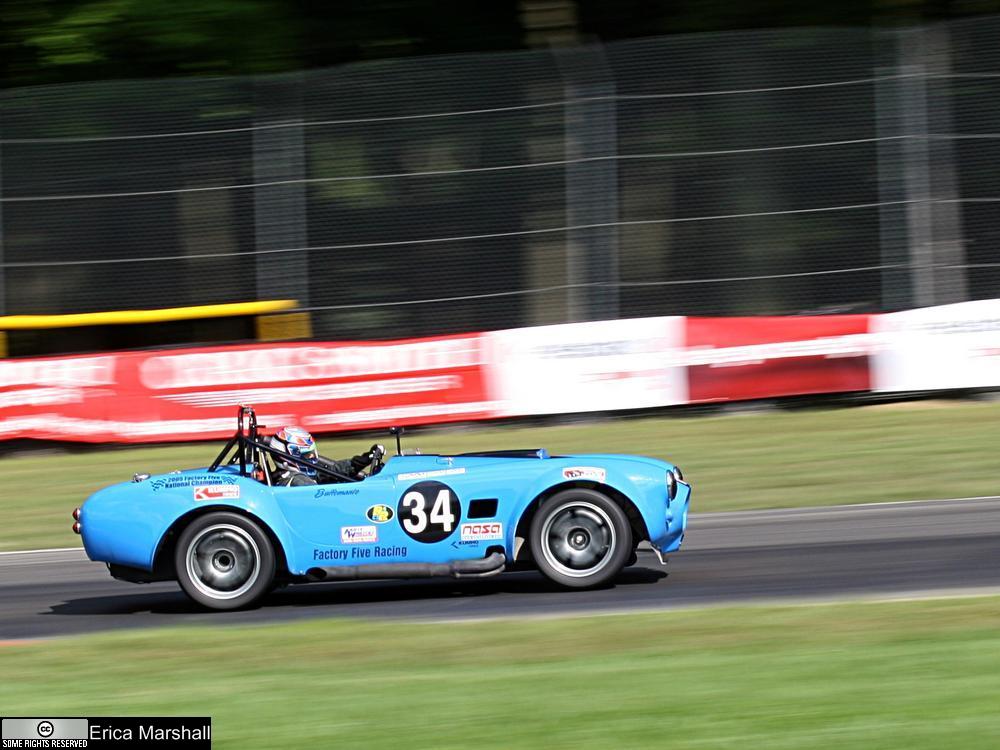
You frequently see these kinds of photos on the covers of magazines because, well, they're impressive. They work for all kinds of sports, and the effect isn't hard to do (although it does take some practice!).
Use: Shutter Speed Priority Mode
The easiest mode to use for these kinds of shots is "Shutter Speed Priority" mode, since a slow shutter speed is what gives the motion blur effect.
Start out using 1/125th of a second:
So, how slow is slow? -It depends on how fast your subject is moving and how far away from it you are, but generally, it's not as slow as you may think. The photo above was taken at 1/80th of a second.
With a fast-moving subject like a car, start with a shutter speed of 1/125 and adjust up or down to fit your needs. You basically want a speed that's slow enough to show obvious blurring of the background, but fast enough so your pan is as short as possible (to increase the chances of the subject being sharp).
Make sure there's something to blur in the background:
A background that's colorful or busy will show the blur better than a plain background (where there's not much to blur). Also consider that objects in the background that are closer to the subject will blur more than those that are further away. -You'll get a feel for this as you get some practice in different locations.
Good backgrounds -close trees, close buildings, close banners, or close stands of cheering fans.
Bad backgrounds -empty fields, empty streets, empty stands, and distant trees or buildings.
Technique:
This will take some practice, but be patient, it's worth it!
I'm writing this as if you're taking a panned photo of a car, but it'll work for other sports as well:
- Plant your feet about shoulder-width apart and at an angle that allows you to pan the section of track where you'll be taking the pictures.
- Do a couple of test pans (without taking a picture) to check your stance and get you in the rhythm of the car's motion for smoother panning later.
- Find the place on the track where you plan on taking the photo, set your focus there.
- (Optional:) If you can find some sort of landmark that you can easily see while you pan, this can be a big plus. (In my photo above I used that yellow-framed hole in the fence as my landmark. As I followed the car in my camera's viewfinder, when I saw that bit of yellow, I knew it was time to press the shutter button to take the photo.)
- Make sure your aperture is small enough (a large enough number) to have a deep enough depth of field to compensate for your focus being off a little bit.
- Start panning early, then when the car comes into view, follow it (early) in your camera's viewfinder. Keep the camera as steady as possible, and click the gently when you see your landmark. -Don't shake the camera when you press the button!
- Follow through with the pan after you hear the shutter close to keep everything as smooth as possible.
Other tips:
Don't rush it! -When you're starting out you should follow at least 5 or 6 cars before you even snap a shot. First, get your stance right and test it by following a couple cars with your camera. This also allows you to get used to how fast the cars are going (and therefore, how fast you'll be panning). Next, try to see how you want the car to end up in the frame, and then find one of the AF points in your viewfinder that'll match up with where you want the car to be so you can get the framing right.
After you've managed to follow a couple of cars and keep the pan steady, you know you're ready to fire off a test shot. After a photo has been taken, look at the result. Whether the car is sharp or not is not super-important yet; instead, look at the background -is it blurred enough? Too much? Adjust the shutter speed up or down as necessary, and continue taking photos until you're happy with the amount of blur (you want enough to show motion, but don't go overboard).
You may be asking: Why is "too much" blur bad? -Well, you'll get a heck of a lot of blur on a 1 second pan, but I challenge you to keep the subject in the EXACT same place in the frame for that long! In other words, the faster your shutter speed, the easier it is to keep the subject sharp. So, try for less blur as you start out and increase it as you get better at the technique.
Subscribe to:
Posts (Atom)