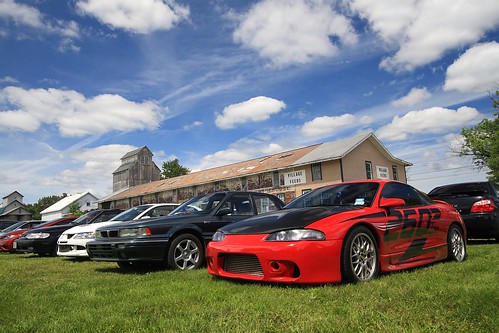
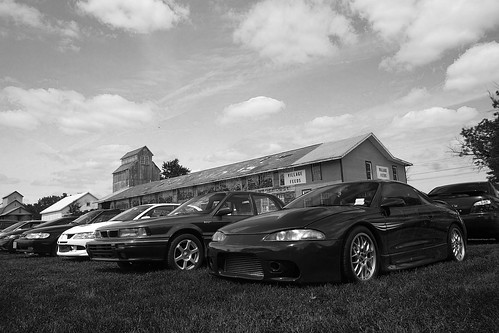
I'm going to use this photo as an example for two different ways to do black and white conversions. I use Gimp, but these different techniques will work in Photoshop and many other programs as well. Here's the photo we'll be working with for this article
First, I'll show you what you get when you just "Desaturate" or do an auto color to black and white conversion
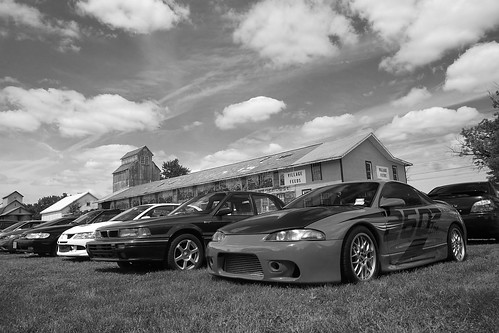
This isn't a bad black and white conversion, but the car ends up being a shade of gray that's very close to that of the grass, so it doesn't stand out well. The barn is a lighter shade too that blends in with the sky rather than standing out. So, let's talk about how Channels can help us get a better result.
Back in the day black and white photographers would carry filters with them that were red, green, or blue to adjust what colors would appear darker or lighter. Channels works in much the same way. This requires a little thought at first, but with some practice it becomes second nature. (And it's always fine to just play with the Channel controls until you like the way it looks too.)
If you put a red filter on the camera it blocks red from being recorded on the black and white film. This means that red blotchy skin is much less noticeable when a red filter is used. A red filter also darkens the color blue, so if you are shooting landscapes and you want a dramatic dark sky you can use a red filter as well. Let's make a table of the filters' effects to make this easier to use as a reference:
Red:
-makes red lighter
-makes blue darker
Blue:
-makes blue lighter
-makes green darker
Green:
-makes green lighter
-makes red darker
So, how does this relate to Channels? Channels adjust the amount of red, green, and blue used in the photo. This means that, effectively, Channels work like a filter does in black and white film photography. In fact, in Gimp (and I assume in Photoshop and other software), Channels will also convert to black and white at the same time that you adjust the amount of red, green, or blue. In Gimp this is done via a "convert to monochrome" checkbox. (The Channels tool in Gimp is under the "Colors" menu, then "Components", then "Channel Mixer".)
On to examples! Here is the photo using 100% red (the equivalent of using a red filter in black and white photography):
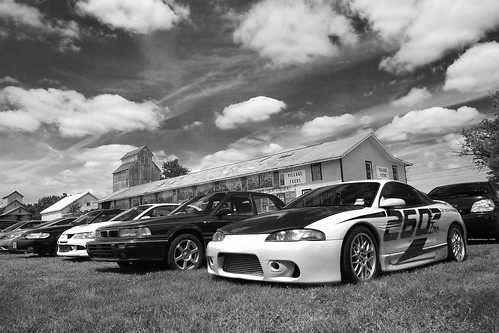
I like this result a lot! But, just to make sure this is the best one let's check out 100% green:
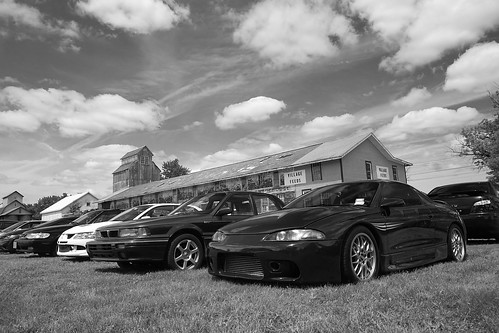
Check out the difference in the color of the car between these two photos! Pretty impressive, huh? Now let's see what 100% blue looks like:
See the difference in the look of the grass in this one? I think red's my pick for this photo. But, unlike the days of film where you'd have one of the 3 filters to choose from, nowadays you have more flexibility than you may even want! You can choose 75% red, 25% green or 80%-20%-20% or any combination you think looks the best. So, give it a try and gain a lot more control over the outcome of your color to black and white conversions!
5 comments:
Awesome!!!!
Thank you so much for this!
This was very interesting to me! I love your work
Point made very clear, thanks for a nice and sensible post.
nice....!
great pictures! very nice
Post a Comment