Wednesday, January 2, 2008

My goal for 2008 -a photo a day

Last year, for a few weeks I had a goal of taking a photo a day and posting it on Flickr. It didn't last long, but one of my favorite photos was taken out of desperation to get a photo for one of those days:

Heartbreak
(click on the photo for a larger version and a description of what it is and how it was taken)

Now, I'm not usually one to make New Year's Resolutions, but I think that, starting today, I'll try my best to take a photo a day. To increase my chances of this lasting more than a few weeks, I'll add that only 1 a week has to be good enough to post to my Flickr account.

Having such a goal keeps you shooting (and therefore practicing) daily. It also helps you look for subjects that you may otherwise miss. And lastly, it helps me get over my habit of skipping photo opportunities if it means I have to break my routine by pulling the car over or even worse -having to turn around! ;-)

So, there you go. This is my public announcement of my goal -perhaps that'll help me stick to it as well. And for those of you who are reading this, I highly recommend setting a similar goal for yourself.

Wednesday, December 19, 2007

Recommended Reading: Evidence of my Existence

I love biographies / autobiographies and while searching for something to read while on vacation I ran across "Evidence of my Existence" by Jim Lo Scalzo. It's an amazing account of how one person got into photojournalism and includes many stories of the adventures he's had on assignments and personal projects. The official description on all the sites that promote his book says:

He’s been spit on by Mennonites in Missouri, by heroin addicts in Pakistan, and by the KKK in South Carolina. He’s contracted hepatitis on the Navajo Nation, endured two bouts of amoebic dysentery in India and Burma and four cases of giardia in Nepal, Peru, Afghanistan, and Cuba. He’s been shot with rubber bullets in Seattle, knocked to the ground by a water cannon in Quebec, and sprayed with more teargas than he cares to recall. But photojournalism is his career, and travel is his compulsive craving.
...and he does a great job of describing these experiences so you feel like you were there and understand his reasons for going and the importance of what he was doing. The struggle for Jim, however, is his real NEED for travel and photography and his attempts at balancing that with his wife and longing to make a family. This theme is woven throughout the book as well, but doesn't detract from the photographic interests like I was worried they might.

Anyway, I've enjoyed this book greatly and wanted to share it with anyone else who may be interested in photo-related reading. One big thing to note about this book, though, is the fact that there are NO PHOTOS. Seems strange for a book that's centered around photography, but I found that reviewing Jim's photos on the book's website gave me enough of a glimpse into his art and the fruits of all his adventures, so I didn't mind so much. This really is more of a biography than a book about photography anyway, but it was of interest to me just to find out how people get into photojournalism and what life might be like if one were lucky enough to be employed as such.

Here's some links for more info:
Book website w/ pictures (contains much flash)
Book trailer -part 1 (video on YouTube.com)
Book trailer -part 2 (video on YouTube.com)

Saturday, November 10, 2007

One way to keep track of your memory cards.

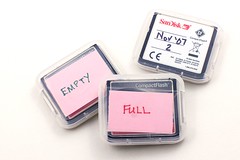
DIY Double-sided memory card labels


I just bought 2 more 2GB memory cards, which means I now have 4 cards to keep track of. It used to be easy when there was one card in the camera and one in the bag, but now it's going to be a bit trickier. I thought of a nice way to keep track of which ones are empty and which ones are full and figured I'd share...

I simply took a pieces of scrap paper and cut it into memory card sized pieces, then wrote "Full" on one side and "Empty" on the other side. Then, I used packing tape to sortof laminate them so they'd last longer. (The reason I made 3 instead of 4 is because one card will always be in the camera.)


On a similar note, I think it's important to be able to tell your cards apart in case you have a problem with a card -then you'll be able to tell which card it is. Or, if you have multiple problems with a card, you'll be able tell if its the same one each time. So, each time I buy a new card I mark it with the date and year (plus "1" or "2" if I buy more than one in a single month/year).


So, that's my tip for today...

Monday, November 5, 2007

Lens test: Sigma 30mm f/1.4 VS Canon 100mm f/2.8

Okay, so I did a TON of research before buying my newest lens, a Sigma 30mm f/1.4 "fixed" or "prime" (meaning it doesn't "zoom", its always at 30mm). But, in all my research I read over and over again that this lens was "L series" sharp in the center, but it's corner and edge performance was poor. The unanswered question was -where's the "center" VS the "edge"? Where does the sharpness fall off? How big of an area will be "L series" sharp? There seemed to be no answer to that question, but I bought it anyway based on a lot of SQF and MTF data as well as lens tests others have done (all archived and/or linked to on this page).

Now that I've had the lens for a couple weeks, I decided to run my own lens sharpness tests. This was my first attempt, so I wasted a whole day doing tests by taking pictures of a newspaper ad taped to the wall. After taking shots with EVERY LENS I OWN (and at several focal lengths for the zoom lenses!), I converted the resulting photos (over 250 of them) from RAW to jpeg, then started comparing them. It was then that I realized that my tests were flawed. The camera was not always exactly perpendicular to the wall, so the edges on many shots were blurry -not because the lens was flawed, but because they weren't in the plane of focus! (GRR!)

So, last night I re-did the test, but only with my Sigma 30mm f/1.4 and my Canon 100mm f/2.8. This time I laid some paper with printing on it on the floor, then used a level to make sure the camera's LCD screen was level before taking the photos (straight down). I had to redo these several times to try to get the framing of the photos to be roughly the same at both focal lengths, but I finally got it right.

All photos were taken on a tripod, using a remote shutter release, with mirror lockup enabled to get the most sharpness possible from each shot. Also, 2 photos were taken at each focal length so that if camera shake was an issue it'd be obvious when the 2 shots were compared.

After the photos were taken, the two versions were compared to make sure they were the same, then they were converted to jpeg. Now, because what I wanted to see when I was shopping around was an entire, full-resolution shot, I uploaded all the shots to flickr, they are in this set.

Then, I opened all the shots at once in Gimp, found the exact center of the photo, and then expanded them all to 100% so that they'd show the same area. Next, I arranged all the windows in order and in such a way that the shots with both lenses at each focal length were together for easy comparison, and then I took a screenshot and uploaded that photo as the "center crops" photo.

Then I looked for the clearest edge for both lenses , and took a crop from as close to the middle of the bottom and right-hand edges as possible, and with them arranged the same as the were for the center crops, I took another screenshot and uploaded those photos as the "bottom edge" and the "right edge" crops. And lastly, I did the same thing for the "corner crop" photo.

All the photos were added to a set which can be seen here: http://www.flickr.com/photos/erica_marshall/sets/72157602932628392/


I'm not going to dwell on results here, because you can see them for yourself. I do feel that it's really important to put this data in perspective, though, so here are some tips for using these test shots in the way they were intended:

If you compare the two lenses, you'll see that the Canon 100mm is much sharper through to the edges and corners than the 30mm. This isn't much of a surprise and does NOT say anything bad about the Sigma 30mm f/1.4. This dramatic difference is due to the focal length -it's much easier to get clear edges and corners with a longer focal length. My suspicion is that even the Canon 35mm f/1.4L lens isn't completely sharp in the corners!

These tests show black and white text to maximize the lack of sharpness. In the real world the difference in sharpness that you see here will almost be imperceptible. The differences will never be this clear in a real photo.

This is a fast lens who's use at low-numbered apertures (which is kindof the point of having it) will yield a very shallow depth of field. When you have a shallow DOF, your subject is usually not right on the edge or in the very corner of the frame anyway, so edge and corner performance isn't really all that important on this type of lens.

Keep in mind that none of these shots were sharpened at all, they are straight RAW files, converted to jpegs.

Don't fall into the trap of obsessing over numbers. I obviously have to an extent, but you have to be able to take a step back and see the whole picture. These tests may be flawed and the results may not apply in real world situations. Use at your own $risk$.


Perhaps one day I'll try to rent a Canon 28mm f/1.8 and re-do the tests so they can be compared more directly. But, I find it interesting to see how much of a difference aperture can make in the sharpness of your photos. In fact, I think I'm going to test the rest of my lenses as well, then label each lens with it's sharpest apertures and some indicator of where the sharpest part of the frame is as well.

As close to a conclusion as I'll get for now:
Last night I was asked if I was happy with my purchase or if I regretted it. I must say that I've already gotten use out of it in low-light situations where I never would have been able to manage a picture before, so I am finding it useful. As far as sharpness goes, I think it's acceptable in the center, and I know, now, how to get the best photos from it. But, not having other similar lenses to test, I cannot say for sure if I'd be happier with another (similar) lens. -I guess time will tell as far as how well it does in real-world situations. I have been impressed with it's use, like I said, but I haven't really had a photo yet that puts it to the test as far as sharpness goes. I do intend to use this lens a lot in my home studio, though, so I'll definitely post another review whenever I get around to getting a really good real-world picture with it.

Monday, October 29, 2007

Getting sharp photos in low light

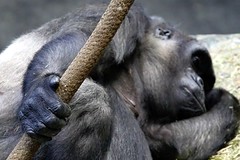
The gorilla's hand

(Click on the photo for a larger version, the EXIF data, etc)

On Saturday I met Mike (ndisgr8) from my yahoogroup at Brookfield Zoo and we spent the whole day taking pictures. It was overcast in the morning, which made many of the indoor exhibits, which are largely lit up via skylights, very dark. As a result, it was extremely difficult to get high enough shutter speeds to get a decent photo in there. I figured this was a great example of low-light photography which everyone seems to run into as a problem from time to time, so here's a write-up about how I dealt with the situation and managed at least a couple decent pics from the ape house...

Equipment:
I was using my Sigma 50-500mm f/4-6.3 lens because this zoo gives the apes a lot of space to roam around and play, so I needed all the "zoom" I could get. For those who aren't familiar with the "f numbers" on lenses, it's included in the description of the lens for just this purpose (low light photography). The lower the "f numbers", the better the lens performs in low light. When you have a range of f-numbers like for this lens, it means that at the wide end (50mm) , 4 is as low of a number as you'll be able to choose for your aperture. At the long end (500mm), it's 6.3.

The reason this matters is as follows: The lower the aperture number, the faster your shutter speed can be. This is because as the aperture numbers get lower, you're letting more light into the camera, with more light via aperture, you can get faster shutter speeds (which allow less light to get in because the shutter doesn't stay open very long). -It's all a matter of balance.

Step 1: Aperture
This lens (the "Bigma") is not very "fast" (meaning it has relatively high f-numbers), so it really limits me when there's not much light. Because of this, I immediately put my camera on aperture priority mode and set it for it's lowest aperture number so I could get the most light possible via aperture (which would, therefore, allow the fastest shutter speeds possible).

Step 2: ISO
Before even bothering to begin looking for photo opportunities, I also set my ISO to 800. The higher your ISO number, the faster your camera will record the light when you take a picture. So, in low light you want to choose a high numbered ISO.

The cost for using high ISO numbers, however, is noise. Most noise can be removed in software later, but there's always an effect on picture quality. You should, therefore, always shoot in the lowest possible ISO setting for the lighting conditions you are in. In other words, remember to set it back down to 100 when you're shooting in daylight again.

Each camera is different as far as how much noise it produces at different ISO's, so it's a good idea to experiment and know how your camera behaves and how well you can remove the noise it produces at each different setting. This way, you'll know not to go above (in my case ISO 800) or you're risking not being able to remove the noise from the photo effectively. -I did end up moving to ISO 1600 later on in the ape house as a last resort because I wasn't getting any clear shots at ISO 800.

Step 3: Check your shutter speeds
Next, I lined up a shot and checked my shutter speed. With most SLR's you can see the shutter speed in your viewfinder. In this case, I was seeing shutter speeds ranging from 1/10 to 1/60 most of the time.

Remember, the rule of thumb is that you need a tripod if your shutter speeds are faster then the reciprocal of your focal length. That's just a fancy way of saying that if you're shooting with a 500mm lens like I was, your shutter speeds should be faster than 1/500th of a second. If you're shooting at 300mm, they should be faster than 1/300th of a second, etc. (Although 1/60th of a second is as slow as you should go with any lens because it's hard to hold the camera steady enough when your shutter speeds are slower than that regardless of how wide the lens is.)

So, I needed shutter speeds that were up to 50 times what I was getting!

Step 4: Put your camera on a tripod
I had a monopod with me just because my lens is so heavy, but I didn't have a tripod. So, I leaned the monopod against the railing and steadied it further by bracing it against side-to-side movement with my foot. A tripod would have made it more steady.

Of course, the monkeys and apes were rarely perfectly still, so even with a tripod, you'd still get blur unless they happened to stay still during the shot.

Step 5: Use burst mode
If you've done all you can with settings and steadying the camera, but your shots are still coming out blurry, your best bet is to take as many shots as possible. Many people aren't aware of it, but they jerk the camera a bit when pushing the shutter button to take a photo. That may be contributing to the blur, so if you put your camera in burst mode you can hold the shutter button down and it'll take several shots one after the other. Even if you're sure you don't jerk the camera, just by shear volume, this will increase your chances at a clear shot.

Step 6: Get creative!
I was doing all of that as well as trying to concentrate only on the apes that were in the best light and I was still having trouble getting clear shots. So, for a few shots I decided to try something different. I was shooting in RAW, so I knew that I'd have a good chance of getting most of the data out of a photo even if it was severely under-exposed (dark), so I intentionally under-exposed several photos as a last resort.

Your camera should have an exposure meter that looks like this: [-2...-1...0..+1..+2] and there's a small indicator that shows you your current exposure setting. "Zero" is normal exposure, but if you use exposure compensation to move the indicator towards the positive numbers, you're telling the camera to over-expose the photo by that amount. When you move the indicator towards the negative numbers, you're telling it to make the photo darker (under-exposed).

Darker photos are a result of letting less light into the camera, so when you move the exposure down into the negative numbers you should get higher shutter speeds. When you're shooting in RAW you're often able to lighten up the photo by up to 2 stops (which correlate with the numbers on that exposure graph on your camera).

So, I moved the exposure meter down to -2 and took a shot. I reviewed the photo on my LCD and turned on the option to view the image's histogram. I made sure the data didn't run off either side of the graph (because that indicates that you're missing data, which you can't get back even in RAW). The photo was very dark, but the histogram looked ok, so I tried a few shots like that and hoped I'd be able to "save them in software" later.

Summary:
The photo above is one of the ones I took on ISO 1600 and under-exposed by 2 stops, then "saved" in the RAW software that came with my camera (Digital Professional Pro). The "right" solution to this kind of a problem is a "faster" lens (meaning a lens with lower f-numbers), but everyone eventually finds themselves in a situation where they didn't expect to have a low-light issue and they need to do what they can with what they have. Hopefully, this write up has given you some ideas for the next time you're shooting in low-light.


Extended reading / other resources:

Monday, October 22, 2007

Choosing a normal prime lens for a Canon mount.

I just purchased a new normal prime lens for my Canon 30D and it took a lot of research to decide which one to get because there are a ton of them on the market ranging from $75 to $1300 or more. If you're in the market for such a lens, I hope my research can benefit you as well.

First, let's define the terms "normal" and "prime" for those who may not be "hip" to the "lingo" (I'm cool like that).

"Normal" lenses are usually 50mm lenses. This is the sweet spot between wide angle lenses and telephoto, hence, they're called "normal". There's one caveat these days, though, and that's the crop factor of your camera's sensor. Make sure you take that into effect. If you have a cropped sensor Canon camera, you'll most likely be looking for a 28mm - 30mm lens in order to get as close to normal as possible.

"Prime" means the same thing as "fixed" and all that means is that it's not a "zoom" lens. You can't zoom in or out with it. It has just one focal length, so you have to "zoom with your legs". Prime or fixed lenses are usually cheaper and sharper because they are more simple to manufacture and compromises don't have to be made so that they can work at sometimes dramatically different focal lengths (I have a 50-500mm lens, for example!).


The research:
There are many options out there for Canon mounts. If you're looking for a 50mm prime there's 3 main choices including the Canon 50mm f/1.8 which goes for $75 or so new! It's surprisingly sharp as well and many people are very happy with this lens. The downside seems to be bad bokeh (background blur) and the build quality isn't great (it's fragile and very plastic-y). Still, for $75, it'd be a nice first prime if you're just wondering what they are all about!

50mm choices include:
  • Canon EF 50mm f/1.2 USM L
  • Canon EF 50mm f/1.4 USM
  • Canon EF 50mm f/2.5 Macro
  • Canon EF 50mm f/1.8 II
30mm / 35mm choices:
  • Sigma AF 30mm f/1.4 EX HSM DC (EF-S mount)
  • Canon EF 35mm f/2.0
28mm / 24mm choices:
  • Canon EF 28mm f/1.8 USM
  • Sigma 28mm f/1.8
  • Canon 28mm f/2.8
  • Canon EF 24mm f/1.4L USM
  • Canon EF 24mm f/2.8
  • Sigma 24mm f/1.8 EX Aspherical DG DF Macro
Prices, MTF Sharpness test results, Vignet or light falloff test results, chromatic aberration test results, distortion, SQF ratings, plus comparisons, sample images, lens tests, and lens reviews can all be seen side by side here in my online spreadsheet: http://spreadsheets.google.com/pub?key=pdA43BWeSXQfNt6IdceEAHQ&output=html


And for those who are interested, I ended up purchasing the Sigma AF 30mm f/1.4 EX HSM DC -I'll post a review soon!

Cropped sensor cameras -what's a "cropped sensor" and what effect does it have?

What's a crop factor?
Most film cameras are 35mm, and that refers to the size of the recorded image on the film. Professional-level ($$$) digital cameras have "full frame" sensors that are 35mm, and therefore replicate film exactly. So-called "Pro-sumer" DSLRs usually have smaller sensors in them because they are cheaper to manufacture. The smaller sensor obviously doesn't impact the image resolution much (DSLR's with cropped sensors are now being made at 10MP or higher resolution), but they do impact the way your lenses work.

Why might I want a full frame camera?
Full frame cameras have better high ISO performance.  This means, in low light when you have to increase the ISO to get a clear shot, you'll get less noise (that grainy, static-looking stuff in your photo) with a full frame than you will with a cropped sensor camera.  You may get a higher quality image as well, but you won't be able to tell the difference at normal print (11x14) or on-screen sizes.  As person who tries to buy the best all the time I held out for a full frame camera for a long time before deciding to go cropped instead.  I've found I have no need for a full frame and feel this is true for anyone who's not making enough money from their photography to cushion the extra expense.  I've sold photos taken with a point and shoot, so buying a crop sensor camera won't impact most sales if that's your aim.

How do we account for the crop factor when looking into buying a new lens?
Easy! Look up the crop factor of your camera. For most Canons (20D, 30D, 40D, 300D, 350D, 400D, Rebel, Rebel XT, and the Rebel XTi) it's 1.6. For other camera types, just google your camera's make and model along with the words "crop factor" and you'll probably get an answer right away.

Then all you have to do is multiply your crop factor times the focal length of the lens to figure out what the equivalent would be for film. So, if you're looking at a 50mm lens and you have a Canon 30D, it would act like a 80mm lens (50 x 1.6 = 80).

But if, instead, you're looking for a lens that ACTS like it's 50mm on your cropped sensor, then all you have to do is divide 50mm by your crop factor. 50 / 1.6 = 31.25. So something in the 30mm range would work out best.

Why does this matter?Most of the time it doesn't. You just use your lenses to get the photos you want. If your 100mm lens isn't long enough for you to photograph birds, you go look for a lens with a higher focal length, and you'll know that a 200mm lens will get you twice as close. None of that changes. And don't fear that your photos will be "cropped" from what you see in the viewfinder -they will not. What you see is still what you get. The only time this will matter is if you're getting advice from someone with a film or full sized sensor camera -or, if you're thinking of buying a full frame camera vs a crop. That's all no biggie :-)