My photos can be found here:
http://gallery.muddyboots.org/gallery2/v/2008DSMShootout/
Sunday, August 17, 2008
Thursday, July 31, 2008
A trick to getting honest critique from friends and family
I find it really interesting to take two photos and ask friends / family which they like better and why. Photos I throw out because of technical problems or distractions, etc are sometimes overwhelmingly the favorites of my non-photographer viewers. I've learned a lot from those kinds of discussions. It's a great way to find your weak spots as far as composition goes. The secret is to present photos in two's so that your friends / family can more easily give critique -they can say something bad about one by saying what's better about the other ;-). That usually breaks the critique ice and can get a real discussion going that's more likely to lead to better insights.
Tuesday, July 8, 2008
Induro C014 Review

(larger versions of all photos in this article can be seen by clicking on them)
I'm going on a 25 Mile bike ride that starts at midnight next weekend (the "LATE Ride" in Chicago) and, in order to get some photos during the ride, I've been thinking about bringing my camera. The problem is that my tripod is heavy and bulky and 25 miles isn't easy to do without all that weight and bother. But, my husband drug me to Calumet Photo in Oakbrook and I saw and fell in love with the Induro C014 tripod. Eventually I ordered it from Adorama to avoid local shop's tendancies to push service plans on you.
In the store it was sitting right next to the very similar Gitzo which had a price tag of nearly double the Induro's, which was $289. I liked how compact it was when folded down as well as how light it was, so I went home and started looking into it.
It turned out on paper it wasn't that much different than my current tripod, a Bogen Manfrotto 190XB:
Folded Length:
- 190XB: 20 inches
- C014: 17.9 inches.
- 190XB: 46 inches w/o column extended, 57 inches including the column
- C014: 46 inches w/o column extended, 55 inches including the column
- 190XB: 4 pounds
- C014: 2.3 pounds
But when you compare them side by side you can see how different they really are:

My hand is stretched when carrying the Manfrotto (folded) by two legs. My hand wraps comfortably around the C014 (I'll post the circumference of both later). And the fact that it's two inches shorter means I can attach it easily to my backpack (which I can't really do with my 190XB):

So, how does it work?
Well, because this is a lightweight, compact, travel tripod, I anticipated that it would not hold my 4 pound Sigma 50-500mm ("Bigma") -the 4th leg on this tripod is quite thin and that's pushing the 8 pound capacity of this tripd. But, after some testing in the backyard yesterday I found that, while it's difficult to get a sharp shot with the tripod fully extended, if you pull in the tiny 4th leg in (leaving only 2 sections instead of all 3 expanded) then it does pretty well. This is a 6 second long exposure taken on the Induro C014:

There was a breeze while this shot was taken, but not a strong wind. A remote was used to trigger the shutter, and no weight was used on the tripod (although there is a hook to attach weight to).
The tripod had no problems fully extended with my 75-300mm lens, a remote, and no weight attached.
The tripod's height without the column raised is a bit short, but it's the same as the full size Manfrotto 190XB. I'm 5 feet 3 inches tall and the height works very well for me. My husband, though, is about 6 feet tall and he has to bend down to look through the camera at that height.
Ease of use:
The twist-type leg locks are quick and easy to use -my hand fits across all three, so I can turn them all a quarter turn and the whole leg is unlocked and ready to be extended. A quick quarter-turn back (each) and they are all locked and I'm onto the next leg. Breakdown is just as easy: loosen each ring a quarter turn, collapse, then I can tighten all three at once. The locks turn very smoothly and their literature says they are resistant to water, sand, dirt, etc.
There's 3 leg positions at preset angles and the mechanism is easy to use. You just pull out that clip that says "Induro" on it, adjust the leg to the angle you want, then put that plastic piece back in place so it catches against the stair-like stopper to hold the position. Column extention is also very easy due to a nice big ring with three tabs around the head that's nice and easy to turn. The column has a channel in it so it won't turn. And the legs are made to not turn as well.
Extras:
There's a compass and circular level at the top of the legs. Both are small, but they both seem to work. The tripod also comes with a VERY nice bag and toolkit, and also has a 5 year warranty (although you have to register it to get all 5 years!).
Warnings:
Before purchasing this tripod I looked for reviews and didn't find very many. A couple of people, though, reported problems with other Induro tripods having cheap glue being used to hold the top portion of the tripod together. Both said that they were carrying the tripod over their shoulder with large (heavy) lenses attached when it came apart. When carrying my Manfrotto like that I ALWAYS have a hold on either the lens or the camera and lens straps just in case it falls. I've always considered carrying the tripod like that a risky manouver anyway, but I thought I'd mention that.
Final Thoughts:
I'm actually surprised at how sturdy this tripod is and I'm going to attempt to switch to this as my full-time tripod. I'm using the Manfrotto 484RC2 head on it, which fits well and together it makes a nice little package that's very compact, yet easy to use and quite functional including the ability to hold up my bigma, which is a big plus that I wasn't anticipating!
There are some who will read the warning as well as the fact that the mechanism for adjusting the angle of the tripod is plastic and will be thinking that they'll get the similar Gitzo. -That may be best if you really test the limits of your equipment. You don't have to guess with Gitzo -you'll know it's made well. Not all of us have that kind of money lying around, though. For the rest of us, know that Gitzo's adjustment is similar -there's a plastic piece you pull out, but the parts that catch to support the tripod are metal in Gitzo's case.
So, yes, it's true that the Induro is not made quite to the same standards as the Gitzo. But the differences are really in the things that would matter more to a pro using the tripod daily with heavy lenses, and this tripod in particular (being compact for travel and limited to supporting 8 pounds), I doubt any of this really matters. Also -it's almost half the price! You could probably break it and buy another one later for the cost of starting out with the Gitzo. And if you keep in mind the limitations and don't abuse your equipment, I doubt you'd ever see a problem with it.
With all the talk about build quality, don't be fooled. Everything on the Induro says quality as far as I'm concerned. From the fluid-like motion of the leg locks to the finish on the carbon fiber. -I was able to use the Induro and the Gitzo side-by-side in the store and I saw very little difference. Everything on the Induro is easy to use and nothing (to me) screams cheap. (Well, maybe the angle adjustment on the legs, but they are easy to use and I don't change leg angles all that much.) -I really do think most people would be quite happy with this tripod!
Comparison photos, the Induro C014 next to the Manfrotto 190XB:
Unexpanded (the ruler thing is 2 feet tall):

Expanded:

Wednesday, July 2, 2008
Unusual
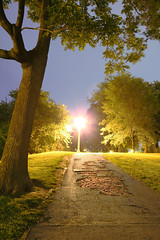
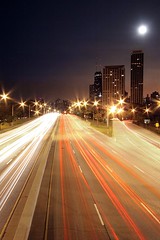
Common photography advice about not centering your subject, not putting the horizon in the center, not taking photos of flowers from straight on, not shooting from eye-level, and so on are all about one thing: breaking habits.
It's everyone's natural tendency to take photos with the subject centered, from eye-level, etc so we've already seen those photos time and time again. They are the same as everyone else's and, therefore, boring. But that's also why photos are more striking when taken according to the rule of thirds or when taken from a different perspective.
So anything you can do to capture the world a bit differently will help catch the eye of your viewer. (Even if it does mean that people look at you funny when you're crawling around on your hands and knees taking pictures!)
Isolate it:
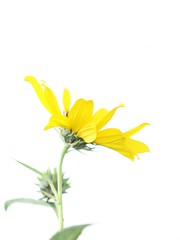
Crop it:
Use a different perspective:
Don't center your subject:
Take photos at different times of day (or night!):
Get low:

Use effects:
Or just find unusual subjects!:

It's everyone's natural tendency to take photos with the subject centered, from eye-level, etc so we've already seen those photos time and time again. They are the same as everyone else's and, therefore, boring. But that's also why photos are more striking when taken according to the rule of thirds or when taken from a different perspective.
So anything you can do to capture the world a bit differently will help catch the eye of your viewer. (Even if it does mean that people look at you funny when you're crawling around on your hands and knees taking pictures!)
Isolate it:
Crop it:
Use a different perspective:
Don't center your subject:
Take photos at different times of day (or night!):
Get low:
Use effects:
Or just find unusual subjects!:
Tuesday, July 1, 2008
Ansel Adams Gallery Blog
The blog itself seems very Yosemite-centric, but the 2 (Non-Adams) photos in this post are fantastic and I figured I'd share:
http://theanseladamsgallery.blogspot.com/2008/06/contrast-exhibit-of-photographic-work.html
http://theanseladamsgallery.blogspot.com/2008/06/contrast-exhibit-of-photographic-work.html
Monday, June 30, 2008
Troubleshooting -silhouette shots aren't dark enough
The real issue here is that your camera has no idea what you are taking a picture of muchless what you want it to end up looking like. To determine how light or dark your photo will be, it's programed with a very simple goal in mind -make every photo average out to a pre-defined "average" tone (about the same shade as the palm of your hand). This works well most of the time, but not so much when you have a lot of really light or dark tones in your photo.
Here's a different way to put it: Your camera assumes that if the photo you are about to take a picture of was blurred 100%, it'd come out to be the same tone as the palm of your hand (tone = how light or dark the resulting color would be).
So, when you take a photo that's very light (like a snowman in a snow covered field) the camera has no idea why it's so bright and will darken it up so it comes out looking gray instead of white. Or when you take a picture of something dark (like silhouettes) they tend to come out lighter than you wanted (they come out gray instead of black) because the camera has to tone down all that black to make that "average tone". So, either way -with really light or really dark scenes, everything moves towards this medium-gray, but how do you fix it? It depends on what kind of camera you have!
FOR POINT AND SHOOTS OR SLR'S WITH EXPOSURE COMPENSATION:
Check your camera's manual to see if it offers exposure compensation in the mode you're using.
Exposure compensation lets you tell the camera to make the photo lighter or darker without jumping through hoops to "trick it" into doing so. Each camera works differently, but you should be able to either move an indicator on a graph that looks like this:
[-2...-1...0..+1..+2] (Nikons have the positive numbers to the left, but it doesn't really matter.)
or change the value of a number ie: "EV +1" or "EV -2".
When you move the numbers towards the negative side you're telling the camera to make the photo darker. Positive numbers mean the photo will come out lighter.
So, for silhouettes, you'll want to try maybe "-1" and see how that works. If it's still not dark enough try -1.5 or -2 -just keep playing with it 'til you're happy.
FOR POINT AND SHOOTS WITHOUT EXPOSURE COMPENSATION:
To get around your camera's "average tone" assumption, you'll have to trick your camera. If you want it darker, point it at something lighter -like the sky! Point your camera at the sky just above or next to whatever you want to be in silhouette and then push the shutter half-way to lock in the exposure. Then re-frame the shot to include whatever you want to appear in silhouette and push the button the rest of the way down to take the picture. (Pushing the shutter half-way usually locks in your focus as well as your exposure, so if your subject is close it may come out blurry -just experiment with it to see what distances work for your camera).
Friday, June 20, 2008
round the bend by rex dart: eskimo spy
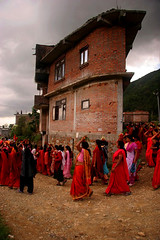
I saw this photo on Flickr and thought it was a great example of why I so often I've encourage new photographers to go out and seek others' work to get inspiration as well as to develop their own eye for what makes a photo good.
This photo caught my eye because it shows a side of the world and a culture I'm not familiar with. I like the warm tones, the repeating color that the women are wearing, the unusual building (that I thought was just the facade of some ruins at first), and the storm cloud looming overhead. There's a clash between the warm feeling and the impending storm that intrigues me. And the description of the photo says that this is an annual event and the women are all carrying flowers in pots on their heads. This adds another layer of mystery to the photo -why?
I find mystery in a photo helps hold the viewer's attention -they linger on it longer pondering those "whys". So, what kinds of events happen where you live that may be considered strange by the people in THIS photo? -I'm using this photo to look at my everyday life as an outsider and attempting to put myself in the shoes of a tourist as a venture into the world this weekend. Perhaps I'll be inspired to photograph something usual in an unusual way.
Subscribe to:
Comments (Atom)