Many filters that were popular for film cameras can now be effectively reproduced in common image editing software such as Photoshop, Gimp, Adobe Elements, Paint.NET, etc. But, other filters' effects cannot be reproduced and you may, therefore, wish to carry some or all of these with you in your camera bag:
UV:
UV filters are clear and often have no effect on your photos other than maybe reducing haze a bit. So, why use them? Most people who use UV filters do so only to protect their lenses. If you may be shooting in rough conditions, it's a good idea to use a UV filter on your lens. A scratched UV filter is much cheaper to replace than it would be to repair your lens! I, like many others, use UV filters on my lenses most of the time. The argument against using UV filters is that many people opt for the cheaper ones, and are therefore buying expensive glass, only to put another element of cheap glass in front of it, therefore reducing the quality of the photos as a result. For this reason, when I'm shooting important shots, I remove my UV filters "just in case".
Neutral Density (ND):
These filters are basically sunglasses for your lens. All they do is remove light. -You may think you can do that with exposure compensation, but in really bright conditions, when you want a long shutter speed (say, for taking photos of waterfalls), a neutral density filter will allow you to use a much longer shutter speed than you otherwise would be able to -even with your ISO on it's lowest setting. If you plan on taking slow shutter speed shots during the day, this type of filter is definitely recommended.
Graduated Neutral Density (GND):
Big name, I know, but an easy enough concept. This filter is split down the middle (often half and half) -part of it is clear, the other part is gray (just like the neutral density filter). The purpose for this is apparent as soon as you run into the following problem: When you're shooting a landscape where the sky (and perhaps the background too) is very bright, but the foreground is either in shadow, or just darker. In this case you're often left sacrificing the sky by exposing for the foreground or taking 2 shots and combining them later. With this filter, you can use the ND part to tone down the sky, while placing the clear portion of the lens where the foreground is so that it gets exposed properly. The problem is, these filters are often split 50-50, so your horizon must be placed in the middle of the shot for the filter to work. You can, of course, get around that by going a bit wide and planning on cropping, but it's kind of annoying. (You can sometimes overcome this exposure issue with a polarized filter instead.)
Circular Polarized / Polarizing Filter:
This filter is slightly different from the others in the fact that it has a freely rotating front element on it. When you screw the filter on the front of your lens, you'll then need to rotate the ring on the front of the filter in order to control the effect of the polarizer. So, what's it good for? -It's used for many reasons: It will make a blue sky bluer (although this works best when you're shooting 90 degrees from the sun), it can enhance or eliminate reflections on water or glass, it can enhance the colors in a rainbow, and sometimes it can even out the exposure as in my example above for the graduated neutral density filter. The reason it can do that without being split down the middle like the GND is this: A polarizer can darken a blue sky to make it bluer, but it won't effect the grass and other objects in your photo. So, if you use a polarizer to darken the sky, often photos come out evenly exposed. An example of this is shown below:
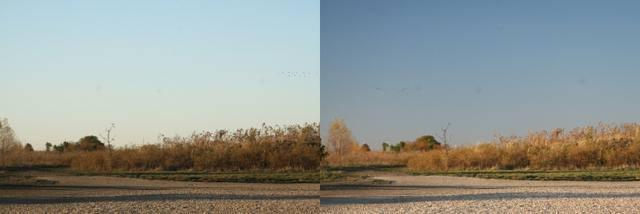
The photo on the left was taken without a polarizer, the photo on the right was taken with a circular polarizer. -See how because of the overly bright sky, the camera doesn't expose the foreground properly? The foreground is properly exposed when you tone down the sky with the polarized filter (like I did on the photo on the right).
In my opinion other filters such as star filters, softening filters, warming, cooling, and other "color filters", as well as many special effects filters like spot-focus, etc can all be achieved in software quite easily. You're free to use them, but many people choose to free up that bit of room in their bag instead.
1 comment:
This is another good reason to have a UV filter on your expensive glass, wouldn't you say? :-)
Post a Comment