To start, this where you can download the photo I'll be using in this tutorial if you want to use it to follow along:
www.flickr.com/photos/15059459@N02/3097360115/sizes/l/
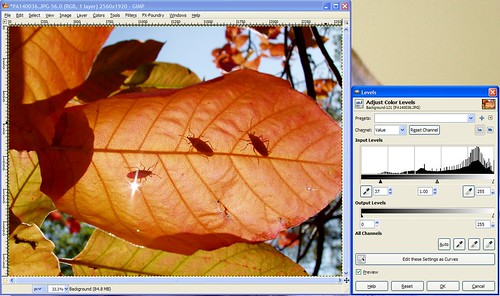
After opening the sample photo (or your own), the next step is to open the Levels tool from the "Colors" menu. It'll look like this:

Notice we're working with the photo's histogram again, much like the Curves tool. Under the histogram is a tonal graph showing black on the left and white on the right. For this photo we see that there's a big gap between where "true black" is and where this histogram starts, which matches what we see in the photo -it's kinda gray looking and needs to be darkened a bit.
Below the tonal graph are 3 trianglular sliders -one's all the way left at "true black", one's all the way right at "true white", and one's right in the middle. If you click on those triangles you can slide them left or right and it'll change the brightness of the dark tones, light tones, or mid-tones (depending on which slider you move) in your photo accordingly.
Since we want to make the dark tones darker, we can think of that as wanting to shift the histogram left. To do that, we move the "true black" slider to the right where we want "true black" to be for our histogram. So, go ahead and move the slider on the far left until you get it where the data begins on the left side of the histogram. It should look like this:

That's good enough for me, but I encourage you to play with the mid-tone and "true white" slider to see the effect they have on the photo as well.
To be completely honest, I rarely use Levels this way. Curves will achieve the same result, just in a different way. Most people like either Curves or Levels (usually Curves I think because it's a little more granular) and they stick with the one tool the majority of the time.
Now, there's another way to use Levels, and I use this more often than I do the manual adjustment I went through before.
Next to that "Auto" button that we used in Exercise #4 there are three buttons with icons that look like eye droppers. One is black, one's gray, and one's white. The idea here is that you can click on the black dropper and then click on an area in your photo that should be 100% black and it'll automatically adjust your photo to make that so. White works the same way -click on the white dropper, then an area that should be 100% white in your photo, and whallah! The gray dropper is used when you're using a gray card -you'd click on the gray dropper, then the gray card, and you'd get good results that way (I never use a gray card, so I don't use that dropper at all).
So try this tool out all three ways -the "Auto" button, the droppers, and the manual adjustment and please post any questions you have about anything you don't understand about the Levels tool. Also feel free to post your results using this tool, I enjoy knowing if these tutorials are useful for you!
4 comments:
I'd like to use the auto levels in a similar way to the way my camera does auto exposure. I've tried selecting the area I'd like auto to use to determine levels but it only adjusts the selected area, not the whole image. Is this possible? Or, so obvious that I've missed the trick?
If you don't select any particular part of the image Auto Levels will adjust the entire image much like auto exposure in your camera and 90% of the time that works good enough.
The other times you need to do manual Levels or Curves, but give the "Auto" button a try without selecting anything and see if you are happy with that first.
When I use Auto Levels on the whole image, the exposure is quite wrong for the part I'm interested in.
I take it that what I'm looking for is not possible.
pdharg:
Changing the exposure in the area of interest is possible, just not with Auto Levels. As with many things, "Auto" doesn't always work. You'll have to see my article on using Curves instead.
Post a Comment