(Click on the photo to view it larger, see the EXIF, etc.)
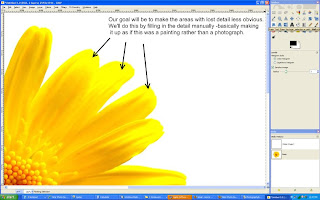
I love everything about this photo from the perfectly white background to the soft shadows that define it's textures. The only thing wrong with it is the areas of lost detail in the highlights. When this banding and loss of detail occurs in a photo it's called "posterization" and the aim of this article is to help auntyre1 to fix it.
Fixing a photo like this requires talent more akin to painting than to photography, so for many photographers this will take a lot of time and practice, but it's well worth the effort to save a photo like this one, so here's how I'd go about it.
The first thing to do would be to open the photo in Gimp and zoom in to see it at 100%. From there we need to pick an area to start working on and I picked the petals at approximately 1 o'clock.

(Click on the photo to view it full size.)
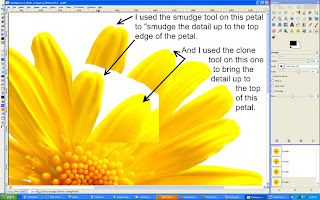
There are 2 ways of bringing detail into the posterized portion of the image, and I'd probably use them both depending on the area I was working on. The first and probably easiest way is to use the "Smudge" tool (in Gimp this looks like a hand pointing downward). You use this tool by placing it on the photo and dragging it, which will bring a portion of the color from where you started in the direction you drag it, just like smudging paint or pencil on paper. Play with the opacity of the tool (which can be changed on the toolbox window under all those icons when the "Smudge" tool is selected). If your smudges are too obvious, just turn the opacity down until it starts blending smoothly.
The other way of adding detail to the petals is to use the "Clone" tool (which looks like a stamper). With this tool, you hold the "Control" key down (which may be labelled "Ctrl" on your keyboard) and click in the area you want to copy FROM. Then let go of the "Control" key, and use your mouse to click and drag, which will paint what's in one area to the other area. I'd use this in a similar manner as the smudge tool to bring the detail from the part of the petal that's further down up towards the tip of the petal. This is a more effective tool if you have a lot of blank area to fill in with detail. The smudge tool is best for smaller areas.
Here's a screenshot to show where I used these two tools as well as my result with them:

(Click on the photo to view it full size.)
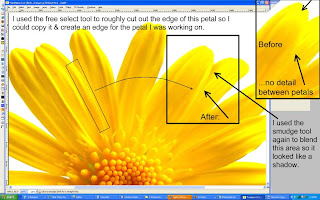
After you get the detail filled in you'll notice that there isn't a clearly defined edge to the 2nd petal I was working on in the example above. Unfortunately, there are no other petals at the same angle that we can use to clone that edge in and making an edge where there wasn't one before is hard to do in a believable manner if you try to paint it in by hand. But there is a pretty easy way to do it...
Look for an edge that's about the right shape elsewhere in the photo. (See screenshot below for the one I chose.):
- Use the "Free Select" tool (looks like a lasso) to select just that edge.
- Go to "Edit" > "Copy" (or Ctrl + C)
- Create a new layer by going to the "Layer" menu and selecting "New Layer". Keep the default of "Transparency" for layer type, and click "OK" to create the new layer.
- You'll automatically be taken to the new layer, so just go to "Edit" > "Paste" (or Ctrl + V) to paste that petal edge onto the photo.
- Click and drag that petal over to the place we want to put it (I know the angle's wrong, that's ok)
- Click on the "Rotate" tool. It looks like a little box with arrows indicating rotation on it.
- Then click on the petal edge (because that's the part we want to rotate) and a "Rotate" window will appear. Ignore it for now.
- Click on one side or the other of that petal edge and drag it left or right to rotate it into the position that'll match the edgeless petal. Click "Rotate" when you get it where you want it.
- Chances are, unless you are REALLY good the petal edge isn't EXACTLY where you want it yet. Click on the "Move Tool" (looks like a "plus sign" made with arrows going up & down and left & right).
- With the Move Tool selected you can drag the petal edge to get it where you want it.
- If you're like me you'll have to go back to the Rotate Tool and tweak it a bit more to get it to line up perfectly. Just keep tweaking it until it's right.
- If you have any areas that look like they'll be hard to blend into the existing petals, use the Eraser Tool to erase them. It won't be perfect, we'll blend the old and new together in a minute...
- When you have it like you want it, go to the "Image" menu and choose "Flatten Image" to merge the layers together so we can work on making the new and old areas seamless.
- Use the Smudge Tool to blend the new petal edge into the existing petals around it.

(Click on the photo to view it full size.)
So, there are the basic techniques for fixing this image and others like it. You just have to keep using those tools and techniques to finish the entire flower. Yes, it'll take some time, especially if you aren't familiar with these tools yet. They all take some practice to use well. But, like I said before, this photo is worth it. If you start getting frustrated, walk away and come back to it later. You'll learn a lot if you stick with it. And, if you get stuck, let me know and I can help you with whatever you are stuck on or expand on some of the tips and techniques to use whatever tool's giving you problems more effectively.
And, please auntyre1, send me an email when you complete your editing. I'd love to see how it comes out!
No comments:
Post a Comment