Image Editing How-To: Creating a twin
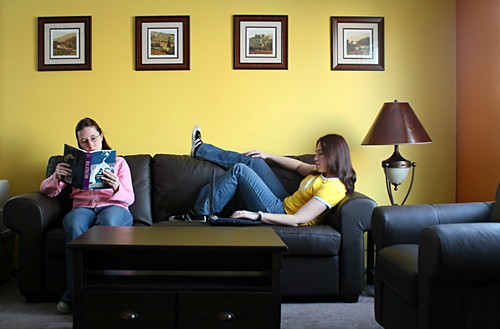
- Set your camera up on a tripod
- Take the first picture. (These are self portraits, so I used my camera's timer to trip the shutter.)
- Change positions, clothes... whatever you choose, but leave the camera EXACTLY where it was for the first photo.
- Take the second picture.
- Open both photos in Gimp (free here or use whatever software you like)
- Select the clone tool (the icon looks like a stamper or you can find it under the "Tools" menu by selecting "Paint Tools" then "Clone").
- Put the clone tool's cursor on the verson of the photo that you want to copy FROM
- Hold the "Control" key down (it may be labelled "Ctrl" on your keyboard) and click on some easily defined point that appears in both photos -I used the point of the lamp shade here.
- Move to the photo you want to clone the 2nd image ONTO
- Put the clone tool's cursor at exactly the same point as you did before -DON'T hold the Control key down this time, though!
- Click and hold the button down to "Paint" the 2nd image into the first. If you let up on the mouse button, be careful to put it back in the same spot when you click it again, or you'll have to go back and do the Ctrl + click thing again.
- This works best with a simple background so that if you're off by a little bit it won't matter or you can fix minor issues using the "Smudge" tool.
No comments:
Post a Comment