The jpg file format was created to make images smaller through something called "compression", and more specifically, "lossy compression". What this means is that it actually makes some changes to the file so it's smaller. So, if a patch of blue sky had 12 different shades of blue before your camera saved the file as a jpg, it'd end up with maybe just 4 different shades of blue afterwards.
That sounds bad, right? And here's where people will start to tell you that RAW has more detail than jpg. The fact is, though, that in order to print the photo, upload it to the web, or email it to your friend you're likely going to have to convert it to jpg anyway, so the loss is pretty much inevitable. Besides, our eyes can only tell the difference between 7 million different colors while RAW files contain billions or even trillions of different colors!
So, what's the advantage of shooting RAW?
Well, when editing a photo, all those extra colors mean a lot. To avoid talking about millions of colors, let's think about it in terms of crayons. If you have a box of 32 different colored crayons you may only have 4 different shades of gray between white and black. So, if you want to lighten an image or darken it, you only have 2 shades to move, up or down before you get "black" or "white". But, if you have a box of 64 different colors, you may have 4 shades to move up or down before getting "white" or "black". The same goes for RAW -all those extra colors mean extra data in the shadows or highlights so, when you go to dramatically lighten shadowed areas or darken highlights you have a lot more room to move with RAW than you do with jpg.
RAW and fake HDR:
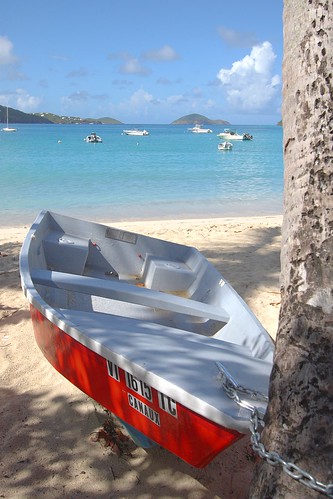
Raw files contain enough information to create an HDR photo from a single RAW file rather than from 3 to 5 jpgs. This means that taking photos in the middle of the day when the light is really harsh and the shadows are really dark isn't a problem anymore! You can take one RAW photo, brighten it by one to two stops, and darken it to the same degree, than run it through HDR software and the shadows and highlights will both be softened so you get this:
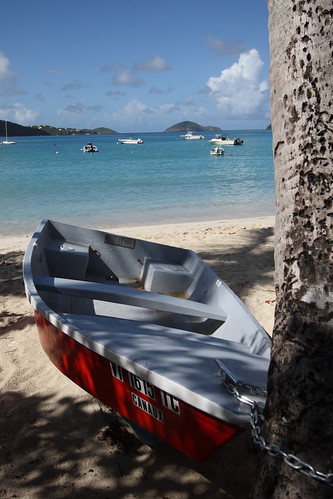
instead of this:
Summary:
* RAW allows you extra room to darken, lighten, or change the color cast in your image.
* RAW files will be larger, about the same size in megabites as your camera has megapixels, so a 10MP camera will have RAW files around 10MB each.
* RAW files require conversion (usually to jpg) before you can upload them to the web, print them, or email them to friends.
* JPG cannot be lightened or darkened to the same degree as a RAW file can.
* JPG files are smaller than RAW files, so you'll get more shots in jpg on your memory card than you can with RAW.
* JPG files can be opened by any image editing software, uploaded directly to the web, or printed with no conversion needed.
RAW workflow:
RAW files can't be opened by many programs, but your camera should have come with software that can open RAW files, do some basic editing on them, then convert them to jpg. Photoshop, Photoshop Elements, and Picasa can open some RAW files. Updates may be necessary to these programs if you have a fairly new camera.
Generally, though, you'll open the file in it's RAW format, make changes to the brightness, white balance, curves, contrast, saturation, etc on the entire image, then convert the image to jpg for further processing, and from there you can work with the file like you would any other jpg image. Because the main advantage of RAW is the ability to use that extra data to make color or brightness changes, that's really all most RAW software can do.
So, when do I shoot RAW?
This, of course, is up to you. I shoot RAW 99% of the time because sometimes I make mistakes and take a photo that's not exposed well and RAW gives me a better chance to save those images. This doesn't make me lazy -my goal is always to get it right in the camera, but a safety net is always nice! The boat photo I used as an example was taken in horribly harsh mid-day light while I was on vacation and had no time to wait for evening or morning light. It wasn't until I was home that I remembered that I could do an HDR technique on it to try to make the shadow areas less dark and it worked! This is why I shoot RAW all the time.
Many fellow photographers laugh at me, though. They find RAW to be tedious because of the extra step involved in processing every image. I don't find it to be a big deal. So, I'd recommend trying it and seeing if you mind the extra step. If you do, you're in the majority, so don't worry. Just remember that if you're unsure about your white balance or exposure, or if youthink you might want to try an HDR technique to improve the balance of light areas to dark areas in a photo, just switch to RAW or RAW+jpg for a safety net. For day-to-day photos for practice or images that you're pretty sure you can get right in the camera, stick with jpg to avoid that extra step!
Example of RAW vs Jpg after brightening an image:
A while back I posted the results of a test I did by taking a photo in RAW and in jpg, then brightening both by the same amount. The RAW file retained it's detail, but the jpg lost some detail as a result of the brightening:
Link
4 comments:
Erica there is also a open source program which will work between the RAW file and Gimp.
UFRaw:
http://ufraw.sourceforge.net/
Erica, i read your article, I have a question , what/where is the RAW setting? Bob
I have a dumb question....what is "HDR"....?
Also, can GIMP handle RAW?
Thanks.
Christian
@ bob:
The RAW setting should be in your camera menu. It's often under "Quality".
@ Anonymous:
Gimp can't work with RAW files, but there's another program caleed "UFRAW", which JestrBob mentioned. That does RAW and import the image into Gimp after it's converted to jpg for further editing.
Post a Comment