Wednesday, March 11, 2009

Gimp: Fixing Posterization

The following photo was taken by auntyre1 on Flickr and was used with her permission:


(Click on the photo to view it larger, see the EXIF, etc.)


I love everything about this photo from the perfectly white background to the soft shadows that define it's textures. The only thing wrong with it is the areas of lost detail in the highlights. When this banding and loss of detail occurs in a photo it's called "posterization" and the aim of this article is to help auntyre1 to fix it.

Fixing a photo like this requires talent more akin to painting than to photography, so for many photographers this will take a lot of time and practice, but it's well worth the effort to save a photo like this one, so here's how I'd go about it.

The first thing to do would be to open the photo in Gimp and zoom in to see it at 100%. From there we need to pick an area to start working on and I picked the petals at approximately 1 o'clock.


(Click on the photo to view it full size.)

There are 2 ways of bringing detail into the posterized portion of the image, and I'd probably use them both depending on the area I was working on. The first and probably easiest way is to use the "Smudge" tool (in Gimp this looks like a hand pointing downward). You use this tool by placing it on the photo and dragging it, which will bring a portion of the color from where you started in the direction you drag it, just like smudging paint or pencil on paper. Play with the opacity of the tool (which can be changed on the toolbox window under all those icons when the "Smudge" tool is selected). If your smudges are too obvious, just turn the opacity down until it starts blending smoothly.

The other way of adding detail to the petals is to use the "Clone" tool (which looks like a stamper). With this tool, you hold the "Control" key down (which may be labelled "Ctrl" on your keyboard) and click in the area you want to copy FROM. Then let go of the "Control" key, and use your mouse to click and drag, which will paint what's in one area to the other area. I'd use this in a similar manner as the smudge tool to bring the detail from the part of the petal that's further down up towards the tip of the petal. This is a more effective tool if you have a lot of blank area to fill in with detail. The smudge tool is best for smaller areas.

Here's a screenshot to show where I used these two tools as well as my result with them:


(Click on the photo to view it full size.)

After you get the detail filled in you'll notice that there isn't a clearly defined edge to the 2nd petal I was working on in the example above. Unfortunately, there are no other petals at the same angle that we can use to clone that edge in and making an edge where there wasn't one before is hard to do in a believable manner if you try to paint it in by hand. But there is a pretty easy way to do it...

Look for an edge that's about the right shape elsewhere in the photo. (See screenshot below for the one I chose.):
  • Use the "Free Select" tool (looks like a lasso) to select just that edge.
  • Go to "Edit" > "Copy" (or Ctrl + C)
  • Create a new layer by going to the "Layer" menu and selecting "New Layer". Keep the default of "Transparency" for layer type, and click "OK" to create the new layer.
  • You'll automatically be taken to the new layer, so just go to "Edit" > "Paste" (or Ctrl + V) to paste that petal edge onto the photo.
  • Click and drag that petal over to the place we want to put it (I know the angle's wrong, that's ok)
  • Click on the "Rotate" tool. It looks like a little box with arrows indicating rotation on it.
  • Then click on the petal edge (because that's the part we want to rotate) and a "Rotate" window will appear. Ignore it for now.
  • Click on one side or the other of that petal edge and drag it left or right to rotate it into the position that'll match the edgeless petal. Click "Rotate" when you get it where you want it.
  • Chances are, unless you are REALLY good the petal edge isn't EXACTLY where you want it yet. Click on the "Move Tool" (looks like a "plus sign" made with arrows going up & down and left & right).
  • With the Move Tool selected you can drag the petal edge to get it where you want it.
  • If you're like me you'll have to go back to the Rotate Tool and tweak it a bit more to get it to line up perfectly. Just keep tweaking it until it's right.
  • If you have any areas that look like they'll be hard to blend into the existing petals, use the Eraser Tool to erase them. It won't be perfect, we'll blend the old and new together in a minute...
  • When you have it like you want it, go to the "Image" menu and choose "Flatten Image" to merge the layers together so we can work on making the new and old areas seamless.
  • Use the Smudge Tool to blend the new petal edge into the existing petals around it.
Here's my result:


(Click on the photo to view it full size.)

So, there are the basic techniques for fixing this image and others like it. You just have to keep using those tools and techniques to finish the entire flower. Yes, it'll take some time, especially if you aren't familiar with these tools yet. They all take some practice to use well. But, like I said before, this photo is worth it. If you start getting frustrated, walk away and come back to it later. You'll learn a lot if you stick with it. And, if you get stuck, let me know and I can help you with whatever you are stuck on or expand on some of the tips and techniques to use whatever tool's giving you problems more effectively.

And, please auntyre1, send me an email when you complete your editing. I'd love to see how it comes out!

Friday, February 27, 2009

Tips on dealing with backlighting

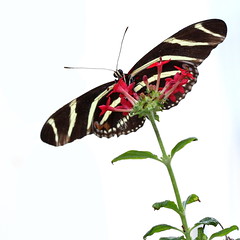
Zebra Longwing against blown out sky

"Backlighting" just means that there's light behind your subject. An example of this would be lining your friends up in front of a sunset to take their photo -the sun would be behind your friends, so they'd be backlit.

What happens with a typical backlighting situation is that your camera sees all that light aimed towards it, so it makes the photo darker to compensate for the excess light. The problem is, the part you want exposed properly is in shadow because of all the light coming from behind, so when the camera darkens the photo, your subject comes out almost black.

There are a few ways to fix this. You can:
* Meter off of your subject instead of metering the whole scene.
* Use exposure compensation to brighten the photo.
* Use fill flash for portraits and other photos where your subject
is small enough and close enough for it to be effective

How these changes effect your background:
If you choose to meter off your subject or use exposure compensation to brighten them, remember that you'll be brightening the entire photo. This was what I intended for the butterfly shot at the top of this post, I wanted the sky to go white behind it. But, for sunset shots this will wash out the beautiful colors of your sunset. For portraits in front of sunsets, use flash. This will balance the light of the sun with the light of your flash and will allow more color to be kept in the sunset.

Tuesday, February 17, 2009

Copyrights, protecting your photos, and CC licensing.

You automatically have copyright on your photo as soon as you click the shutter button on your camera. The problem lies in proving it if your image is stolen. If you have the RAW file, if the EXIF is attached and your camera's serial number is in it (although this can be faked), or if you only post a crop or a version that's smaller than the original and you keep the full size on file, you're good. ...the problem is, most of the time when your work is stolen you'll never know and if you don't know about it, you can't take legal action against them.

As far as not allowing your work to be stolen, if it's on the web it can be taken. Many photo hosting sites try to put protections in like not allowing right-clicks, but there are well known workaround for getting around that (google "right click blocked" without the quotes and look at the 3rd result).

Your options are:
  • Watermark it: Put a graphic or text (like your name) over thephoto. There is software that can remove watermarks if they are clear or even if they are opaque if they are over sky or grass, so for maximum protection they need to be put over important parts of the photos (like facial or building details that can't be "figured out" or"faked" by software).
  • Post only really tiny photos that aren't worth stealing.

...for the record I don't do any of this. It's too intrusive to the viewer and doesn't allow normal people who like my photos to download them to use them for their wallpaper, etc. So, I give many of my copyright protections away by using a Creative Commons license that allows people to download or use my photos on their blogs, etc as long as they are using it for personal use. I've tried to sell my photos, but I found that it takes too much marketing (which I hate). So, this way, people do the marketing FOR me because part of my Creative Commons license says that they need to attribute the photo to me including the url for my website that advertises my photography lessons and product photography work.

The upsides of giving my copyright protections away have been amazing! My photos have been used on all kinds of blogs, some popular enough to be dugg. They've also been used by travel sites, one's supposed to be put on a brochure although I haven't heard back from them in a long
time, but they've been on news sites, and I've been contacted about getting 2 of my photos published in books as well. To me, the trade's been well worth it.


For more on Creative Commons licensing check out: http://creativecommons.org ...their licenses are customizable so you can keep or give away whatever rights you choose.

Tuesday, February 10, 2009

Adjusting curves by a photo's histogram

Because you can adjust the brightness of your monitor, how do you know if your photo is light or dark? Judging exposure on your computer monitor, unless it's calibrated, is not a good idea. Luckily, there's a tool that can help us judge if our photo is too light or too dark -it's called a histogram. If you are unfamiliar with reading histograms, read this article.

So, let's open this photo in Gimp: (feel free to download it to follow along)
http://www.flickr.com/photos/15059459@N02/3269890274/

Then, open the Curves tool:
HistoImageEditing1
(click on image to view it larger)

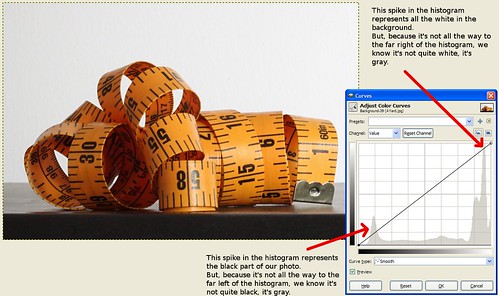
In the background of the Curves tool you can see the image's histogram. For this image, I wanted the white background to be pure white, meaning I wanted it intentionally over-exposed so it lost it's detail. That means, I expected the white spike on the right side of the graph to spill off the right side of the graph instead of being so far into the graph on that side.

I can also see that the spike on the left representing the black parts of the photo is too far in as well.

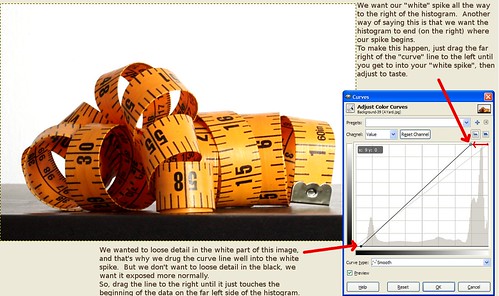
To fix the white, click on the far right hand part of the curves line and drag it to the left until it's in the middle of the "white spike". Essentially what you're doing here is making the histogram end in the middle of that white spike. In this case, to get the far left side of the photo to become pure white you actually need to drag the curve line past the middle of the spike as shown in the final screenshot below.

For the black, we're not aiming to loose the detail like we wanted to do with the white, so we're just going to drag the curve line on that side to the right until it touches the point where the data just begins on the left side of the histogram.

The result should look like this:
HistoImageEditing2

...now the white is pure white instead of gray and the black part at the bottom doesn't look so washed out.

Histogram basics

Histograms don't look that hard. Many people make assumptions about them based on reading similar graphs in the past, but this leads to so many people thinking it's the shape of the data that matters when, in truth, all that matters most of the time is the far left edge and far right edge of the graph.

So, let's start over. Here's what you need to know:
  • The far left edge of the graph represents black
  • The far right edge of the graph represents white
  • The middle is all the shades of gray in-between (and for color photos, just think about them being converted to black and white before being represented on the graph)
What this means is:
  • If the data peters off to zero at the edges of both ends of the graph, your exposure is perfect.
  • If the data gets chopped off on the left side and peters off to zero on the right before reaching the far right edge, your photo is too dark or "underexposed".
  • If the data gets chopped off on the right side and peters off to zero on the left before reaching the far left edge, your photo is too bright or "overexposed".
Here's some examples:

Proper exposure:


Too dark (under-exposed):


Too bright (over-exposed):

Thursday, January 29, 2009

Help for lens shoppers!

If you are looking at getting a new lens, no matter what kind it is you might be overwhelmed by the lens descriptions. Do you need a Canon 75-300mm f/4-5.6 USM IS AF for $600 or will a Canon 100-300 f/5.6-6.7 AF for $130 do? And what will you get if you go for a Sigma 100-300 f/4 EX DG IF HSM for $1065?

Hopefully, if you're lens shopping you have a purpose in mind. Make sure you really think about what it is about your current lens(es) that is making you look for a new lens. What will the new lens be used for the most? Will there be other uses? What kind of lighting situations will it be used in? And are there features you want in a new lens?


Focal length:
This is usually the first part of the lens description followed by "mm" as in the bolded part here:
Canon 75-300mm f/4-5.6 USM IS AF
The smaller the number, the farther away your subject will appear and the more of your surroundings will fit into a shot. "Wide" lenses (10mm to 30mm) are often used for landscapes, "Normal" or "Standard" lenses are 30mm to 50mm and come close to what we see normally with our eyes. For this reason, they are often used for portrait work and as general walk-around lenses. Telephoto lenses are anything 100mm and up. They are used for wildlife, candids, and other situations where you want or need to take photos at a distance.

Zoom Lenses
:
When you see two numbers like you do above "75-300mm" that means it's a zoom lens. These are the lenses most of us are familiar with. They'll make the subject appear closer or further away as we turn a ring on the lens.

Primes / Fixed Lenses:
If you see just one number, the lens is a "prime", otherwise known as a "fixed" or "standard" lens. These lenses don't "zoom". In order to make the subject appear closer or further away, you'll need to "zoom with your feet", in other words, move yourself closer or further away.

People choose primes because you can usually get better quality and "faster lenses" for much cheaper this way. (We'll discuss "fast" lenses later.) Usually people purchase something like a fast 30mm or 50mm prime for portrait work.


Maximum Aperture:
After the focal length there's usually a "f/" followed by a number or two numbers. The maximum aperture is bolded in the example below:
Canon 75-300mm f/4-5.6 USM IS AF

If you aren't using manual mode yet you can see some of my other articles for the specifics on aperture, but here's the quick and dirty -the lower the numbers after the "f/" the "faster" the lens is. f/4-5.6 is not all that fast, the example lens is fairly average. When you get into f/2.8 or even all the way down to f/1.0 with some specialty primes, those are what are considered "fast".

"Fast" lenses will give you 2 advantages. First, the lower that number, the better low-light performance you'll get. This is really why they are called "fast" -the lower your aperture number, the faster shutter speed you'll be able to achieve, so if you take photos of, say indoor sporting events or dance recitals a fast lens can help you avoid blur due to camera or subject movement.

The side-effect from using really low-numbered apertures like f/2.8 or 1.4 is a really shallow depth of field. So, if you like those photos with really smoothly blurred backgrounds and a sharp subject, those are done with small numbered apertures. This is very nice for portrait work, but when you are shooting indoor sporting events this will mean your focus has to be EXACT in order for you to get a sharp shot. Focus is very important because at these low-valued apertures your depth of field is so shallow.


Brand:
This usually comes first in the lens description. In the examples above it was Canon, but I included a Sigma lens in the first paragraph of this article as well. Nikon, Olympus, and other camera makers obviously make lenses for their systems as well, but Sigma, Tamron, Tokina, and others are 3rd party lens makers that make lenses for at least Canon and Nikon.

Personally, I consider Canon and Sigma whenever I go to buy a lens. I own both makes of lenses and feel that in some cases Sigma is just as good as Canon, but it does depend on the specific lens you are looking at. I know other photographers who are happy with their Tamron lenses, but I've never found one of quality for my own use. No matter what the make, you'll need to do your homework before buying a lens because quality will differ greatly depending on the lens you are looking at -even with Canon! (...unless you buy all "L" glass.) If you are on a budget, though, 3rd party lenses are worth considering!


The Alphabet Soup:
After the basic lens description ("Canon 75-300mm f/4-5.6") comes a bunch of letters. I'll try to define as many as I can here:
  • AF -AutoFocus
  • EF or EF-S -"EF" means it'll fit any Canon camera wether it's full frame or a crop sensor. These lenses are required if you have a full frame camera (a Canon 1D or 5D). "EF-S" lenses fit only crop sensor cameras. These include Canon's Rebel lineup (XT, XTi, XSi, XS), and the 10D, 20D, 30D, 40D, and 50D's. The "EF-S" lenses are usually a little cheaper, but if you decide to move to a 1D or 5D someday, you won't be able to use them on your full frame camera.
  • HSM -Sigma's version of "USM", it's an autofocus mechanism that's faster, focuses better than non-HSM in low light, and it's quieter than non-HSM lenses as well.
  • IF -Internal Focus, these lenses will not have rotating front elements and they won't change length while you are focusing. This is a good thing for macro photography where if the lens moves while you focus there's a risk of the front of the lens hitting your subject as you focus.
  • IS -"Image Stabalized", this means the lens will compensate for some movement as you take photos. This helps in low-light situations when camera shake often ruins photos. It's not magic, but it'll help give you a stop or two advantage depending on the lens. Some lenses have dual IS motors so you can turn on just vertical IS or both vertical and horizontal compensation. The ability to turn off horizontal compensation is nice for automotive photography since it can help keep panned shot sharp.
  • "L" -If you see an "L" tacked on to the end of a lens description like "Canon 70-200mm f/2.8L" it designates the lens as one of Canon's pro line lenses. If it's a telephoto, it'll be white like you see on the sidelines of many sporting events. If it's a wide-angle lens it'll just have a red ring that designates it as an "L", but either way "L" lenses are generally of excellent quality, but are also very expensive.
  • Macro -These lenses will focus closer than non-macro lenses. True macro lenses will give you 1:1 size ratios although some "macro" lenses won't do 1:1, so if you really want to get into macros, make sure you verify whether the lens you're looking at will do 1:1.
  • MF -Manual Focus
  • OS -"Optically Stabalized", Sigma's equivilent of the "IS" designation for Canon lenses
  • Rotating front element: One thing to watch out for on cheaper lenses is a front element that rotates. This will make it difficult to use a circular polarizer filter on the lens.
  • USM -"Ultra Sonic Motor", this is an autofocus mechanism made by Canon that's fast, focuses better than non-USM in low light, and it's quieter than non-USM lenses as well.
  • VR -"Vibration Reduction", Nikon's designation for image stabalized lenses
More Nikon lens definitions:
http://imaging.nikon.com/products/imaging/lineup/lens/glossary.htm

More Sigma lens definitions:
http://www.sigmaphoto.com/lenses/lenses.asp


Lens Test Data:
The final step in lens shopping is to look at comparisons between similar lenses. Google searches may result in many test shots, searches on Flickr can show you samples of what others have done with the lens, and these are really good things to do, but the best way to compare lenses is to look at the sites below: