Sometimes, when we want to take pictures of something, the background is rather ugly or maybe it's too complex and overwhelms the viewer. In these cases, if we can get the background blurred, the subject stands out better and the photo looks more professional. Some examples: Taking a picture of a person in front of a city street or taking a closeup of a flower without having mud or weeds showing in the background. A blurred background will lead to a much nicer photo in both of these cases as well as many others.
For Beginners:
If you are using auto modes, try the two below. They'll both lead to blurred backgrounds in most cases.
- Portrait Mode: For people pictures, monuments, and other work where your subject will be fairly large ("person-sized" plus or minus a few feet), "Portrait Mode" works well. The icon for this mode usually looks like a woman's head.
- Macro Mode: For smaller subjects, like flowers, where you'll be pretty close to the subject when you take the picture (within a foot or so), use Macro Mode. The icon usually looks like a flower.
Aperture is the setting that controls "depth of field" or how much of the photo is in-focus. Low numbers (up to about "8.0") will create more background blur than higher numbers (around "16" and above). Try putting your camera in "Aperture Priority Mode" (usually marked with an "A" or "Av"), select an aperture, and the camera will automatically choose the shutter speed to match it so your photos will come out properly exposed. (This mode may take some experimenting with to get used to, but it's really quite easy and it's a great way to get familiar with aperture before moving into learning full Manual Mode!)
Some things to watch out for:
- Overly dark photos: This will happen if there's not enough light and you're trying to use too big of a number for the aperture. You can lower the aperture number or increase your ISO number (for example, if you were using ISO 200, turn it up to 400 or 800), or move to an area where there's more light (if possible).
- Overly bright photos: This will happen if there's too much light and you're trying to use too small of a number for the aperture. You can increase the aperture number, or decrease your ISO number (for example, if you were using ISO 400, try turning it all the way down to 100), or move to a less bright area (if possible).
- Weird or blurry photos: This happens when you choose a high numbered aperture in conditions that are too dark. The camera had to use a slow shutter speed, so if you move the camera at all you get a blurry mess. Either put your camera on a tripod or use one of the tips for an overly dark photo: choose a smaller aperture number, increase the ISO number, or you'll need to find a way to get more light on your subject.
For Advanced Photographers:
Once you spend a little time using different apertures in different conditions, you'll notice that using an aperture of "8.0" might result in a lot of blur in a flower photo, but almost no blur in a photo of a mountain range. This is because aperture isn't the only thing that determines depth of field. The other conditions that effect how much blur you'll get are:
- Distance to subject: The closer that you are to your subject (the thing you are focusing on), the more blurred your background will be.
- Your lens: The longer your lens is, the more blur you'll get. (A "long lens" means one with more "zoom" -more technically, a long focal length, as in a 300mm lens rather than a 28mm lens)
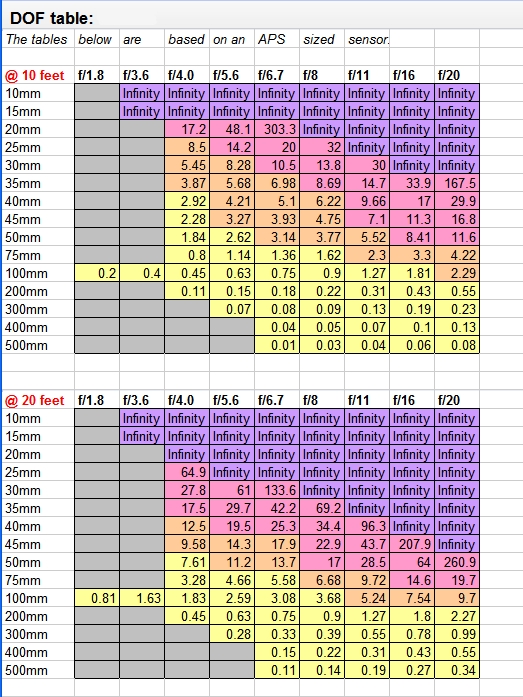
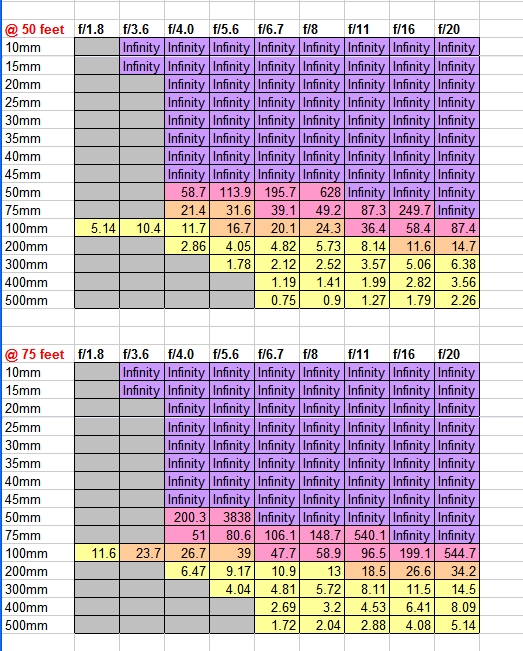
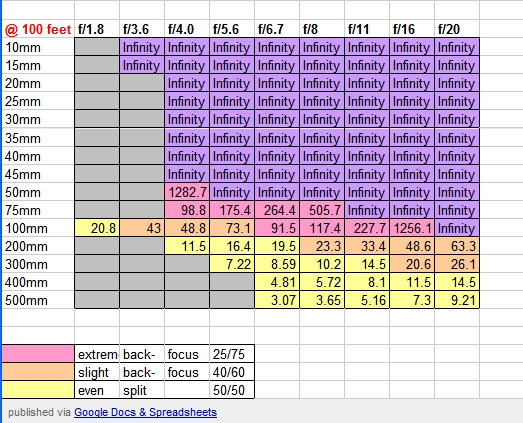
For more information, see my depth of field tables below:
(* Again, by "subject", I mean "what you are focusing on".)
You can print those tables and keep them with you to get an idea for how much blur you'll get with a given lens, and a subject a given distance away, or you can just experiment. An interesting thing to note is that the change in distance and focal length go hand-in-hand. In other words, if you want a photo framed a certain way, you can't use a longer lens to get more background blur -you'll have to back away too far and those two changed conditions will cancel each other out so that you'll get about the same amount of background blur either way. The only way to get more blur in these situations is to use a smaller aperture.
Conclusion:
This is one of the secrets of pro photographers -be aware of your background. If it's ugly or busy and you can't change it, do what you can to take the viewer's attention away from it by blurring it (or in more technical language, using a shallow depth of field). ...and (hopefully) now you know how to do it too!
If you don't understand something or have trouble with any of my tips, feel free to contact me via a comment on this (or any) article, or see my website for my email address and I'll be happy to help you out!
No comments:
Post a Comment