In fact, I'm my own worst enemy sometimes; a few weeks ago I went to lunch with my husband, then we walked a few doors down to get coffee. In the middle of my latte, I realized that I had left my camera bag in the sandwich shop! Luckily, it was still there, but I know next time my luck may not be as good...
So, I started looking at "stealth" camera bags. From what I saw, there are only a few options. The only one I liked, and one of the cheapest, was the Crumpler bags, which would cost anywhere from $105 to $128 depending on which model I wanted. One was a bit shorter than my current bag, so I was worried that my camera with my 75-300mm lens attached wouldn't fit. The other one was a bit too big -I don't know if I'd want to carry it around everyday. I also didn't like the idea of shelling out over $100 for a BAG!!!
I googled some more, and stumbled upon a blog post someone made about a camera bag they put together from various parts. It wasn't as compact as I'd like and the insert the guy used moved around in the bag unless it was held in place with more stuff, like a sweatshirt, books, etc. -I didn't want to deal with all that since I really wanted to keep my bag about the same size as the Tamrac bag I'm used to carrying. I needed just enough room for my camera and an attached lens (stored lens-down for accessibility), then compartments for 2 more lenses, one on each side. The insert he used was perfect, but the bag was much too big for my needs.
I took down the info about the insert, then searched for a bag that it'd fit more snuggly in. I probably searched for over an hour, then decided to give it a rest for the day. Later on I got to thinking -I had bought a bag that was about the right size from an Army Navy Surplus store locally years ago and I had never used it. I ran upstairs to my closet and dug it out. I measured it and it seemed perfect, so I coughed up the $20 for the insert and waited for the Fed Ex truck to arrive. When it did, cardboard and packing peanuts flew as I unpacked the insert, and then stuck it in my Army bag. It was a perfect fit!
Now I have a new $20 stealth camera bag :-) . It's just a tiny bit bigger than my Tamrac was, so now I don't have to use force to fit my Canon 10-22mm in the bag anymore ;-) There are all kinds of nifty pockets all over the thing, and the strap's wide enough that it was quite comfortable to carry it around all weekend at the Shootout!
Here's some pics of what it looks like, click on the photo to go to my Flickr page where you can see larger versions of it:
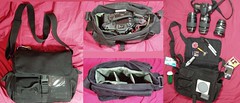
And here's the info if you want to make one for yourself for about $35 (the bag's about $15):
- The insert is made by Domke, search google for for "Domke FA-230" and you should get some results. I bought mine at Adorama (link), but B&H also has them.
- The bag can be found by searching google for "urban explorer bag". Since I got mine locally a few years ago, I can't really recommend a site to buy that part from.
The downsides of this bag: The lens insert doesn't have as much padding between the lenses as my old bag. That's just those 2 interior walls, though. I find that the lenses are snug enough in there that I'm not concerned about them at all. The front velcro pockets have big gaps where stuff can fall out, so I don't use them much -just for snacks and other stuff that I could get by with loosing. And the last issue some may have with this bag is that it's not waterproof. In fact, it's canvas. I'm sure it'd soak up water nicely... That's why I have the plastic bag in the big back pocket, permanently. If I get stuck in a downpour, my plan is to just stick my camera bag in the plastic bag and run for it!
8 comments:
excellent idea .... as for the canvas bag not being waterproof ... canvas tents have the same issue but you can go to most any outdoor supplier (Bass Pro etc)and get canvas tent waterproofing that you spray or brush on ..... it works great on other materials as well ....
I used to water proof my blue jeans when I was a land surveyor because we always got caught in the rain and wet jeans all day is uncomfortable....
anyways thanks for the blog tip and I hope this helps you in return
John (Zapp)
Thanks for the waterproofing idea -excellent point!
Nice idea, I'd been looking for something along these lines and this fits the bill, nicely.
Waterproofing is a good idea, but the top flap is not particularly tight, on mine, at least. So, I would be a little nervous about toting it around in anything other than a drizzle without some extra protection.
I added some light cardboard to the insert to stiffen up the sides a little. It helps.
Thanks for the good idea.
hawing just spent A extraordinary amount off money on a Urban disguise 40 from
think tank This looks like a good alternative.. ill give it a try
Nice idea. Just a question though - is the bottom of the Domke insert padded or just thin canvas? One of the reviews on B&H suggests it isn't. And if it isn't are you not worried about damaging the lenses by not putting the bag down gently enough? Or is the bottom of the bag itself padded enough?
Do Domke make other inserts with padded bottoms?
Thanks!
It's true that the Domke insert has no padding on the bottom. This is easily fixed by using old camera bag velcro separators, cardboard, neoprene from an old mouse pad, or similar material you might have lying around.
I actually don't have anything in the bottom of my bag, though. I probably should in case I drop it, but I'm usually just careful to set it down gently knowing that the bottom is unprotected.
I just found the exact same bag in a "stealth" project of my own at an army surplus place in Houston (http://www.armysurplusworld.com/). I went with the tan version. They have all sizes of bags. I'm adding some padding to the bottom using some 1/2" closed cell foam from the craft store (or a piece of a 1/2 foam sleeping bag pad). Also going to add the waterproofing.
Excellent idea. I honestly like the points mentioned here.
Post a Comment