First, slowly squeeze the shutter button:
The first thing to pay attention to when you are taking photos at low shutter speeds is how you are pressing the shutter button. Many people don't realize it, but they often jerk or move the entire camera when they push it. If you are reading this at home, grab your camera, line it up with the line where your ceiling meets the wall and watch as you press the button. If you move the camera, practice until you eliminate that movement.
Second, relax:
Tense muscles lead to shake due to muscle fatigue, so keep it loose. If you feel a muscle getting tired, burning, or shaking you are doing it wrong. Find a position that's comfortable and your shots will be more stable.
Third, breathe:
Another common problem is the natural tendency to hold your breath, but this will also lead to shake. Instead, take a slightly deeper than normal breath, then slowly let the air out as you gently press the shutter button.
Now on to stable positions to take photos:
Click on any of the photos below to see larger versions of them.
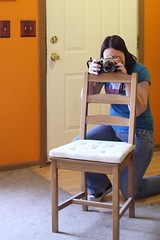
A normal stance:

Your feet should be about shoulder-width apart and your arms should be relaxed.
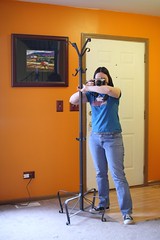
A slightly more stable stance uses an "elbow tripod" like this:

When people try this stance they tend to press their elbows together too hard. Remember to keep it loose, not tense. Your elbows should be just touching and resting on your chest/stomach, so it'll cause your hips to come forward and your shoulders back a little bit, but it should be comfortable. There should be no squeezing or tension in the position at all.
If there's something horizontal to rest the camera on:
You can rest the camera directly on a chair, fence, car, or any other horizontal surface you can find. If the camera doesn't rest at the angle you'd like you can put your hand under it or prop it up on a towel, blanket, sweatshirt, or anything else you might have handy.
If you have a vertical pole you can use it as a brace:
This works well with stop sign poles and the like. Just grab the pole with your left hand, then use your forearm as a stable horizontal surface to rest your camera on. I use this position a lot for macro photography because it allows me to move the camera back and forth in tiny increments to get the depth of field exactly where I want it.
If there's a wall you can use it like this:
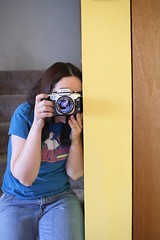
Press the camera against the wall with just enough force to keep it there (again, nothing should be tense to avoid shake due to muscle fatigue).
Another option is to kneel:
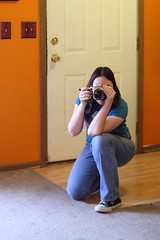
Kneel in a stable position, then use your knee to rest your elbow on. Keep it comfortable and relaxed.
Or use a sitting position like this one:
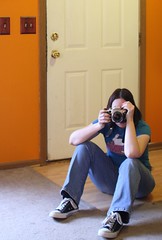
Sitting is more stable than kneeling because you can create a tripod by resting both elbows on both knees. Keep it comfortable and don't let your knees fall outward or you'll be using your inner thigh muscles to keep them up and that will lead to shake from muscle fatigue pretty quickly.
Even more stable is the prone position shown here:
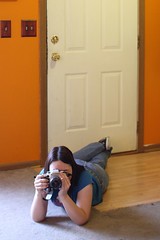
Here your "elbow tripod" rests directly on the ground. If the perspective works and you're willing to lay down this is a very stable position. Even more stable, if necessary, is resting your arm on the ground, then putting your camera on your arm, but this will give you an even lower perspective.
If all else fails, try burst:
If you use the above techniques and still can't get a stable shot, try putting your camera on "burst" so that holding the shutter button down will have the camera take several photos in a row. Many times the 2nd or 3rd photo will show less shake than the 1st. (This is especially helpful if you can't seem to press the shutter without moving the camera.)
4 comments:
Sometimes putting a delay timer of 2 sec or so prevents the shake becouse of shutter press.
Very true -I do that too. Thanks for reminding everyone!
when i was trained in assault rifles, we were taught a squatting stance when attempting to aim low without going prone.
Elbows were braced against the insides of the knees so we could get a steady aim. I've used that stance to great effect in photography.
http://www.globalsecurity.org/military/library/policy/army/fm/23-31/23310040.gif
Awesome, icelave, thanks for adding that stance. I'll have to try that one.
Post a Comment