* Exposure means how bright or dark your photo is.
* "Correct" exposure means that the photo came out as dark or light as you intended.
* The light meter on your camera will show you your exposure.
* The light meter on your camera looks like this:
[-2...-1...0..+1..+2]
* "0" on your light meter usually gives you a "correct exposure".
* Exposing for positive numbers like "+1", "+1.5", "+2", etc will make the photo BRIGHTER.
* Exposing for negative numbers like "-1", "-1.5", "-2", etc will make the photo DARKER.
Aperture:
* Aperture adjusts how large of an opening your lens makes to let light in.
* Low numbers like f/4 = larger opening = more light = a more shallow depth of field
* High numbers like f/20 = smaller opening = less light = a deeper depth of field
* Depth of field means how much of the photo is in focus. See examples below:
Shallow depth of field:
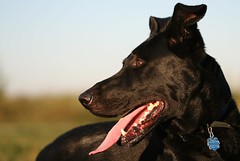
(click for larger version)
Deep depth of field:
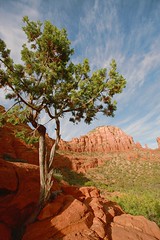
(click for larger version)
Shutter Speed:
* "500" in the viewfinder means a shutter speed of 1/500
* Shutter speeds of 1/60th or less can't usually be handheld, put your camera on a tripod
* For telephoto lenses, even faster shutter speeds are needed to handhold the camera, a rule of thumb is for a 100mm lens you need 1/100 or faster, 300mm = 1/300 or faster, 500mm = 1/500 or faster, etc.
* 1/6 or 1/8 is good for blurring waterfalls
* 1/125 can be used for panned shots of cars
* 1/500 will stop most action
* The slower your shutter speed, the more light you get.
* The faster your shutter speed, the less light you get.
ISO:
* ISO determines how fast your image is recorded
* ISO 100 will record light the slowest (less light)
* ISO 800 will record light 8x faster than ISO 100 (more light)
* Higher ISO's will result in more noise or "graininess" in your image.
Each setting effects the rest. Once you find settings that give you a "correct" exposure ("0" on your exposure meter), you can change your settings to find a more "creatively correct" exposure.
If you change the aperture from f/4 to f/5.6 you'd be SUBTRACTING light by 1 stop. You could ADD back a stop of light by increasing the ISO from 100 to 200, or by choosing a slower shutter speed like 1/30 instead of 1/60.
A great way of seeing how aperture and shutter speed relate to one another is to play with this camera simulator for awhile. And note that ISO relates to aperture and shutter speed in the same way.
...but don't worry too much about calculating the exposure like the examples above. Eventually you'll want to know how to do it, but for now you can just change the settings, watch the exposure meter, and aim for "0" (or whatever gives you the brightness you want, but "0" is a good place to start if you're unsure -it'll at least get you close and you can adjust from there).
Feel free to print this or copy and paste parts of it to keep in your camera bag as a quick reference. I kept a cheat sheet like this with me for at least 6 months after learning to shoot in manual mode.
14 comments:
Thank you, thank you, thank you!
wow this is amazing... glad i found your great blog..
this is a FABULOUS reference! I'll be using it to help teach a basic photo class this week, and will credit your link :) thanks!
I've been working with photography for several years now and was trying to teach a co-worker about aperture & shutterspeeds. I found your blog to be very helpful in teaching her and love the link to the camera. Seeing it work out is so much easier to use. Thanks so much!
Devin
simply and clearly said! It helped me a lot! Thanks!
Finally! I am having a hard time getting the numbers/settings through my head and this has made it clear! Thank you!!
You are my saving grace! Thank you so much!
Best explanation I've read online. Thank you!
This is a really helpful guide, thanks! I will be printing it out!
I posted it on my blog and linked back to you.
http://wetinkblog.blogspot.com/2011/03/manual-mode-cheat-sheets.html
How do i join your manual mode email course, i've looked everywhere how to contact you help:)
For Manual Mode lessons: email me at: erica@muddyboots.org
Man! I wish I'd seen this a couple months ago! It took me forever to get some of the basics down, and this is STILL really helpful. Hmmm maybe I will print it out. Thank-you!
Thank you SSSSSSOOOOOO much, I ve just bought a DSLR and this article will be with me on my first safari !
I always explain to people that ISO refers to how sensitive the film is. the higher the number the more sensitive it is and less light you need. the lower the number, the less sensitive the film is and more light you need. 50 = not sensitive, 3200 = very sensitive.
great article!
Post a Comment